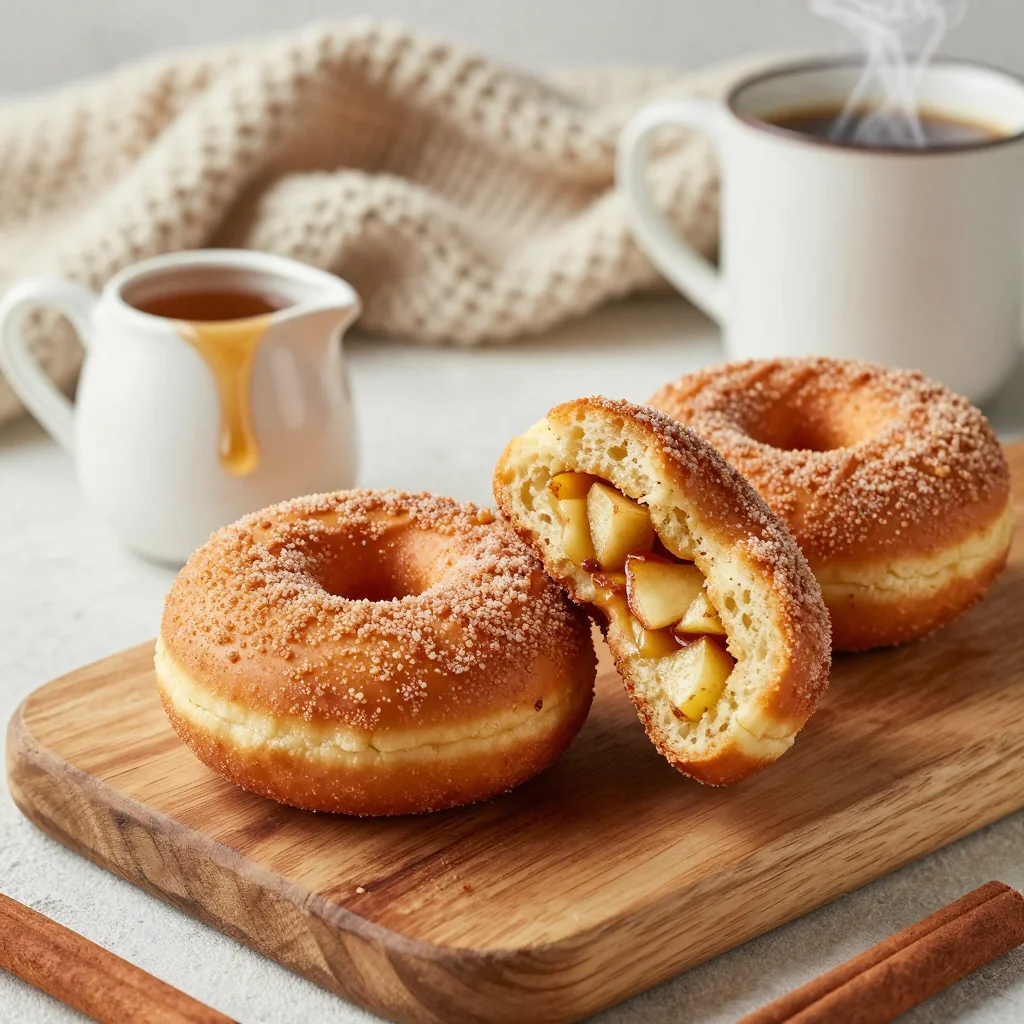
I’m going to start with a confession: I once tried to make a “quick apple cinnamon snack” and ended up with soggy, sad‑looking tortilla bits that tasted like a grocery‑store experiment gone rogue. I stared at the mess, thought about the apple‑cinnamon roll I’d been craving all week, and dared myself to reinvent the whole thing from the ground up. The result? A dessert that makes the ordinary feel like a distant memory, and a batch so addictive I’ve already eaten half before anyone else got a bite. I dare you to taste this and not go back for seconds.
Picture this: the kitchen filled with the warm, sweet perfume of caramelized apples, a buttery crisp that crackles when you bite, and a creamy swirl of cinnamon‑spiced cheese that melts like sunrise on a winter’s morning. The visual is just as spectacular – golden‑brown roll‑ups glistening with a powdered‑sugar glaze that catches the light like fresh snow on a pine branch. You’ll hear the faint sizzle as the butter hits the pan, feel the soft give of the tortilla as it folds, and taste that perfect balance of tart apple and sweet spice that makes your taste buds do a happy dance.
Most recipes out there either drown the apple in syrup, over‑complicate the roll‑up, or forget the essential creamy layer that turns a simple snack into a dessert masterpiece. This version stands out because it respects each component: the apple stays crisp, the cinnamon is bold, the cream cheese adds richness without overwhelming, and the tortilla provides a sturdy yet tender canvas. I’ve stripped away the fluff, added a few pro‑tips, and discovered a technique that locks in moisture while giving you that coveted crunch. Most recipes get this completely wrong. Here’s what actually works.
You might wonder what the secret weapon is. Spoiler: it’s a splash of lemon juice that keeps the apple from turning brown and brightens the whole flavor profile, plus a dash of all‑purpose flour in the cream cheese mixture that stabilizes the filling during cooking. The combination creates a texture that’s both airy and satisfying, like a cloud that refuses to melt when you bite into it. This next part? Pure magic. And now the fun part – let’s walk through every single step so you’ll never settle for a mediocre version again.
Okay, ready for the game‑changer? By the end of this post you’ll have a foolproof method, a handful of insider tricks, and a menu of creative twists that will keep this dessert fresh for months. If you’ve ever struggled with soggy apple rolls, you’re not alone — and I’ve got the fix. Stay with me here — this is worth it.
What Makes This Version Stand Out
- Flavor Explosion: The tartness of Granny Smith apples meets the deep, caramel‑sweetness of brown sugar, while ground cinnamon adds that iconic roll‑up warmth. Each bite delivers a layered taste that feels like a cozy hug.
- Texture Harmony: A crisp, buttery tortilla exterior gives way to a soft, gooey apple‑cinnamon core and a velvety cream cheese center. The contrast is as satisfying as biting into a perfectly toasted marshmallow.
- Simplicity Meets Sophistication: Only twelve pantry staples are needed, yet the result feels like a bakery‑level creation. No fancy equipment, just a skillet and a few trusty tools.
- Ingredient Quality: Using a tart apple variety ensures the fruit stays bright, while fresh lemon juice prevents oxidation and adds a zing that lifts the whole dish.
- Crowd‑Pleaser Factor: This dessert is a hit at brunches, after‑school snacks, and even holiday gatherings. People often ask for the recipe before the first bite is finished.
- Cooking Method: Pan‑frying, not baking, gives you that irresistible caramelized edge while keeping the interior moist. The skillet’s heat distribution is key to that perfect golden crust.
- Make‑Ahead Potential: You can prep the filling and apple mixture hours in advance, then roll and cook when you’re ready. It’s ideal for busy mornings or last‑minute dessert demands.
Inside the Ingredient List
The Flavor Base
Large apple: Choose a tart variety, like Granny Smith, for the best flavor. This will provide a crisp bite and balance the sweetness. If you substitute a sweet apple, you’ll need to cut back on brown sugar to avoid cloying overload. A good tip is to slice the apple thinly so it cooks evenly and releases its juices without turning mushy.
Lemon juice: Fresh lemon juice helps to brighten the apple flavors and prevents browning. The acidity also cuts through the richness of the butter and cream cheese, keeping the palate refreshed. If you’re out of lemons, a splash of apple cider vinegar works in a pinch, though the citrus note will be milder.
The Sweet & Spicy Duo
Brown sugar: This adds a rich sweetness and depth, amplifying the cozy taste of cinnamon. Its molasses undertone gives the apple mixture a caramelized finish that white sugar can’t replicate. For a deeper flavor, you can swap half of the brown sugar with dark muscovado.
Ground cinnamon: The star spice that brings warmth and that famous cinnamon roll flavor. Don’t be shy with it! A generous two teaspoons ensures each bite sings. If you love spice, a pinch of nutmeg or cardamom can elevate the profile without stealing the show.
The Texture Crew
Butter: Melted butter gives richness and helps get those roll‑ups golden and crispy when cooked. It also coats the tortilla, preventing it from soaking up too much apple moisture. If you prefer a lighter version, use clarified butter (ghee) – it browns faster and adds a nutty note.
Flour tortillas: Soft, pliable tortillas work best here, allowing easy rolling of your filling. The thinness ensures a quick, even crisp without a doughy interior. For a gluten‑free twist, swap with corn tortillas, but expect a slightly different texture.
The Unexpected Star
Cream cheese: Softened cream cheese creates a rich, creamy layer that pairs beautifully with the apples. It adds a tang that balances the sweet elements and provides that melt‑in‑your‑mouth feel. If you’re dairy‑free, try a plant‑based cream cheese alternative – the texture stays similar.
Granulated sugar: For sweetness in the cream cheese filling, balancing flavors just right. It dissolves quickly, ensuring a smooth consistency. You could substitute with coconut sugar for a subtle caramel note.
Vanilla extract: A splash of vanilla adds a lovely aroma and enhances the overall sweetness. Even a modest teaspoon can make the difference between “good” and “wow”.
All‑purpose flour: A tiny bit helps to thicken the cream cheese mix and keeps it stable. Without it, the filling could weep during cooking, making the tortilla soggy. Use gluten‑free flour if you need to keep the dish allergen‑friendly.
The Final Flourish
Chopped walnuts or pecans (optional): Add these for a nutty crunch. They also bring extra texture to your roll‑ups and a buttery depth that complements the apple. If you’re allergic, omit or replace with toasted pumpkin seeds.
Powdered sugar: For a sweet, drizzled glaze that elevates your dessert game. It creates a delicate snow‑like coating that melts into the warm roll‑ups. Adjust the amount of liquid to get a glaze that drips but isn’t runny.
Milk or cream: A dash of either thins the glaze to your desired consistency, making it perfect for drizzling. Cream gives a richer finish, while milk keeps it light. Use a non‑dairy milk if you’re avoiding dairy.
Everything's prepped? Good. Let’s get into the real action…

The Method — Step by Step
- Start by preparing the apple filling. Peel, core, and dice the large apples into bite‑size cubes. Toss them in a bowl with two tablespoons of fresh lemon juice, a third cup of brown sugar, and two teaspoons of ground cinnamon. Let the mixture sit for five minutes; you’ll notice the sugar beginning to melt and the apples releasing a fragrant steam that smells like autumn in a kitchen. Kitchen Hack: Sprinkle a pinch of salt into the apple mixture; it intensifies the sweetness and balances the acidity.
- While the apples macerate, whip the cream cheese filling. In a medium bowl, combine four ounces of softened cream cheese, two tablespoons of granulated sugar, one teaspoon of vanilla extract, and one tablespoon of all‑purpose flour. Beat until smooth and slightly fluffy – the texture should be thick enough to hold its shape when spread, yet soft enough to spread easily on the tortilla. This step is crucial; over‑mixing can incorporate too much air, leading to a runny filling later.
- If you’re using walnuts or pecans, give them a quick toast in a dry skillet over medium heat for two minutes. The toasting releases their natural oils and adds a deep, buttery crunch that will surprise anyone biting into the roll‑up. Set them aside to cool while you continue.
- Now it’s time to assemble the roll‑ups. Lay a flour tortilla flat on a clean surface. Spread a generous layer of the cream cheese mixture across the entire surface, leaving a half‑inch border around the edges. Next, spoon a heaping tablespoon of the apple‑cinnamon mixture onto the center, then sprinkle a few toasted nuts if you’re using them. The key is to keep the filling centered so the roll stays tight.
- Roll the tortilla tightly, like you would a burrito, tucking the ends in as you go. The tighter the roll, the better the bite‑to‑crust ratio. Place the rolled tortilla seam‑side down on a plate, and repeat with the remaining tortillas and fillings. You should end up with four neat cylinders, each looking like a golden promise.
- Heat a large non‑stick skillet over medium‑high heat and add three tablespoons of melted butter. As soon as the butter foams and begins to turn a light amber, it’s ready. Watch Out: If the butter starts to smoke, lower the heat immediately; burnt butter will give a bitter flavor that overwhelms the delicate apple.
- Place the roll‑ups in the skillet, seam side down, and press gently with a spatula. Cook for about three minutes, or until the bottom turns a deep golden‑brown and you hear a faint sizzle that signals caramelization. Flip carefully and cook the other side for another three minutes. The edges should start pulling away from the pan, indicating a perfect crust.
- While the roll‑ups finish cooking, whisk together half a cup of powdered sugar with two tablespoons of milk or cream to create a glossy glaze. Adjust the liquid until the glaze is pour‑able but not runny. Drizzle the glaze over the hot roll‑ups right after they’re removed from the pan; the heat will melt the glaze into a silky coating that glistens like a sunrise.
- Let the roll‑ups rest for two minutes before slicing. This short rest allows the interior to set, preventing the filling from oozing out when you cut. Slice each roll into three‑quarter‑inch rounds and arrange them on a serving platter. That sizzle when it hits the pan? Absolute perfection. That first bite? Pure bliss. That’s it — you did it. But hold on, I've got a few more tricks that'll take this to another level...
Insider Tricks for Flawless Results
The Temperature Rule Nobody Follows
Never start the skillet on high heat. A medium‑high setting gives the butter time to emulsify and coat the tortilla evenly. If the pan is too hot, the butter burns before the tortilla crisps, leaving a bitter aftertaste. My friend once cranked the heat to “max” and ended up with a blackened mess; lesson learned: patience is the secret ingredient.
Why Your Nose Knows Best
When the apple mixture starts to bubble, trust that aroma. The sweet‑spicy scent is your cue that the apples have released their juices and the sugars are caramelizing. If you can smell cinnamon dancing with butter, you’re on the right track. If the scent is still raw, give it a minute longer – the flavor deepens with each second.
The 5‑Minute Rest That Changes Everything
After you finish cooking, let the roll‑ups rest on a cooling rack for exactly five minutes. This brief pause lets the interior settle, preventing the creamy filling from spilling out when sliced. Skipping this step leads to a soggy mess that looks less than appetizing. Trust the rest; it’s the difference between “good” and “restaurant‑level.”
Nuts About Texture
If you love crunch, add the toasted nuts directly into the cream cheese mixture instead of sprinkling on top. The nuts will embed themselves, giving each bite a surprise snap. My cousin tried this once and declared it “the ultimate texture party.”
Glaze Consistency Control
Start with a thin glaze, then add more powdered sugar if it looks too watery. A glaze that’s too thin will run off the roll‑ups, while a too‑thick glaze won’t spread. Use a whisk and drizzle slowly to achieve that perfect glossy coat that clings just enough to make each bite sparkle.
Creative Twists and Variations
This recipe is a playground. Here are some of my favorite ways to switch things up:
Maple‑Bacon Bliss
Swap the lemon juice for a tablespoon of pure maple syrup and fold in crisp bacon bits with the apple mixture. The smoky‑sweet combo turns the roll‑ups into a brunch‑star that will have everyone reaching for seconds.
Caramel Pecan Dream
Replace brown sugar with dark caramel sauce and add a generous handful of toasted pecans. The caramel adds a buttery depth, while the pecans provide a satisfying crunch that pairs beautifully with the tart apple.
Tropical Twist
Use diced pineapple and a pinch of coconut sugar in place of the apples, and swap the cinnamon for a dash of ground ginger. This gives the roll‑ups a sunny, island‑vibe that’s perfect for summer gatherings.
Vegan Velvet
Swap the cream cheese for a vegan cream cheese alternative, use coconut oil instead of butter, and choose gluten‑free tortillas. The flavor profile remains intact, and you’ll have a plant‑based version that still delivers that melt‑in‑your‑mouth experience.
Chocolate Swirl
Add a tablespoon of cocoa powder to the cream cheese mixture and drizzle dark chocolate ganache over the finished roll‑ups. The bitterness of chocolate balances the sweet apple, creating a sophisticated dessert that feels indulgent.
Storing and Bringing It Back to Life
Fridge Storage
Place cooled roll‑ups in an airtight container and store them in the refrigerator for up to three days. The tortillas may soften slightly, but a quick re‑heat will restore their crunch. For best texture, store the glaze separately and add it just before serving.
Freezer Friendly
Wrap each roll‑up individually in plastic wrap, then place them in a freezer‑safe zip‑top bag. They’ll keep for up to two months. When you’re ready to enjoy, thaw in the fridge overnight, then warm in a skillet with a splash of butter for five minutes.
Best Reheating Method
To revive the crispness, heat a non‑stick skillet over medium heat, add a tiny splash of water (just enough to create steam), and place the roll‑up seam‑side down. Cover for two minutes; the steam re‑hydrates the interior while the bottom crisps again. Finish with a quick drizzle of fresh glaze for that just‑baked feel.