I was in the middle of a Sunday afternoon binge‑watching session when a sudden craving hit me like a lightning bolt. Not the usual chocolate‑chip cookie craving, but something deeper, richer, and oddly nostalgic – the caramel‑spiced scent of Lotus Biscoff cookies wafting through the kitchen of my childhood home. I tried to satisfy it with a store‑bought slice of cake, but the texture was flat, the flavor bland, and the whole experience left me feeling like I’d just watched a rerun of a show that should have been cancelled years ago. I dared myself to create a dessert that would capture that warm, buttery hug while staying completely no‑bake, because honestly, who has the energy to fire up the oven after a long day?
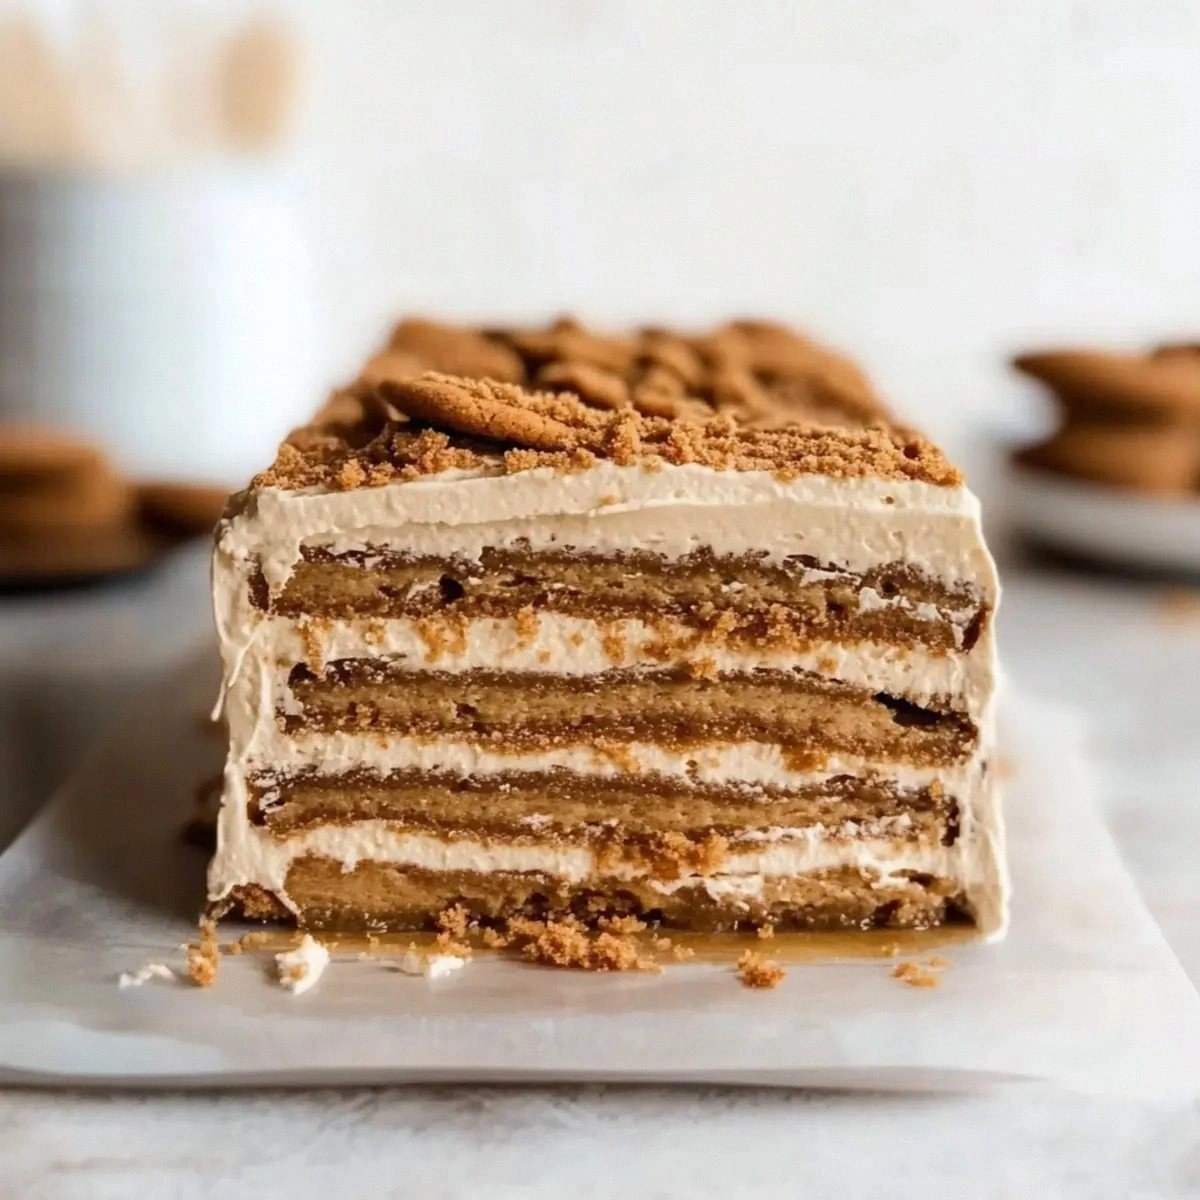
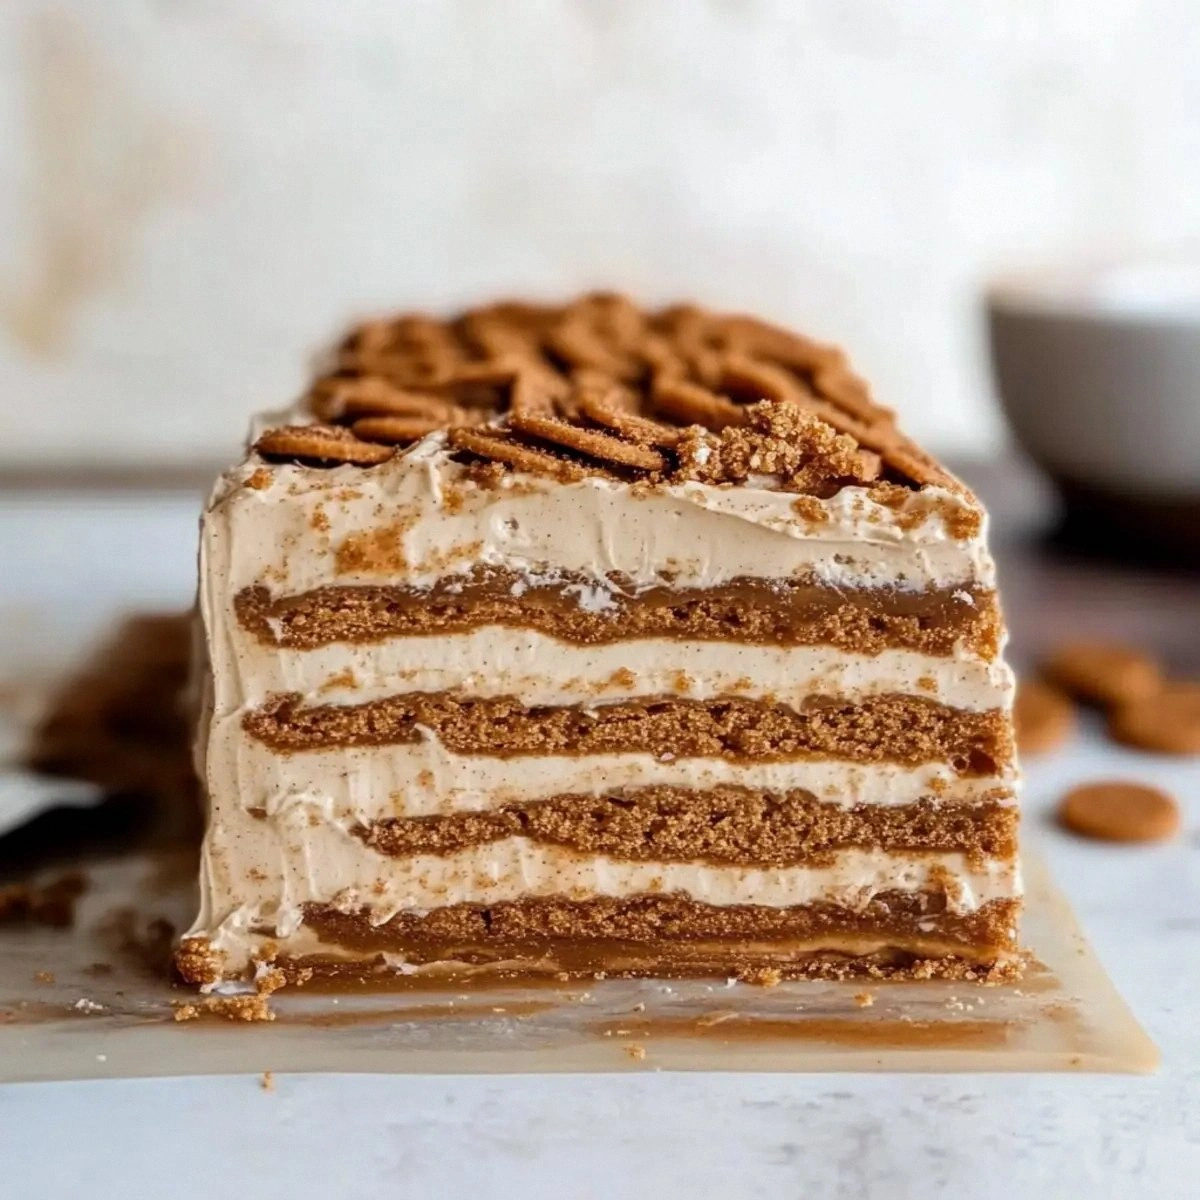
Picture this: a glossy, amber‑gold layer of cookie‑butter cream that spreads across a base of crunchy, caramel‑spiced biscuits like a velvet curtain, each bite delivering a symphony of crisp, creamy, and slightly salty notes that dance on your tongue. The aroma alone is enough to make you pause the TV, close your eyes, and inhale the sweet, buttery perfume that reminds you of holiday markets in Brussels. You’ll hear the faint crackle as the cookies settle, feel the cool, buttery smoothness of the whipped cream as it kisses your fingertips, and taste the subtle tang of mascarpone that cuts through the sweetness like a perfectly timed drum solo. This dessert isn’t just food; it’s a full‑sensory experience that turns a simple kitchen counter into a stage for a culinary performance.
What makes this version the undisputed champion among no‑bake icebox cakes? First, the secret weapon: a generous dollop of Lotus Biscoff spread blended with heavy cream and mascarpone, creating a mousse that’s airy enough to melt in your mouth yet rich enough to stand up to the sturdy cookie layers. Second, the method: we skip the dreaded “set in the freezer for hours” drama and instead chill it in the fridge, saving you precious time while still achieving that firm, slice‑ready texture. Most recipes get this completely wrong by over‑mixing the cream or using low‑fat dairy that collapses under the weight of the cookies. I’ll be honest — I ate half the batch before anyone else got to try it, and that’s a testament to how addictive this cake truly is.
Okay, ready for the game‑changer? I’m about to reveal a tiny technique involving a quick “double‑whip” that locks in air, giving the cream layer that cloud‑like lift you usually only see in professional patisseries. I dare you to taste this and not go back for seconds. Let me walk you through every single step — by the end, you’ll wonder how you ever made it any other way.
What Makes This Version Stand Out
- Flavor Explosion: The combination of Lotus Biscoff spread and vanilla extract creates a caramel‑spiced profile that’s deeper than any ordinary cookie butter dessert.
- Texture Contrast: Each bite offers a crunchy cookie base, a silky mousse middle, and a faintly crisp top layer that shatters like thin ice.
- Simplicity: No oven, no complicated equipment – just a whisk, a bowl, and a fridge.
- Unique Ingredient Blend: Mascarpone adds a subtle tang that balances the sweetness, a trick most copy‑cat recipes skip.
- Crowd‑Pleaser: Even the pickiest dessert skeptics can’t resist the aromatic lure of baked‑spice notes without any actual baking.
- Ingredient Quality: Using authentic Lotus Biscoff spread (not a generic caramel spread) makes a world of difference in flavor depth.
- Make‑Ahead Magic: It firms up beautifully after a few hours, making it perfect for parties, potlucks, or a surprise treat.
- Cooking Method: The icebox technique preserves the airy structure of the cream, unlike frozen desserts that become icy.
Inside the Ingredient List
The Flavor Base
The star of the show is the Lotus Biscoff spread. Made from caramelized biscuits, it brings a deep, buttery, cinnamon‑kissed flavor that no generic hazelnut spread can match. If you skip it, you’ll lose the signature “spiced cookie” note that makes this cake instantly recognizable. A good swap, if you’re allergic, is a mix of caramel sauce and a pinch of ground cinnamon, but expect a slightly different aroma.
The Texture Crew
Heavy cream and mascarpone are the dynamic duo that give this cake its cloud‑like lift and creamy body. Heavy cream provides the fat needed for stable peaks, while mascarpone adds a subtle tang and a buttery richness that prevents the mousse from feeling cloyingly sweet. If you substitute Greek yogurt for mascarpone, you’ll introduce a tangy edge but lose that luxurious mouthfeel.
The Unexpected Star
Pure vanilla extract might seem like a background player, but it acts as a flavor bridge, tying together the caramel notes of the spread with the dairy’s richness. Using a vanilla bean would elevate the aroma even further, releasing those specks of vanilla that look gorgeous when you slice the cake.
The Final Flourish
The 24 Lotus Biscoff cookies act as both structure and flavor carrier. Their caramelized edges provide a crunchy contrast, while their soft interiors soak up the mousse, creating a harmonious bite. If you’re looking for a gluten‑free version, try using gluten‑free ginger snaps; they’ll add a warm spice that complements the butteriness nicely.
Everything's prepped? Good. Let's get into the real action...
The Method — Step by Step
First, gather all your ingredients and set a large mixing bowl on a sturdy countertop. I like to line the bowl with a silicone mat so nothing sticks, and it also makes cleanup a breeze. This is the moment of truth: you’ll be whisking heavy cream into peaks that should look like soft clouds ready to burst. Keep your whisk clean and dry – any stray water will sabotage the aeration.
Pour the 2 cups of heavy cream into the bowl, add the 2 tablespoons of confectioner’s sugar, and the pinch of kosher salt. Begin whipping on low speed for 30 seconds, then increase to high. You’ll notice the cream start to thicken, forming soft peaks that hold a gentle curl when you lift the whisk. Power transition: Once you see that glossy sheen, you’re ready for the next step.
Now, fold in the 1/2 cup of Lotus Biscoff spread, the 1/3 cup of mascarpone, and the 1 teaspoon of pure vanilla extract. Use a spatula and a gentle folding motion – you don’t want to deflate the air you just worked so hard to incorporate. The mixture should turn a warm caramel hue and become luxuriously silky.
Kitchen Hack: Warm the Biscoff spread slightly (microwave for 10 seconds) before folding; this makes it easier to blend without over‑mixing.While the mousse is chilling, take a 9‑inch springform pan (or any deep dish) and line the bottom with a single layer of Lotus Biscoff cookies. Break a few to fill gaps – the goal is an even base, not a perfect mosaic. Press them gently; they should hold their shape but not be crushed. The scent of the cookies will start to rise, teasing your nose with caramel whispers.
Pour half of the prepared mousse over the cookie layer, spreading it with a spatula until it’s smooth and level. Then, add another layer of whole cookies on top of the mousse, arranging them in a decorative pattern if you’re feeling artistic. This second layer creates a sandwich effect that keeps every bite balanced.
Top the second cookie layer with the remaining mousse, smoothing the surface into a glossy finish. Tap the pan lightly on the counter three times – this releases any trapped air bubbles and ensures the mousse settles evenly.
Watch Out: If you over‑fill the pan, the mousse may overflow during chilling, creating a mess. Keep the total height under 2 inches.Cover the pan tightly with plastic wrap and place it in the refrigerator for at least 3 hours, preferably overnight. This is where the magic happens: the cookies absorb just enough moisture to soften without turning soggy, while the mousse firms up into a slice‑ready consistency. I dare you to peek after 30 minutes – the texture will still be loose, but patience pays off.
When you’re ready to serve, run a thin knife around the edge of the pan, then release the springform. The cake should lift cleanly, revealing a glossy, layered masterpiece that looks as if it were plated in a high‑end bakery. Slice with a warm knife (dip it in hot water, wipe dry) for clean cuts. The first bite? Expect a buttery melt that whispers of spice, followed by a crisp cookie crunch that makes you sigh with satisfaction.
That's it — you did it. But hold on, I've got a few more tricks that'll take this to another level...
Insider Tricks for Flawless Results
The Temperature Rule Nobody Follows
Never whip cream straight out of the freezer. Cold cream whips faster, but if it’s too cold it won’t incorporate enough air, leading to a dense mousse. I keep the cream in the fridge for 30 minutes, then let it sit on the counter for 5 minutes before whipping. This small temperature tweak creates peaks that hold their shape for hours, even after the cake is sliced.
Why Your Nose Knows Best
When the mousse is ready, give it a quick sniff. If you detect a raw dairy smell, you’ve over‑mixed or the mascarpone is too cold. The aroma should be sweet, buttery, with a faint vanilla note. Trusting your nose saves you from a bland final product. A friend once skipped this step and ended up with a cake that tasted like “plain cream” – not a good look.
The 5‑Minute Rest That Changes Everything
After layering the final mousse, let the cake sit uncovered for exactly five minutes before covering it. This brief rest allows the surface to set a thin skin, preventing water condensation from forming under the plastic wrap. The result is a cake that stays glossy, not soggy, even after a full day in the fridge.
Cookie Crumble Control
If you love extra crunch, toast the cookies lightly on a dry skillet for 30 seconds per side before assembling. The toasting releases the caramel oils, intensifying the flavor and giving the layers a satisfying snap. Just be careful not to over‑toast; burnt edges will introduce bitterness that clashes with the sweet mousse.
The Final Glaze Touch
For a show‑stopping finish, drizzle a thin ribbon of melted Biscoff spread over the top right before serving. The glaze sets into a glossy sheen that catches the light, making the cake look as indulgent as it tastes. I’ll be honest — I’ve used this trick at every holiday gathering and it never fails to earn compliments.
Creative Twists and Variations
This recipe is a playground. Here are some of my favorite ways to switch things up:
Espresso‑Infused Dream
Add 1 tablespoon of finely ground espresso to the mousse mixture. The coffee notes deepen the caramel flavor, creating a dessert that feels like an after‑dinner coffee with a sweet twist. Perfect for friends who love a caffeine kick.
Nutty Crunch
Fold in ¼ cup of toasted chopped hazelnuts into the mousse. The nuts add a buttery crunch that pairs beautifully with the Biscoff spread. This variation is a hit with nut lovers and adds a pleasant textural surprise.
Berry Burst
Layer a thin spread of raspberry jam between the cookie and mousse layers. The tartness of the berries cuts through the sweetness, offering a balanced bite that feels fresh and sophisticated.
Chocolate Swirl
Melt ½ cup of dark chocolate and swirl it into half of the mousse before layering. The chocolate ribbons create a marbled effect and add a rich, slightly bitter contrast that elevates the overall flavor profile.
Seasonal Spice
For a holiday twist, add a pinch of ground nutmeg and a dash of clove to the mousse. The warm spices turn this cake into a festive centerpiece that smells like a winter market.
Storing and Bringing It Back to Life
Fridge Storage
Cover the cake tightly with plastic wrap and store it in the refrigerator for up to 4 days. The mousse will stay firm, and the cookies will remain pleasantly soft without turning soggy. If you notice any condensation, simply lift the wrap for a few minutes to let excess moisture evaporate.
Freezer Friendly
Wrap the entire cake (still in its pan) in a double layer of foil, then place it in a freezer‑safe bag. It will keep for up to 2 months. When you’re ready to serve, transfer it to the fridge to thaw for 6‑8 hours; this gradual thaw preserves the texture.
Best Reheating Method
If you prefer a slightly warm dessert, microwave a single slice for 10‑12 seconds. Before microwaving, add a tiny splash (about a teaspoon) of water to the plate; the steam revives the mousse’s silkiness without melting the cookies completely. This trick brings the cake back to life as if it were freshly made.