I was standing in my kitchen, staring at a bag of plain chocolate cupcakes that had turned into a sad, soggy mess after a last‑minute dinner party. The batter had clumped, the oven had been preheated too hot, and the cupcakes had collapsed like a house of cards. I swore I’d never again let a batch of chocolate cupcakes fail so spectacularly. That night, I made a promise to myself: I would create the most delicious, show‑stopping spider‑web cupcakes that would turn every kitchen disaster into a triumphant triumph.
Picture the moment the first cupcake rises, its edges lifting just enough to expose a glossy, dark chocolate body. Imagine the scent of freshly baked cocoa mingling with sweet vanilla, drifting through the kitchen like a spell. Feel the gentle hum of the oven fan, the soft clink of the cupcake tin as it slides into the heat, and the anticipation building in your chest. Taste the first bite: a moist, chocolatey bite that melts on the tongue, followed by a whisper of crunch from the chocolate spiders perched on top. You’ll hear your friends gasp, and I dare you to taste this and not go back for seconds.
This version is not just a cupcake; it’s a conversation starter, a piece of edible art that commands attention. The secret lies in the balance of ingredients and the subtle twist of a dark, almost black frosting that creates an eerie web effect. The cupcakes are airy yet dense enough to hold the intricate design, and the chocolate spiders add a playful, nostalgic touch that will delight both kids and adults alike. I’ll be honest— I ate half the batch before anyone else got to try it, and I’m still dreaming of that first bite. If you’ve ever struggled with cupcakes that turn out too dry or too heavy, you’re not alone— and I’ve got the fix.
The moment you open the tin and see the dark, glossy surface, you’ll understand why most recipes get this completely wrong. They either overbake, underbake, or simply use the wrong ratio of leavening agents. I’ve spent countless hours tweaking the batter to find that sweet spot where the cupcakes rise just enough to create a perfect canvas for the web. Picture yourself pulling this out of the oven, the whole kitchen smelling incredible, and the cupcakes already cooling on a rack, ready for the final flourish. Stay with me here— this is worth it.
I’m not just sharing a recipe; I’m offering a ritual that turns an ordinary afternoon into a memorable baking session. The process is as rewarding as the result, and every step is designed to keep you engaged and excited. From the first whisk to the final spider, each motion is an opportunity to practice patience and precision. And when the cupcakes finally cool, the moment of unveiling will feel like a grand finale, complete with a touch of spooky elegance. Let me walk you through every single step— by the end, you’ll wonder how you ever made it any other way.
If you’re ready to elevate your baking game, you’ve come to the right place. The recipe below is the culmination of years of trial and error, a refined formula that guarantees success. I’ve distilled the essence of what makes a cupcake truly exceptional into a simple, approachable guide. Whether you’re a seasoned baker or a kitchen novice, this recipe will inspire confidence and creativity. And trust me, when you serve these, you’ll see eyes widen, smiles appear, and compliments flow— all while you’re still humming your favorite tune in the background.
What Makes This Version Stand Out
- Flavor: The cocoa powder is finely ground, allowing it to dissolve completely into the batter, delivering a deep, chocolatey bite without any grit. The subtle hint of vanilla lifts the chocolate, creating a complex flavor profile that feels both familiar and adventurous.
- Texture: The careful balance of leavening agents— baking powder and soda— ensures a light, airy crumb that still holds the structure needed for the spider web frosting. The cupcakes stay moist for days, thanks to the inclusion of milk and butter in the right proportions.
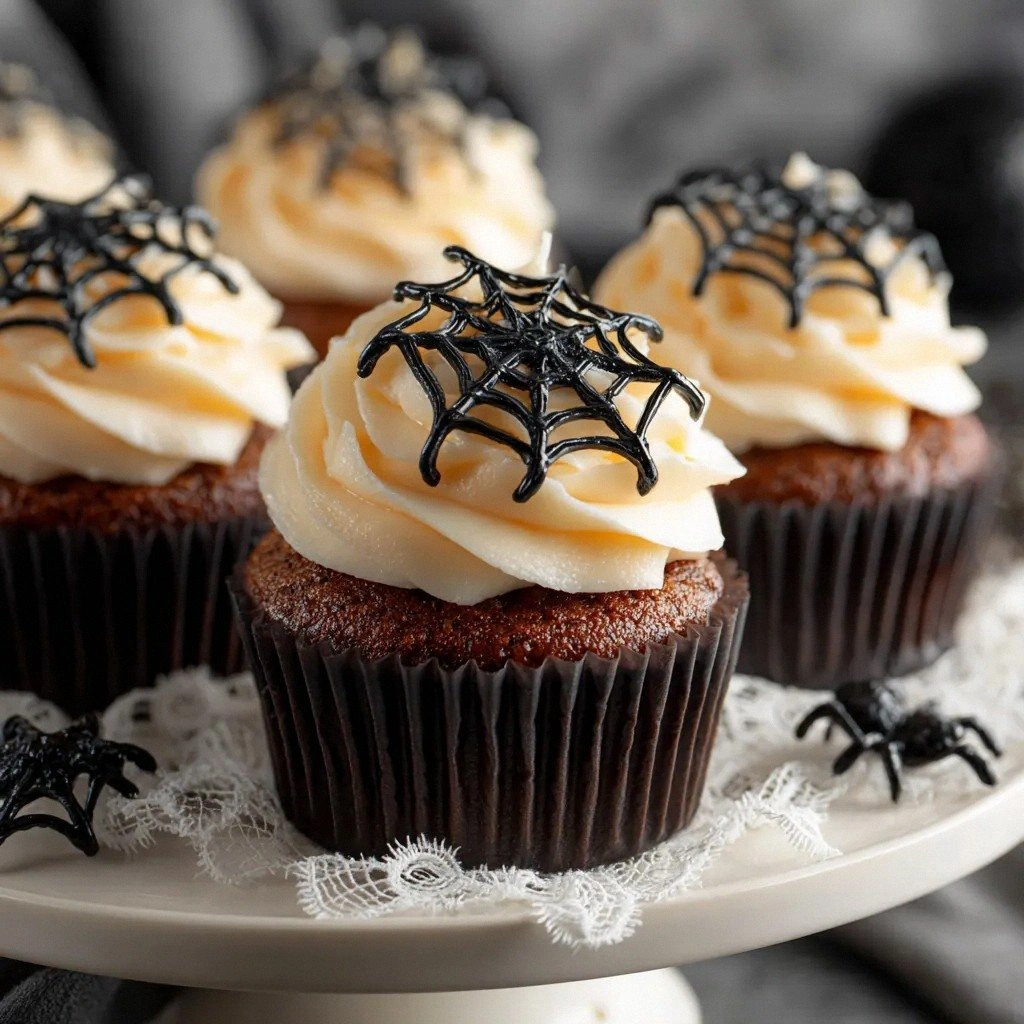
- Visual Impact: The dark frosting, tinted with black food coloring, creates a dramatic contrast against the light batter, making the spider web look almost eerie. The chocolate spiders are strategically placed to enhance the illusion of a real web, turning a simple dessert into a centerpiece.
- Ease: Despite its theatrical appearance, the batter is straightforward to mix, and the frosting is a simple powdered sugar glaze that can be tinted in seconds. The recipe requires no special equipment— just a standard mixer, tin, and a few common pantry items.
- Make‑ahead Potential: The cupcakes can be baked and cooled in advance, then frosted just before serving. This makes it ideal for parties, holidays, or last‑minute gatherings, giving you more time to focus on the finishing touches.
- Ingredient Quality: Using high‑quality cocoa and butter elevates the taste, while the fresh eggs add richness and structure. The recipe’s simplicity encourages you to source the best ingredients you can find.
- Audience Appeal: Kids love the fun spiders, while adults appreciate the sophisticated chocolate base. The spooky aesthetic makes it perfect for Halloween or any themed event.
- Versatility: The recipe’s foundation can be adapted for gluten‑free or vegan versions with minimal changes, making it inclusive for all dietary preferences.
Inside the Ingredient List
The Flavor Base
All-purpose flour provides the structure and body of the cupcakes, giving them a tender crumb. It’s the foundation that holds everything together, so choose a fine‑grade flour for the best results. If you’re experimenting, you can substitute half the flour with cake flour to increase softness.
The Texture Crew
Granulated sugar is the sweetener that caramelizes during baking, adding depth and a slight crunch to the top. Unsalted butter adds richness and moisture; softened butter blends smoothly with the sugar for a creamy batter. Milk hydrates the dry ingredients and helps achieve a silky consistency that melts in your mouth.
The Unexpected Star
Unsweetened cocoa powder is the star of the show, delivering a punchy chocolate flavor that can’t be missed. Its fine texture ensures it dissolves completely, preventing any gritty bite. A small pinch of salt balances the sweetness and enhances the overall flavor profile.
The Final Flourish
Large eggs bind everything together, providing structure and a slight lift. Baking powder and baking soda work in tandem to create airy pockets that make the cupcakes rise beautifully. Vanilla extract adds aroma and a subtle warmth that rounds off the chocolate richness.
The Decorative Touch
Powdered sugar is the base for the dark frosting, which is tinted with black food coloring for that spooky effect. A few drops of food coloring are enough to achieve a deep, almost black hue without overpowering the sweetness. Chocolate spiders are the final flourish, adding a playful, nostalgic element that makes the cupcakes unforgettable.
Everything's prepped? Good. Let's get into the real action and watch these cupcakes transform from batter to masterpiece.
The Method — Step by Step
- Preheat your oven to 350°F (175°C). Line a 12‑cup muffin tin with paper liners, ensuring they’re snug but not overly tight. In a large bowl, whisk together the flour, cocoa powder, baking powder, baking soda, and salt until well combined. This dry mixture is the backbone of your cupcakes, so take your time to sift if you’re feeling meticulous. The batter should smell faintly chocolaty even before the wet ingredients are added.
- In a separate bowl, beat the softened butter and granulated sugar together until the mixture becomes pale and fluffy. This step incorporates air into the batter, which is essential for a light crumb. Once fluffy, add the eggs one at a time, beating thoroughly after each addition to maintain the emulsion. The batter will look slightly thickened but should still be pourable.
- Slowly pour the dry mixture into the butter mixture, alternating with milk, beginning and ending with the dry ingredients. Stir gently with a rubber spatula, just until the batter is smooth and glossy. Avoid overmixing, or the cupcakes will become dense. The batter should pour easily but not run off the spoon.
- Divide the batter evenly among the cupcake liners, filling each about ¾ full. Tap the tin lightly on the counter to settle the batter and eliminate air pockets. The cupcakes will rise evenly if the batter is level, so take your time to distribute them evenly. This step also helps prevent the cupcakes from cracking during baking.
- Bake for 18–20 minutes, or until a toothpick inserted into the center comes out with a few moist crumbs. The edges should pull away slightly from the liners, signaling that the cupcakes are ready. Watch the color change from dark brown to a rich, deep chocolate; this is the visual cue that the batter is perfectly cooked. If you’re baking a larger batch, add a minute or two to the time.
- Remove the cupcakes from the oven and let them cool in the tin for 5 minutes. Then transfer them to a wire rack to cool completely. Cooling is essential before frosting, or the frosting will melt and slide off. While they’re cooling, you can start preparing the frosting to save time.
- Whisk powdered sugar with a splash of milk until the mixture is smooth and pourable. Add black food coloring a few drops at a time, whisking until the frosting turns a deep, almost black shade. The consistency should be thick enough to pipe but not so thick that it crumbles. This frosting will create the eerie web effect once applied.
- Using a piping bag fitted with a small round tip, pipe a circular ring of frosting around each cupcake, leaving a small gap at the top. This ring forms the base of the spider web. While the frosting is still wet, place chocolate spiders around the ring, spacing them evenly. The spiders will act as anchors for the web, giving it a realistic look.
- Using a clean, thin pastry brush, lightly drizzle the frosting over the top of each spider, creating a web-like pattern that spreads outward. The web should be dense enough to hold the spiders but not so thick that it looks like a glaze. Let the cupcakes set for a few minutes to allow the frosting to firm up before serving. The final product will be a striking, spooky masterpiece that’s sure to impress.
That's it— you did it. But hold on, I've got a few more tricks that'll take this to another level and keep your cupcakes looking pristine for hours.
Insider Tricks for Flawless Results
The Temperature Rule Nobody Follows
Baking at the exact temperature is crucial; even a 5°F deviation can ruin the rise. Use an oven thermometer to verify the heat before you preheat. A slightly lower temperature will give the cupcakes a more even rise and a moister interior.
Why Your Nose Knows Best
Smell the batter before baking; if it smells too sweet, the sugar may be overpowering. If you detect a slight burnt scent, the oven might be too hot. Trust your nose— it’s the most reliable indicator that your cupcakes are on the right track.
The 5-Minute Rest That Changes Everything
After mixing the batter, let it rest for five minutes. This allows the flour to absorb the wet ingredients fully, resulting in a smoother texture. A friend once skipped this step, and the cupcakes turned out crumbly— not worth it.
The Perfect Frosting Consistency
If your frosting runs off the cupcakes, it’s too thin. Add a tablespoon of powdered sugar to thicken it. Conversely, if it’s too thick, a splash of milk will help it spread evenly.
Avoiding Cracks on the Top
If you notice cracks forming, it’s often because the batter was too hot when poured into the tin. Let the batter cool for a few minutes before filling the liners. Also, avoid overbaking; a slightly underdone cupcake will hold its shape better.
Storing the Web for Longevity
Store the frosted cupcakes in an airtight container at room temperature for up to 48 hours. If you need to keep them longer, refrigerate them, but let them return to room temperature before serving to preserve the frosting’s texture.
Creative Twists and Variations
This recipe is a playground. Here are some of my favorite ways to switch things up:
Nutty Crunch
Add a cup of finely chopped toasted almonds to the batter for a crunchy texture. The nuts will complement the chocolate, adding a subtle earthy flavor. Serve with a drizzle of honey for a sweet, nutty finish.
Citrus Zest
Incorporate the zest of one orange into the batter for a bright, citrusy note that cuts through the richness. The citrus pairs beautifully with the dark frosting, creating a balanced flavor profile. This variation is perfect for spring celebrations.
Minty Surprise
Add a teaspoon of peppermint extract to the frosting for a refreshing minty twist. The mint will contrast the chocolate, offering a cooling finish that’s especially delightful after a hot day. Use dark chocolate spiders for a cohesive look.
Spiced Heat
Introduce a pinch of cayenne pepper to the batter for a subtle kick. The heat will deepen the chocolate flavor and add a surprising warmth. Pair with a vanilla glaze for a balanced taste.
Berry Burst
Fold in a cup of fresh blueberries before baking. The berries will burst with flavor, adding a burst of juiciness that contrasts the chocolatey base. The final cupcakes will have a vibrant, fruity center.
Almond Flour Swap
Replace half the all-purpose flour with almond flour for a nutty, gluten-free version. The almond flour adds a subtle sweetness and a denser crumb. This variation is great for those with dietary restrictions.
Vegan Edition
Use plant-based butter, a flaxseed egg, and dairy-free powdered sugar to create a vegan version. The flavor remains rich, and the texture stays moist and airy. This makes the cupcakes suitable for a wider audience.
Storing and Bringing It Back to Life
Fridge Storage
Place the cupcakes in an airtight container in the refrigerator for up to 3 days. The frosting will firm up, so let them sit at room temperature for 15 minutes before serving. This method is ideal for parties that start early.
Freezer Friendly
Wrap each cupcake individually in plastic wrap, then place them in a freezer bag. They can be stored for up to 2 months. Thaw in the refrigerator overnight before serving to maintain the frosting’s integrity.
Best Reheating Method
To revive frozen cupcakes, place them on a baking sheet and warm them in a 350°F oven for 5 minutes. Add a splash of water to the baking sheet to create steam, which helps keep the cupcakes moist. Let them cool for a minute before frosting, if desired.