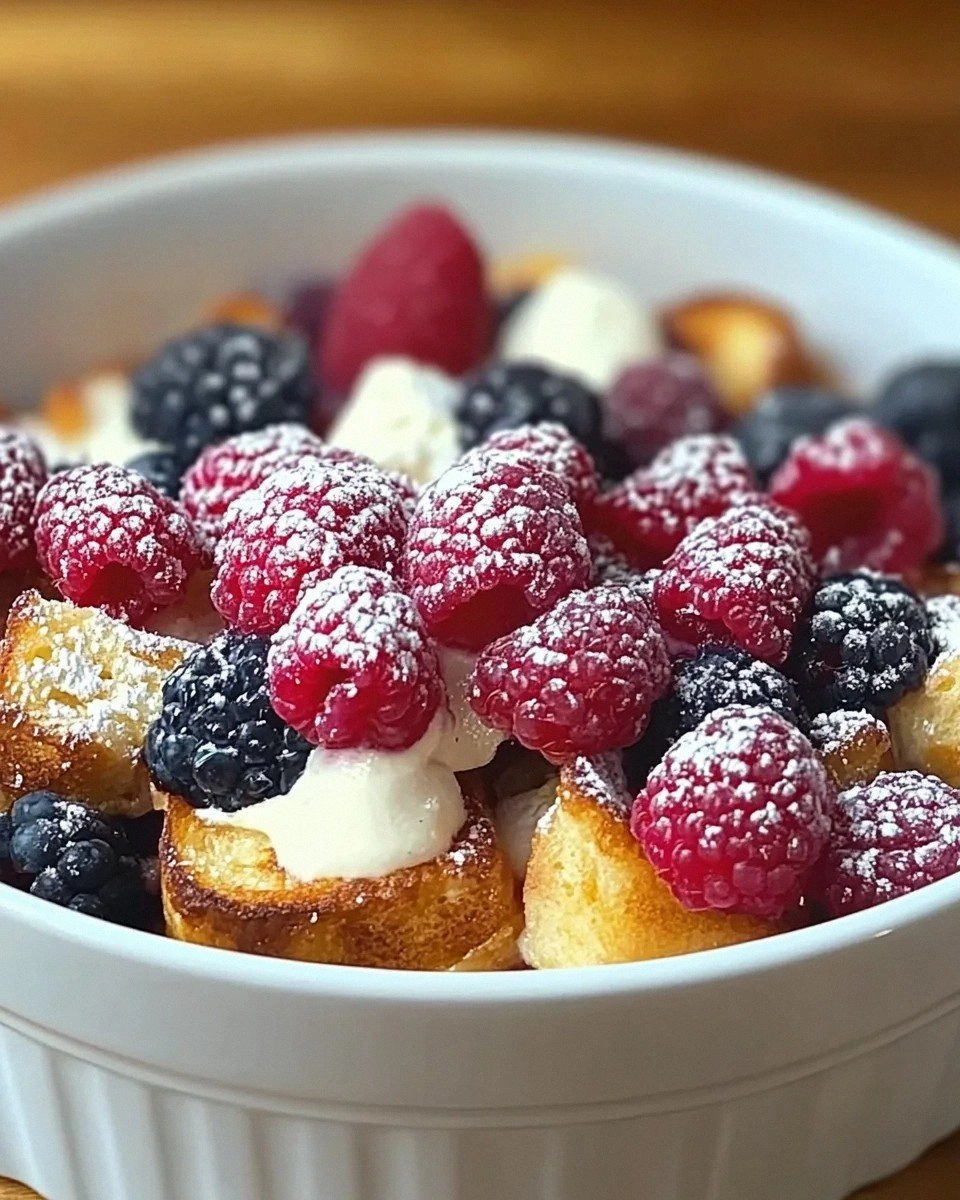
I still remember the morning I accidentally created what would become the most requested dish at every family gathering. It was one of those chaotic Sundays where I had promised to bring something special to brunch, but between the dog's vet emergency and my daughter's science project exploding all over the kitchen, I completely forgot to prep anything the night before. Standing in my pajamas at 7 AM, staring at a loaf of stale bread and some berries that were dangerously close to retirement, I decided to throw caution to the wind and create something magical. What emerged from my oven forty-five minutes later was nothing short of miraculous — a golden-crowned casserole that made my kitchen smell like I'd hired a French pastry chef while I wasn't looking.
But here's where it gets interesting. As I stood there, fork in hand, ready to taste what I assumed would be a mediocre attempt at salvaging breakfast, the first bite literally stopped me mid-chew. The edges had caramelized into these crispy, almost crème brûlée-like shards while the center remained custardy and cloud-soft. The berries had burst into jammy pockets of sweetness that danced between the layers of custard-soaked bread, creating this gorgeous marbled effect that looked like I'd spent hours on presentation. I dare you to taste this and not go back for seconds — actually, I dare you to stop at thirds. I'll be honest — I ate half the batch before anyone else got to try it, standing at my kitchen counter in my flour-dusted robe, making little happy noises with each bite.
What makes this berry French toast casserole absolutely life-changing isn't just the flavor bomb that explodes in your mouth with every forkful. Picture yourself pulling this out of the oven, the whole kitchen smelling like vanilla and butter and those precious moments when berries hit hot custard and create pure magic. The top forms this delicate sugar crust that cracks under your spoon like the surface of a perfect crème brûlée, revealing the tender, pudding-like interior beneath. Most recipes get this completely wrong — they either turn out soggy disasters that taste like wet bread, or dry bricks that could double as doorstops. Here's what actually works: the overnight method that lets the bread become one with the custard, creating this unified texture that's somehow both substantial and ethereal.
The secret weapon? It's not some fancy French technique or obscure ingredient you need to special order. It's patience, proper ratios, and one game-changing ingredient I'll reveal in a moment that transforms ordinary breakfast into something that makes grown adults close their eyes and sigh with pleasure. Okay, ready for the game-changer? Stay with me here — this is worth it. We're talking about using both brioche AND challah bread, creating this perfect balance of buttery richness and eggy tenderness that makes each bite feel like you're eating dessert for breakfast without the sugar crash. Let me walk you through every single step — by the end, you'll wonder how you ever made it any other way.
What Makes This Version Stand Out
Texture Harmony: This isn't your typical mushy bread pudding masquerading as breakfast. The genius lies in using two types of bread — brioche for buttery richness and challah for that perfect eggy structure — creating layers that are simultaneously custardy and substantial. When you bite into it, you get those crispy caramelized edges that shatter like thin ice, giving way to a center so soft it practically melts on your tongue.
Berry Strategy: Instead of just throwing in frozen berries and hoping for the best, we macerate them first with a touch of sugar and lemon zest, intensifying their flavor and preventing them from bleeding purple streaks throughout the custard. The result is distinct pockets of jammy fruit that burst in your mouth like little flavor bombs rather than creating a homogenous purple mess.
Make-Ahead Magic: Here's where this recipe absolutely demolishes the competition. You can assemble the entire thing up to 24 hours in advance, letting the flavors meld and the bread achieve that perfect custard-soaked texture. When morning chaos hits, you just pop it in the oven and let the magic happen while you're brewing coffee and pretending to be a functional human being.
Flavor Layering: Most recipes rely on vanilla extract alone, but we're building complexity with vanilla bean paste, a whisper of cardamom, and orange zest that makes the berries sing. The custard base gets infused with warm spices that complement rather than compete with the fruit, creating this sophisticated flavor profile that tastes like it came from a boutique bakery.
Visual Impact: This isn't just delicious — it's absolutely stunning. The berries create these ruby and sapphire gems throughout the golden custard, while the top develops this gorgeous bronzed crown that'll have everyone whipping out their phones for photos before they even taste it. If you've ever struggled with presentation, you're not alone — and I've got the fix.
Feed-a-Crowd Friendly: Whether you're hosting twelve hungry relatives or meal-prepping for the week, this casserole scales beautifully. The baking time stays consistent whether you're making a small batch or doubling for a crowd, which means no more playing oven Tetris or trying to coordinate multiple pans of different sizes.
Inside the Ingredient List
The Flavor Base
The foundation of any exceptional French toast casserole lies in its dairy components, and this is where we're not cutting corners. Whole milk provides the silky backbone, but we're adding a generous splash of heavy cream for richness that clings to your spoon like liquid velvet. The eggs need to be room temperature — cold eggs won't incorporate smoothly and can leave you with scrambled bits in your custard. And now the fun part: vanilla bean paste versus extract. While extract works in a pinch, the paste gives you those gorgeous black specks that signal serious baking credentials while delivering a more intense vanilla presence that permeates every bite.
Dark brown sugar isn't just for sweetness — it brings molasses notes that deepen the overall flavor profile and help create that gorgeous caramelized top. The touch of maple syrup in the custard isn't optional; it adds this subtle complexity that makes people ask, "What's that amazing flavor I can't quite identify?" Salt might seem counterintuitive in a sweet dish, but it's the difference between flat and phenomenal, amplifying all the other flavors and preventing the sweetness from becoming cloying.
The Texture Crew
Brioche and challah aren't just fancy bread choices — they're textural powerhouses that transform this from ordinary to extraordinary. Brioche brings buttery richness and tender crumbs that practically dissolve in the custard, while challah contributes that perfect eggy structure that holds everything together. The ratio matters: two parts challah to one part brioche gives you structure without overwhelming richness. Day-old bread isn't a suggestion — it's mandatory for achieving that perfect custard-soaked texture that holds its shape instead of collapsing into bread soup.
Butter plays multiple roles here. We're using it to grease the pan (obviously), but also brushing the top of the casserole before baking to encourage that gorgeous golden browning. European-style butter with its higher fat content creates superior flavor and better browning, but regular butter works if that's what you've got. The key is using enough — skimp here and you'll miss out on those crispy edges that everyone fights over.
The Unexpected Star
Here's where we separate the amateurs from the pros: orange zest and cardamom. The orange oil in the zest contains aromatic compounds that make berries taste more berry-like — it's like turning up the volume on their natural flavor. Cardamom adds this mysterious warmth that makes people ask for your secret ingredient, but use a light hand — too much and your breakfast tastes like chai. Fresh nutmeg grated directly into the custard adds another layer of warmth without overwhelming the delicate fruit.
But the real game-changer? A tablespoon of cornstarch whisked into the custard. This prevents weeping and ensures your casserole holds together in perfect slices instead of collapsing into a sad puddle when you serve it. It's the difference between restaurant-quality presentation and "I guess we're eating this with spoons straight from the dish."
The Final Flourish
Fresh berries will always outperform frozen in both flavor and appearance, but we're not just tossing them in raw. Macerating them with sugar and lemon zest for fifteen minutes intensifies their flavor and creates this gorgeous syrup that gets folded into the custard. The variety matters too — mixing raspberries, blueberries, and strawberries gives you different textures and flavor notes that keep each bite interesting. Save a handful for the top to prevent them all from sinking to the bottom during baking.
Powdered sugar for dusting isn't just for looks — the cornstarch in it helps absorb any excess moisture and creates this professional bakery finish. But wait until just before serving, or it'll dissolve into sad white patches. A final drizzle of real maple syrup right before serving ties everything together and gives you that Instagram-worthy glisten that makes people reach for their phones before their forks.
The Method — Step by Step
- Start by cubing your bread into 1-inch pieces — not too small or they'll dissolve, not too large or they won't absorb the custard properly. Spread them on a baking sheet and let them air-dry for at least 2 hours, or better yet, overnight. This step is crucial for achieving that perfect texture where the outside stays defined while the inside becomes custardy. While the bread is drying, you can prep your berries and mix up the custard base.
- For the berry prep, combine your mixed berries in a bowl with 2 tablespoons of sugar, the zest of half an orange, and a squeeze of lemon juice. Let this sit while you make the custard — the sugar will draw out the berry juices, creating this gorgeous ruby syrup. Don't skip this step; it's what prevents your casserole from becoming a purple mess and instead gives you distinct, jewel-like berries throughout. After 15 minutes, you'll see the berries have released their juices and are glistening like little gems.
- Now for the custard — whisk together the eggs, milk, cream, brown sugar, maple syrup, vanilla bean paste, cardamom, nutmeg, and salt until completely smooth. The cornstarch goes in last; whisk it with a splash of milk first to make a slurry, then whisk it into the custard to prevent lumps. The mixture should be silky smooth and pale yellow, with visible specks from the vanilla bean paste. Let this rest for 10 minutes to allow the flavors to meld and any foam to settle.
- Assembly time! Butter your baking dish generously — don't be shy here. Layer half the bread cubes, then half the macerated berries (juices and all), then repeat with the remaining bread and berries. Pour the custard slowly over everything, pressing down gently with a spatula to ensure all the bread gets soaked. Cover and refrigerate for at least 2 hours or up to 24 hours — this is where the magic happens as the bread transforms into a custard-soaked dream.
- When you're ready to bake, remove the casserole from the refrigerator 30 minutes before baking. Preheat your oven to 350°F (175°C) and position the rack in the center. Brush the top with melted butter — this is what creates that gorgeous golden crown. Bake for 45-50 minutes until the top is golden brown and the center just barely jiggles when you shake the pan. The edges will start pulling away from the sides of the dish, and your kitchen will smell like you've died and gone to breakfast heaven.
- The rest is crucial — let it stand for 10 minutes before serving. This allows the custard to set properly and prevents molten berry lava from burning everyone's mouths. During this time, you can dust with powdered sugar and warm some maple syrup for drizzling. The casserole should slice cleanly, revealing those gorgeous layers of custard-soaked bread and jewel-toned berries.
- Serving is where you get to be fancy. Use a sharp knife dipped in hot water for clean cuts, and serve with a drizzle of warm maple syrup and a few fresh berries on the side. The contrast between the warm casserole and cool berries is absolutely divine. If you're feeling extra, add a dollop of whipped cream or a scoop of vanilla ice cream for a breakfast that blurs the line between morning meal and dessert.
- Storage tip: If you somehow have leftovers (unlikely, but let's pretend), let the casserole cool completely before covering and refrigerating. It keeps beautifully for up to 4 days, and reheats like a dream. The flavors actually intensify overnight, making day-two servings arguably better than fresh from the oven. Just add a splash of milk before reheating to restore moisture.
Insider Tricks for Flawless Results
The Temperature Rule Nobody Follows
Room temperature ingredients aren't just a snobby chef suggestion — they're the difference between silky custard and scrambled egg disasters. Cold eggs hitting warm dairy can cause the proteins to seize up, creating those unpleasant rubbery bits that ruin the texture. Take your eggs, milk, and cream out of the fridge 30 minutes before you start. If you're impatient (I get it), submerge the eggs in warm water for 5 minutes and microwave the milk for 15 seconds. But here's the real secret: whisk the eggs with the sugar first until pale and thick, then slowly stream in the dairy. This creates an emulsion that stays smooth and prevents curdling.
Why Your Nose Knows Best
Trust your sense of smell over the timer — when this casserole is perfectly baked, your kitchen will smell like vanilla and butter with hints of caramelized sugar. The aroma shifts from raw and eggy to warm and inviting right when it's done. If you smell berries starting to get jammy and the edges looking deeply golden, it's time to check. A friend tried skipping this step once — let's just say it didn't end well. She set her timer for the full 50 minutes without checking, and ended up with a casserole that could've doubled as a hockey puck.
The 5-Minute Rest That Changes Everything
I know it's torture when your kitchen smells like heaven and everyone is hovering with forks ready, but those 5 minutes of resting time are non-negotiable. During this time, the custard finishes setting and the temperature equalizes throughout. Cut too early and you'll get a puddle of custard running out, leaving you with dry bread and disappointed eaters. Cover loosely with foil during resting to keep it warm without creating condensation that'll ruin your crispy top. Use this time to brew coffee, set the table, or just bask in the compliments about how amazing your kitchen smells.
Creative Twists and Variations
This recipe is a playground. Here are some of my favorite ways to switch things up:
Tropical Sunrise Casserole
Swap the berries for diced pineapple, mango, and coconut flakes, then replace the orange zest with lime and add a splash of coconut extract to the custard. The tropical fruits caramelize beautifully and create these golden pockets of sunshine throughout. Top with toasted macadamia nuts before serving for crunch. This version transports you straight to a beachside brunch, no matter how dreary the weather outside.
Chocolate Cherry Decadence
Use cherries instead of mixed berries and fold in chocolate chips between the layers. The chocolate melts into the custard, creating these molten pockets of joy that make this feel like eating dessert for breakfast. Add a tablespoon of cocoa powder to the custard for extra chocolate depth. If you've ever struggled with getting chocolate to distribute evenly, you're not alone — and I've got the fix: toss the chips with a teaspoon of flour first to prevent them all from sinking to the bottom.
Apple Pie Breakfast Bake
Replace berries with diced apples sautéed in butter with cinnamon and a touch of maple syrup until just softened. Add walnuts for crunch and use apple pie spice instead of cardamom. The apples maintain their texture better than berries and create this homey, comfort-food vibe that makes everyone feel like they're waking up at grandma's house. This version is particularly forgiving if you need to make it morning-of instead of overnight.
Lemon Blueberry Deluxe
Use only blueberries but double the amount, and add lemon curd dollops between the layers. The tart lemon cuts through the richness of the custard, while the blueberries burst into jammy pockets. Replace half the milk with buttermilk for extra tang, and add lemon zest to the custard. This bright, sunny version is perfect for spring brunches and makes your kitchen smell like a lemon grove.
Savory Brunch Twist
Okay, this one's wild but trust me: skip the sugar and vanilla, instead adding sharp cheddar, crispy bacon, and scallions to the custard. Use sourdough bread and add a touch of Dijon mustard. The technique is the same, but you get this incredible savory bread pudding that pairs perfectly with mimosas. Top with everything bagel seasoning before baking for the ultimate brunch mashup that'll have people talking for weeks.
Pumpkin Spice Autumn Version
Add a cup of pumpkin puree to the custard along with pumpkin pie spice, use pecans instead of berries, and drizzle with maple-cream cheese glaze after baking. The pumpkin adds moisture and creates this gorgeous orange hue that screams autumn comfort. This version is particularly forgiving for beginner bakers since the pumpkin helps mask any minor texture issues.
Storing and Bringing It Back to Life
Fridge Storage
Let the casserole cool completely before covering tightly with plastic wrap or transferring to an airtight container. It'll keep for up to 4 days in the refrigerator, and honestly, day-two servings might be even better as the flavors have time to meld and intensify. Store individual portions in separate containers for grab-and-go breakfasts throughout the week. The key is cooling it completely first — warm casserole creates condensation that'll make your crispy top soggy and sad.
Freezer Friendly
This casserole freezes beautifully, making it perfect for meal prep or gifting to new parents. Cut into portions, wrap each piece tightly in plastic wrap, then foil, and freeze for up to 2 months. Thaw overnight in the refrigerator before reheating. For best results, freeze before baking — assemble the casserole, cover tightly, and freeze for up to 1 month. Thaw overnight in the fridge, then bake as directed, adding 10-15 extra minutes if needed. Pro tip: write the baking instructions on the foil so you don't have to hunt down the recipe later.
Best Reheating Method
The microwave works in a pinch, but you'll lose that gorgeous texture contrast. Instead, reheat in a 325°F (165°C) oven for 10-15 minutes, covered with foil for the first 10 minutes, then uncovered to restore crispiness. Add a tiny splash of milk before reheating — it steams back to perfection and prevents drying out. For single portions, a toaster oven works brilliantly. If you're reheating from frozen, thaw completely first for best results. And here's a confession: sometimes I eat it cold straight from the fridge like dessert, and it's absolutely delicious that way too.