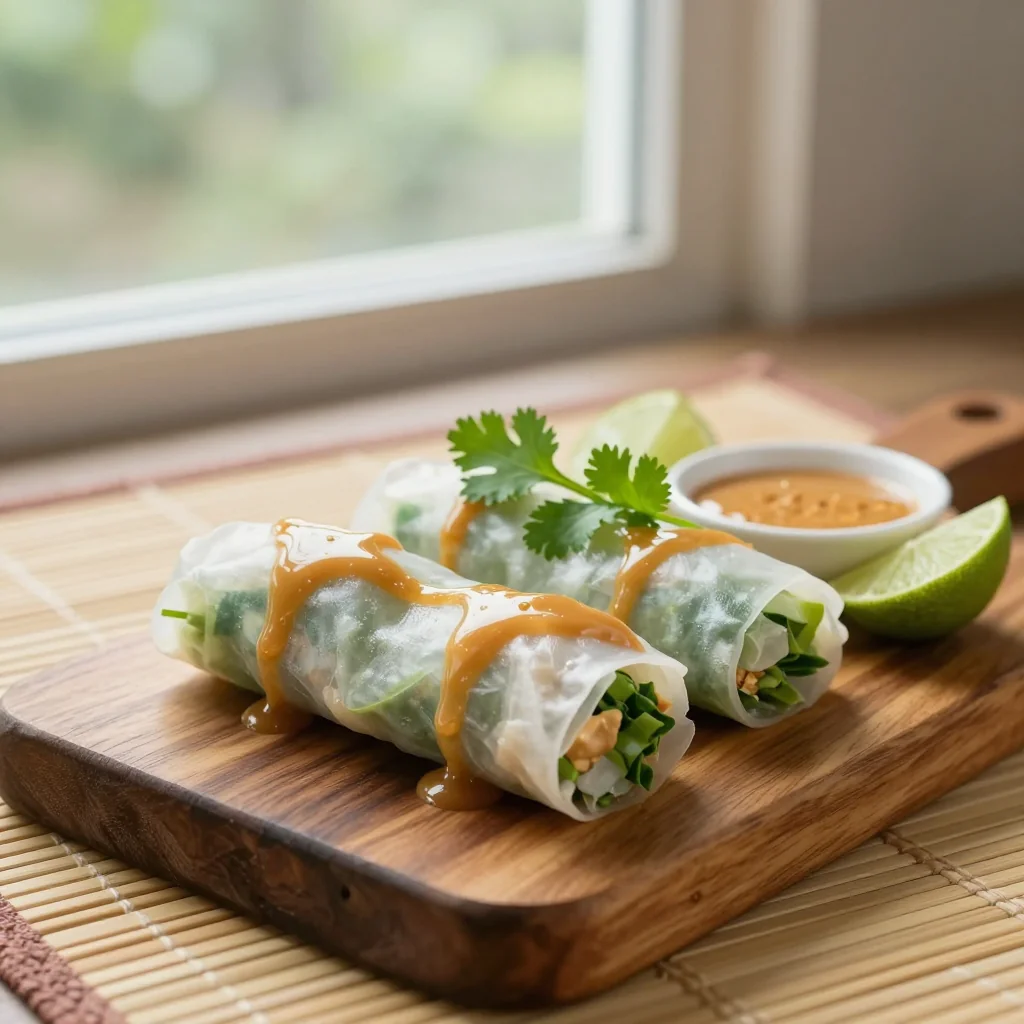
Fresh, light, and packed with flavor – the perfect handheld appetizer for any occasion.
When I first stepped into a bustling night market in Ho Chi Minh City, the aroma of fresh herbs, sizzling grills, and the sweet tang of peanut sauce wrapped around my senses like a warm hug. I remember watching a street vendor skillfully roll translucent rice paper around crisp vegetables, succulent shrimp, and fragrant herbs, all while the crowd gathered for a quick bite. The experience was a sensory revelation – the crunch, the freshness, the subtle heat from chilies, and the silky, nutty sauce that tied everything together.
Vietnamese spring rolls, known locally as “gỏi cuốn,” have a long tradition of being a light, healthy snack that balances textures and flavors. They are a staple at family gatherings, casual picnics, and even upscale restaurants where they are presented as elegant appetizers. What makes them truly special is the harmony between the delicate rice paper and the vibrant filling, complemented perfectly by a homemade peanut dipping sauce that adds depth without overwhelming the fresh ingredients.
In this article, I’ll walk you through every step of creating authentic Vietnamese spring rolls at home, from selecting the freshest herbs to mastering the art of rolling. You’ll learn how to balance flavors, achieve the perfect rice paper texture, and craft a peanut sauce that sings with every bite. By the end, you’ll be confident enough to host a dinner party or simply enjoy a wholesome snack any day of the week.
Let’s dive in and bring a taste of Vietnam to your kitchen – the rolls are waiting!
🌟 Why This Recipe Will Win Your Heart
These spring rolls are more than just food; they’re a celebration of freshness, balance, and culinary craftsmanship.
- ✨ Freshness in Every Bite: The combination of crisp lettuce, crunchy carrots, and aromatic herbs creates a mouthfeel that feels like a garden in your mouth.
- ✨ Customizable to Your Taste: Swap shrimp for tofu, add extra chilies for heat, or incorporate mango for a sweet twist – the recipe is a flexible canvas.
- ✨ Nutrient-Packed: Low in saturated fat, high in fiber, and rich in vitamins from the vegetables, these rolls are a wholesome choice.
- ✨ No Cooking Required: Aside from preparing the sauce, the rolls are assembled cold, making them perfect for hot summer days or quick weeknight snacks.
- ✨ Crowd-Pleaser: The bright colors and interactive nature of rolling your own pieces make it a fun activity for guests of all ages.
- ✨ Authentic Flavor Profile: The homemade peanut sauce captures the sweet‑savory‑spicy balance that defines Vietnamese street food.
🥗 Ingredients
📝 Complete Ingredient List
For the Spring Rolls:
For the Peanut Sauce:

🔍 Focus on Key Ingredients
Rice Paper Wrappers
Rice paper is a delicate, translucent sheet made from rice flour, water, and tapioca starch. It becomes pliable when briefly soaked in warm water, allowing you to wrap the fillings without tearing. Choose the 8‑inch size for easier handling, and store them in an airtight container to prevent them from drying out.
Fresh Herbs (Mint & Cilantro)
Mint adds a cool, refreshing note while cilantro contributes a citrusy brightness. Both herbs are essential for achieving the authentic Vietnamese flavor profile. When buying, look for leaves that are vibrant, not wilted, and give them a gentle rinse before use. Pat dry with a paper towel to avoid excess moisture that could make the rolls soggy.
Peanut Butter
Using a smooth, natural peanut butter without added sugars or hydrogenated oils ensures a clean, nutty base for the sauce. The sauce’s richness comes from the peanuts, while the lime juice and chili paste balance it with acidity and heat. If you prefer a thinner consistency, adjust the amount of warm water gradually while whisking.
🔄 Quick Substitutions
| If you don’t have... | Use instead... |
|---|---|
| Rice paper | Lettuce leaves (butter lettuce works best) |
| Shrimp | Firm tofu, sliced into strips |
| Peanut butter | Almond butter (will alter flavor slightly) |
👨🍳 Step‑by‑Step Instructions
Follow these detailed steps to create perfectly rolled spring rolls and a silky peanut dipping sauce. Take your time with each phase, and remember that practice makes perfect.
📋 Phase 1: Preparation & Mise en Place
Gather, wash, and prep all ingredients before you start assembling.
Cook the Vermicelli Noodles
Bring a pot of water to a boil, then remove from heat and add the dry rice vermicelli. Let it soak for 5‑7 minutes until tender, then drain in a fine‑mesh sieve and rinse under cold water to stop cooking. Toss the noodles with a drizzle of vegetable oil to prevent sticking.
Slice and Prepare Fillings
Julienne the carrots and cucumber into match‑stick sized pieces. Separate lettuce leaves, wash them, and pat dry. Roughly chop the mint and cilantro. If using pork belly, slice thinly and quickly sear in a hot pan with a splash of oil, then set aside to cool.
Prepare the Peanut Sauce
In a medium bowl, whisk together smooth peanut butter, hoisin sauce, soy sauce, lime juice, minced garlic, chili paste, and brown sugar. Gradually add warm water, whisking until the sauce reaches a pourable consistency. Taste and adjust salt or sweetness as needed. Transfer to a serving bowl and sprinkle crushed peanuts on top for texture.
🔥 Phase 2: Assembly
Now the fun part – rolling the spring rolls.
Soften the Rice Paper
Fill a shallow dish with warm (not hot) water. Dip one rice paper sheet for about 5‑7 seconds until it becomes translucent but still slightly firm. Lay it flat on a clean, damp kitchen towel to prevent sticking.
Layer the Fillings
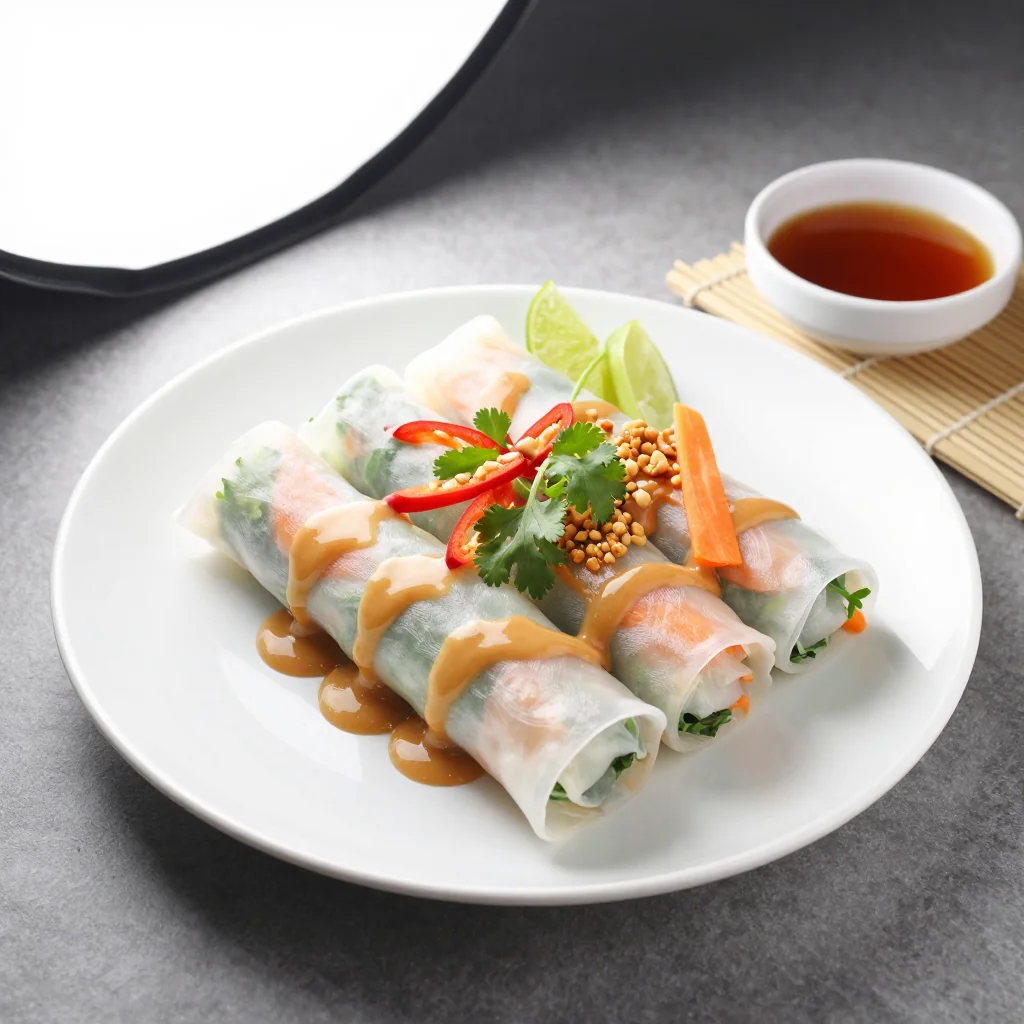
Place a small handful of vermicelli noodles in the lower third of the rice paper, followed by a few carrot and cucumber strips, a couple of mint and cilantro leaves, a slice of lettuce, and finally two shrimp halves (or tofu strips). Leave about 2‑3 cm at the edges free for folding.
Roll the Spring Roll
Fold the bottom edge over the filling, then fold the sides inward, creating a tight cylinder. Continue rolling gently but firmly until the top edge seals. The rice paper’s natural stickiness will hold the roll together.
Repeat Until All Ingredients Are Used
Continue the soaking and rolling process until you have 8 complete rolls. Arrange them on a platter, seam side down, and cover loosely with a damp cloth to keep them from drying out.
✨ Phase 3: Finishing Touches & Serving
Final checks and presentation.
Check the Rolls
Ensure each roll is sealed tightly and the rice paper is fully transparent. If any roll looks too dry, lightly mist it with a spray bottle of water.
Plate and Garnish
Arrange the rolls on a large serving plate. Drizzle a little extra peanut sauce around the edges for visual appeal, and sprinkle the remaining crushed peanuts over the sauce.
Serve Immediately
Serve the spring rolls with the peanut sauce on the side. Encourage guests to dip each roll generously. The rolls are best enjoyed fresh, within an hour of assembly.
💡 Expert Tips & Tricks
🛒 Choosing the Best Ingredients
When selecting shrimp, look for firm, translucent flesh with a mild sea scent; avoid any that appear gray or have a strong odor. For herbs, choose mint and cilantro that are bright and aromatic, discarding any wilted stems. Rice paper should be stored in a cool, dry place; once opened, keep it sealed to prevent moisture absorption.
🔪 Preparation Techniques
Julienne vegetables using a mandoline for uniform thickness; this ensures even crunch in each bite. When handling rice paper, work on a damp surface to avoid tearing. Arrange your fillings in the order listed to make the rolling process smoother and more efficient.
🌡️ Mastering the Peanut Sauce
Warm the water before adding it to the sauce; this helps emulsify the peanut butter without clumping. Adjust the chili paste gradually – a little goes a long way. If the sauce becomes too thin, add a touch more peanut butter; if too thick, thin with additional warm water.
🍽️ Presentation & Service
Serve the rolls on a wooden board or a bright ceramic platter for visual contrast. Garnish with thinly sliced red chilies and a sprinkle of toasted sesame seeds for extra color. Provide small dipping bowls for each guest to avoid cross‑contamination of flavors.
🏆 Pro Tips
Professional chefs focus on precision, balance, and efficiency. Apply these insights to elevate your spring rolls from good to extraordinary.
- 🎯 Uniform Rolling Pressure: Apply consistent pressure when folding the sides of the roll. Too much pressure squeezes out the filling; too little leaves the roll loose and prone to unraveling.
- 🎯 Layering Flavor: Lightly brush the shrimp with a mixture of fish sauce and a dash of sugar before cooking. This adds a subtle umami depth that complements the fresh herbs.
- 🎯 Temperature Control: Keep the water for soaking rice paper at around 40‑45 °C. Water that is too hot softens the paper too quickly, while cold water leaves it brittle.
- 🎯 Sauce Emulsion: Use a whisk instead of a fork to blend the peanut sauce; the rapid motion creates a stable emulsion, preventing separation during service.
- 🎯 Efficient Assembly Line: Set up a workstation with three stations – soaking, filling, rolling. This assembly‑line approach reduces downtime and maintains a steady workflow.
- 🎯 Garnish Geometry: Arrange crushed peanuts in a radial pattern around the dipping bowl. The visual symmetry enhances the dining experience and signals attention to detail.
"The secret to great Vietnamese spring rolls is not just the ingredients, but the love and patience you fold into each piece." — Chef Andrea Nguyen
🔄 Variations & Adaptations
Feel free to experiment with the base recipe to suit dietary preferences, flavor cravings, or seasonal produce.
🥬 Vegetarian / Vegan Version
Replace shrimp and pork with firm tofu or tempeh. Marinate tofu cubes in soy sauce, lime juice, and a pinch of smoked paprika before grilling. For a vegan sauce, ensure the peanut butter is free of honey and use maple syrup instead of brown sugar.
- Tofu substitution: 200 g firm tofu, sliced and lightly pan‑seared.
- Vegan sweetener: 1 tbsp maple syrup in place of brown sugar.
🌶️ Flavor Variations
Explore different taste profiles by tweaking the sauce or fillings.
Spicy Version
Add fresh Thai bird chilies, thinly sliced, to the filling and increase the chili paste in the sauce to 1 tsp. Finish with a drizzle of chili oil for an extra kick.
Mediterranean Version
Swap mint for fresh basil, use sun‑dried tomatoes in the filling, and replace the peanut sauce with a tzatziki‑style yogurt dip flavored with garlic and dill.
Asian Fusion Version
Incorporate thinly sliced mango for a sweet contrast, and blend a dash of coconut milk into the peanut sauce for a tropical twist.
⚠️ Dietary Adaptations
Gluten‑Free
All ingredients are naturally gluten‑free, but double‑check that the soy sauce you use is labeled gluten‑free.
Lactose‑Free
The recipe is already lactose‑free; just ensure any peanut butter you purchase does not contain added dairy.
Low‑Calorie
Reduce the amount of peanuts in the sauce to 1 tbsp, use a low‑sugar hoisin alternative, and increase the proportion of lettuce and cucumber in the roll.
👶 Kid‑Friendly Version
Omit the chili paste and use a sweeter sauce by adding a teaspoon of honey. Cut the carrots into thin ribbons and let kids help assemble their own rolls – it’s a fun, hands‑on activity that encourages healthy eating.
📦 Storage & Reheating
🧊 Conservation
Refrigerator
- Duration: 2 days
- Recommended container: Airtight plastic container with a damp paper towel on top
- Tip: Place a layer of parchment paper between rolls to prevent them from sticking together.
Freezer
- Duration: 1 month
- Method: Individually wrap each roll in plastic wrap, then place in a zip‑lock bag.
- Defrosting: Transfer to the refrigerator overnight; re‑soak in warm water for 10 seconds before serving.
💡 For best texture, consume within 24 hours; the rice paper can become tough if stored too long.
♨️ Reheating
🔥 Oven (Recommended)
- Preheat to 180 °C (350 °F).
- Place rolls on a baking sheet, cover loosely with foil.
- Heat for 8‑10 minutes.
- Remove foil and heat an additional 2‑3 minutes to crisp the edges slightly.
⚡ Microwave (Quick)
- Place rolls on a microwave‑safe plate, cover with a microwave‑safe lid.
- Heat on medium power for 45 seconds.
- Check and heat another 15 seconds if needed.
🍳 Stovetop
Warm a non‑stick skillet over low heat, add a splash of water, and briefly steam the rolls for 2‑3 minutes, turning gently.
🍷 Perfect Pairings
🥗 Accompaniments
- Fresh Papaya Salad (Gỏi Đu Đủ): The bright, tangy flavors complement the richness of the peanut sauce.
- Vietnamese Fried Spring Rolls (Chả Giò): Adds a crunchy contrast to the fresh rolls.
- Pickled Daikon & Carrot: Provides a sweet‑sour bite that balances the nutty sauce.
🍷 Wine & Beverage Pairings
- Riesling (off‑dry): The slight sweetness mirrors the honeyed notes in the sauce while cutting through the herbs.
- Thai Iced Tea: Its creamy texture and subtle spice echo the sauce’s depth.
- Non‑Alcoholic Option: Sparkling lime‑mint water with a splash of ginger syrup.
🍰 To Complete the Meal
Start with a light miso soup, follow with the spring rolls, then serve a delicate mango sticky rice for dessert. The sweet mango finishes the palate beautifully after the savory rolls.
❓ Frequently Asked Questions
Q: Can I use frozen shrimp?
Yes, thaw the shrimp completely and pat them dry before halving. Frozen shrimp may release more moisture, so a quick sauté in a hot pan helps remove excess water and adds a light caramelization.
Q: How do I prevent the rice paper from tearing?
Do not over‑soak the rice paper; a quick dip of 5‑7 seconds is sufficient. Work on a damp surface, and handle the paper gently when adding fillings. If a tear occurs, simply patch it with a small piece of the same rice paper.
Q: What if I don’t have hoisin sauce?
You can substitute with a mixture of 1 tbsp soy sauce, 1 tbsp honey, and a pinch of five‑spice powder. The flavor will be slightly less smoky but still sweet and savory.
Q: My sauce separated after standing. How can I fix it?
Whisk the sauce vigorously or blend briefly with a hand blender. Adding a splash of warm water while whisking helps re‑emulsify the mixture. Serve immediately after fixing for best texture.
Q: Can I make the rolls ahead of time for a party?
Yes, assemble the rolls and store them in a sealed container with a damp cloth on top. Keep them refrigerated and serve within 2 hours for optimal freshness. The sauce can be prepared up to 24 hours in advance.
Q: How do I adjust the recipe for more or fewer servings?
Use the portion adjuster at the bottom of the recipe card. It automatically recalculates ingredient quantities based on the number of servings you select, ensuring the ratios stay consistent.
🎉 Let’s Get Cooking!
Vietnamese spring rolls with peanut sauce are a celebration of fresh ingredients, vibrant flavors, and hands‑on cooking. By mastering the technique of softening rice paper, balancing the sauce, and arranging the herbs, you’ll create a dish that impresses both the eyes and the palate. Whether you’re serving them at a casual family dinner or a sophisticated cocktail party, these rolls bring a touch of Southeast Asian elegance to any table.
Remember, the key to perfect rolls is patience and practice. Don’t be discouraged if the first few attempts feel a bit uneven – the more you roll, the better you’ll become. Feel free to experiment with the variations we suggested, and make the recipe truly your own.
Have you tried this recipe?
Leave a comment and rating below! Share your photos on Instagram with #VietnameseRolls for a chance to be featured.
Vietnamese Spring Rolls with Peanut Sauce
Crispy fresh rolls paired with a silky, nutty peanut dipping sauce.
📝 Ingredients
For the Spring Rolls
For the Peanut Sauce
👨🍳 Instructions
- 1
Soak vermicelli noodles in hot water for 5‑7 minutes, drain, rinse, and toss with a drizzle of oil.
- 2
Julienne carrots and cucumber; wash and dry lettuce leaves; pick mint and cilantro leaves.
- 3
Whisk together peanut butter, hoisin, soy sauce, lime juice, garlic, chili paste, brown sugar, and warm water until smooth.
- 4
Dip a rice paper sheet in warm water for 5‑7 seconds, lay flat on a damp towel.
- 5
Place a small amount of noodles, vegetables, herbs, lettuce, and shrimp (or tofu) onto the lower third of the wrapper.
- 6
Fold bottom edge over, tuck sides in, and roll tightly to seal.
- 7
Repeat for remaining rolls; keep covered with a damp cloth.
- 8
Arrange rolls on a platter, drizzle with extra sauce, and sprinkle crushed peanuts.
- 9
Serve immediately with the peanut dipping sauce on the side.
- 10
Enjoy and share with friends!
🥗 Nutritional Information (per serving)
*Values are approximate and may vary based on specific brands used.
📚 You Might Also Like

Thai Fresh Summer Rolls

Vietnamese Bánh Mì Sandwich

Spicy Lemongrass Chicken


💬 Comments & Reviews
Leave a Comment
No comments yet. Be the first to share your thoughts!