Love this? Pin it for later! 📌
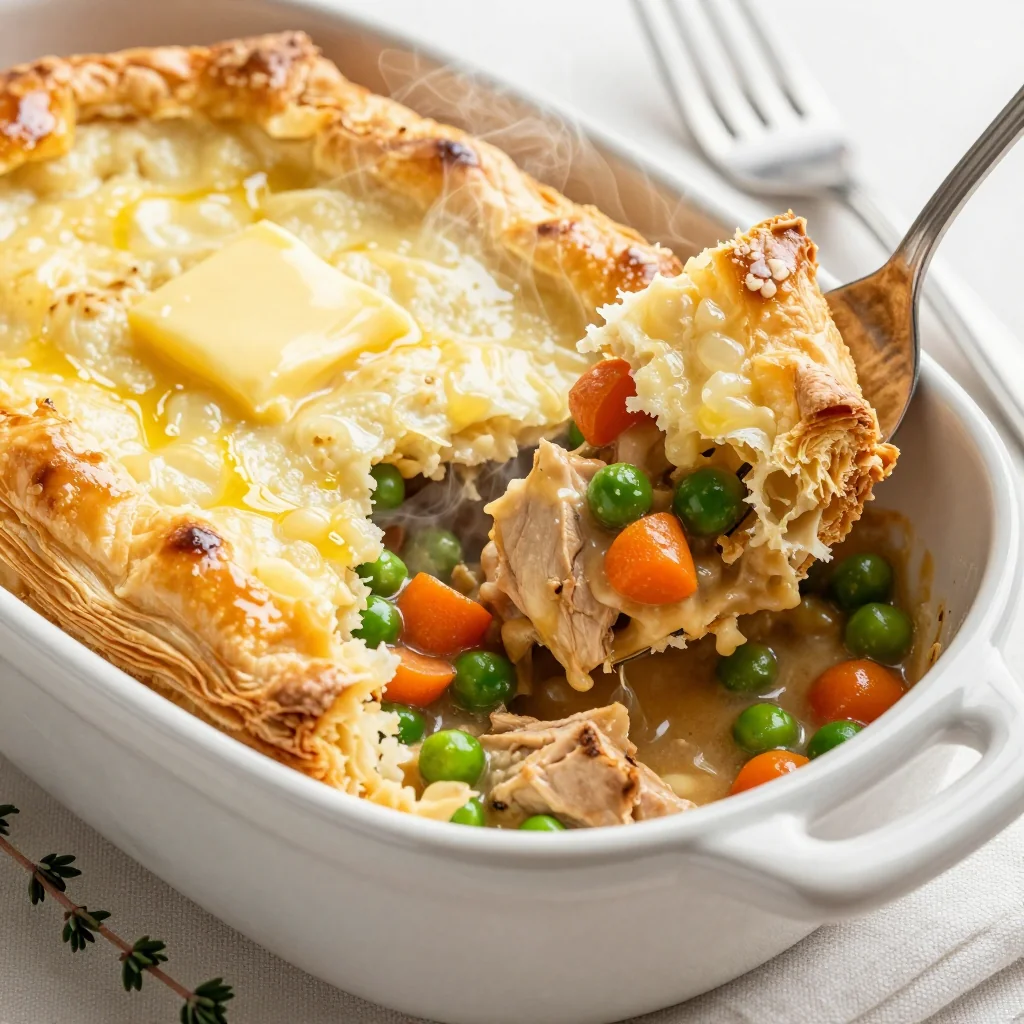
There's something magical about pulling a golden-brown chicken pot pie from the oven, the buttery crust crackling as steam escapes through the vents, carrying the aroma of comfort and home. Growing up, my grandmother would make pot pies whenever we visited, transforming leftover chicken and whatever vegetables were lurking in the crisper drawer into something extraordinary. It wasn't until I moved into my first apartment, armed with a tight budget and basic cooking skills, that I truly understood the genius of her frugal cooking.
This budget-friendly chicken pot pie has become my Sunday meal prep hero, feeding me and my roommate for days while costing less than ordering a single take-out meal. The secret lies in using affordable ingredients smartly—rotisserie chicken when it's marked down, frozen mixed vegetables that are just as nutritious as fresh, and a homemade crust that's both flaky and forgiving. Whether you're cooking for a family on a budget, meal prepping for the week ahead, or simply craving comfort food that won't break the bank, this recipe delivers all the cozy satisfaction of traditional pot pie without the premium price tag.
Why This Recipe Works
- Budget-Smart Ingredients: Uses affordable rotisserie chicken, frozen vegetables, and pantry staples to keep costs under $12 for the entire dish
- Make-Ahead Friendly: Assemble and freeze for up to 3 months, perfect for busy weeknights or unexpected guests
- Flaky Crust Secret: The vodka in the crust creates steam pockets for ultra-flaky layers without expensive butter
- One-Pot Filling: Everything cooks in a single skillet, minimizing dishes and maximizing flavor through caramelization
- Customizable Base: Swap proteins, use different vegetables, or make it vegetarian while maintaining the same cooking method
- Feed a Crowd: Serves 6-8 people generously, making it perfect for potlucks or large family dinners
- Comfort Food Therapy: The process of making and eating this pot pie provides genuine emotional comfort during stressful times
Ingredients You'll Need

The beauty of this pot pie lies in its humble ingredients, each chosen for maximum flavor and minimum cost. Let's break down what makes each component special and how to shop smart for the best results.
For the Flaky Crust:
All-purpose flour (2½ cups): Regular AP flour works perfectly here—no need for expensive pastry flour. Store brands work just as well as name brands for this recipe. If you're in a humid climate, you might need an extra tablespoon or two.
Cold butter (1 cup): I use store-brand butter, which is often $2-3 less than name brands. The key is keeping it cold—pop it in the freezer for 15 minutes before using. If butter prices are high, substitute half with cold vegetable shortening to maintain flakiness while reducing cost.
Vodka (¼ cup): This is my secret weapon for ultra-flaky crust! The alcohol burns off during baking, leaving behind layers so delicate they'll make you weep. Buy the cheapest vodka available—no need for Grey Goose in your pie crust. Don't worry about the alcohol; it completely evaporates during baking.
Salt (1 teaspoon): Enhances the flavor of the crust. I use kosher salt, but any salt works. This small amount makes a big difference in the final taste.
For the Budget-Friendly Filling:
Cooked chicken (3 cups): Here's where the real savings happen! I buy rotisserie chickens when they're marked down after 7 PM (often half price), strip the meat, and freeze it in 3-cup portions. You can also use leftover roasted chicken, or poach chicken thighs (cheaper than breasts) in seasoned water for 20 minutes. Dark meat adds more flavor and stays moist.
Mixed frozen vegetables (1 pound bag): Skip the expensive fresh produce section! Frozen vegetables are picked at peak ripeness and flash-frozen, making them more nutritious than "fresh" produce that's been sitting for days. Look for bags with peas, carrots, corn, and green beans. If you have fresh vegetables starting to wilt, throw those in too.
Yellow onion (1 large): The foundation of flavor. Store onions in a cool, dark place (not the fridge) and they'll last for months. Buy them in bulk bags rather than individual onions for significant savings.
Potatoes (2 medium): Adds bulk and makes this pot pie extra filling. I use russet potatoes because they're cheapest, but any variety works. No need to peel if you scrub them well—the skins add fiber and nutrients.
Butter (4 tablespoons): For making the roux that thickens our filling. You can substitute with vegetable oil if butter is too expensive, but butter adds better flavor.
All-purpose flour (⅓ cup): The thickening agent for our sauce. Same flour as the crust keeps things simple and affordable.
Chicken broth (2 cups): Store-brand broth works perfectly. I often use Better Than Bouillon paste mixed with water—it's cheaper per serving than boxed broth and takes up less space. Keep an eye out for sales and stock up when it's discounted.
Milk (½ cup): Makes the sauce creamy and rich. Any milk works—from whole to skim, or even evaporated milk in a pinch. For a dairy-free version, use unsweetened plant milk.
Salt, pepper, thyme (1 teaspoon each): These humble seasonings transform simple ingredients into something spectacular. Dried thyme is inexpensive and lasts forever. Fresh thyme is lovely if you have it growing in your garden.
How to Make Budget Friendly Chicken Pot Pie with Flaky Crust Topping
Make the Flaky Crust
In a large bowl, whisk together 2½ cups flour and 1 teaspoon salt. Cut 1 cup cold butter into small cubes and add to the flour. Using your fingertips (not warm hands), quickly work the butter into the flour until it resembles coarse crumbs with some pea-sized pieces remaining. This creates those signature flaky layers. Drizzle ¼ cup ice-cold vodka and ¼ cup ice water over the mixture. Using a fork, gently toss until the dough just comes together—don't overmix! Divide into two balls (one slightly larger than the other), wrap in plastic wrap, and refrigerate for at least 1 hour or up to 3 days. The vodka prevents gluten formation, ensuring tender, flaky results every time.
Prepare Your Baking Dish
While the dough chills, grab your baking dish. I use a 9×13-inch glass baking dish because it makes 6-8 generous servings, but any 2-3 quart baking dish works. Lightly grease it with butter or cooking spray. If you're making this for a potluck, disposable aluminum pans are perfect for easy transport and zero cleanup. Pro tip: place your baking dish on a foil-lined baking sheet to catch any potential overflow during baking.
Cook the Aromatic Base
Heat a large skillet over medium heat and add 1 tablespoon butter. Dice your onion and sauté for 3-4 minutes until softened and fragrant. Add the diced potatoes (cut into ½-inch cubes) and cook for another 5 minutes, stirring occasionally. The potatoes will start to develop golden edges, creating a flavor base that's far superior to simply boiling everything together. Season with a pinch of salt to draw out moisture and concentrate flavors. This step builds the foundation of your filling—don't rush it!
Create the Perfect Roux
Push the vegetables to one side of the skillet and add 3 tablespoons butter to the cleared space. Once melted, sprinkle ⅓ cup flour over the butter and whisk constantly for 2 minutes. This creates a roux that will thicken your filling to the perfect consistency. You want to cook out the raw flour taste while maintaining a pale blonde color. Gradually whisk in 2 cups chicken broth, ensuring no lumps form. The mixture will thicken dramatically—this is exactly what you want! Add ½ cup milk and continue whisking until smooth and creamy.
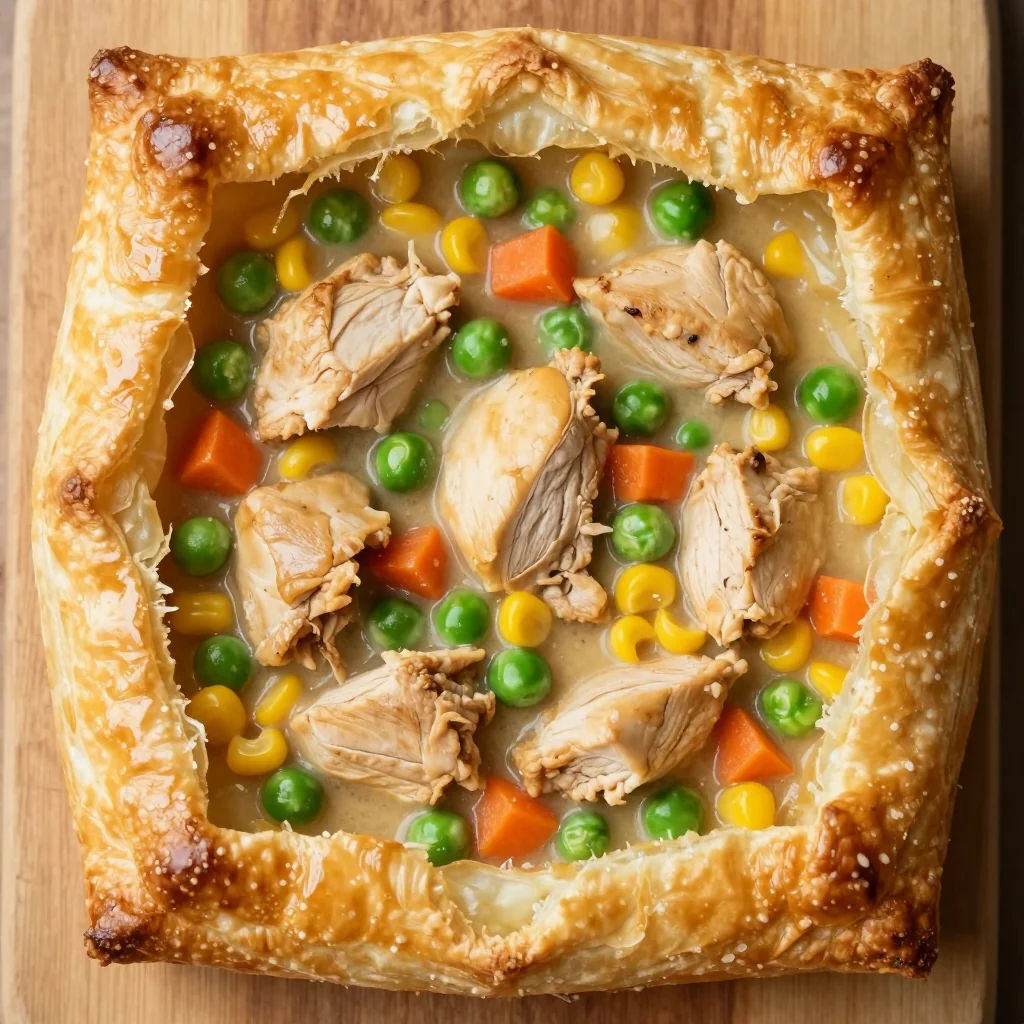
Build the Filling
Add your cooked chicken, frozen vegetables, thyme, salt, and plenty of black pepper to the sauce. Stir gently to combine without breaking up the chicken too much. Let everything simmer together for 5 minutes so the flavors can meld. Taste and adjust seasoning—this is your chance to ensure the filling is properly seasoned before it goes under the crust. The filling should be thick but still spoonable; if it's too thick, add a splash of broth or milk. Remove from heat and let cool slightly while you roll out the crust.
Roll Out the Bottom Crust
Remove the larger piece of dough from the refrigerator. On a lightly floured surface, roll it into a rectangle about 2 inches larger than your baking dish on all sides. Transfer the dough to the dish by rolling it onto your rolling pin, then unrolling it over the dish. Gently press the dough into the corners and up the sides, leaving some overhang. Don't worry if it tears—just patch it with extra dough. The vodka makes this crust extra forgiving and easy to work with.
Assemble and Top
Pour the slightly cooled filling into the crust-lined dish, spreading it evenly. Roll out the second piece of dough to fit the top. Place it over the filling, then trim both crusts together, leaving about 1 inch of overhang. Fold this overhang under itself and crimp the edges to seal. Use a sharp knife to cut several steam vents in the top—get creative with decorative patterns! This prevents the filling from bursting through the crust and creates those beautiful golden peaks.
Bake to Golden Perfection
Preheat your oven to 425°F (220°C). Place the assembled pot pie on the middle rack and bake for 35-45 minutes until the crust is deep golden brown and the filling is bubbling up through the vents. If the edges brown too quickly, cover them with foil. Let the pot pie rest for 15 minutes before serving—this allows the filling to set and prevents molten lava burns. The aroma will drive you crazy, but patience is rewarded with perfect slices that hold their shape.
Expert Tips
Keep Everything Cold
The secret to flaky crust is keeping the butter cold. I freeze my butter for 15 minutes before cutting it in, and I use ice-cold vodka straight from the freezer. If your kitchen is warm, chill your flour bowl too. Warm ingredients lead to tough, greasy crust—every baker's nightmare!
Double Your Batch
Always make a double batch of crust and freeze half. Wrap it well in plastic wrap, then foil, and freeze for up to 3 months. Having ready-made crust means you can whip up pot pies, quiches, or fruit pies whenever inspiration strikes. Label with the date and contents!
Prevent Soggy Bottoms
Nobody likes a soggy bottom! Brush the bottom crust with beaten egg white before adding the filling. The protein creates a moisture barrier that keeps the crust crisp. Alternatively, pre-bake the bottom crust for 10 minutes at 375°F before adding the filling.
Stretch Your Chicken
Make your chicken go further by mixing it with sautéed mushrooms or additional vegetables. The umami from mushrooms provides meaty satisfaction while costing a fraction of chicken. This is especially helpful when meat prices spike or you're feeding a crowd.
Temperature Matters
Use an instant-read thermometer to check doneness. The filling should reach 165°F (74°C) for food safety. If the crust is browning too quickly, reduce heat to 375°F and continue baking until the filling reaches the proper temperature.
Freeze Individual Portions
Make pot pies in muffin tins or mini loaf pans for perfectly portioned freezer meals. Wrap each cooled pie in foil, then freeze. Reheat from frozen at 350°F for 25-30 minutes. These make excellent grab-and-go lunches or quick dinners.
Golden Egg Wash
For that bakery-perfect golden crust, brush the top with an egg wash made from 1 egg beaten with 1 tablespoon water. For extra shine, brush twice—once before baking and again during the last 10 minutes of baking time.
Leftover Magic
Transform leftovers into new meals! Dice leftover pot pie and fold into scrambled eggs for breakfast, or crumble over salads for lunch. The flavors actually improve after a day in the refrigerator, making leftovers something to look forward to.
Variations to Try
Seafood Pot Pie
Swap chicken for a mix of frozen shrimp (thawed) and canned salmon or tuna. Add Old Bay seasoning and replace thyme with dill. This elegant variation costs about the same but feels special enough for company dinner parties.
Vegetarian Deluxe
Replace chicken with chickpeas and add extra vegetables like zucchini, bell peppers, and spinach. Use vegetable broth instead of chicken broth. Add smoked paprika for depth that mimics the richness of meat.
Mexican-Inspired
Add cumin, chili powder, and oregano to the filling. Use pepper jack cheese, black beans, corn, and diced green chilies. Top with crushed tortilla chips mixed into the crust for extra crunch and flavor.
Thanksgiving Leftovers
Use leftover turkey, stuffing, and vegetables from holiday meals. Add a splash of white wine to the sauce and some dried sage. This transforms holiday leftovers into something entirely new that doesn't feel like leftovers at all.
Storage Tips
Refrigerator Storage
Cool leftover pot pie completely, then cover tightly with plastic wrap or transfer to airtight containers. Store in the refrigerator for up to 4 days. For best results, reheat individual portions in a 350°F oven for 15-20 minutes until heated through. The microwave works in a pinch but will make the crust soggy. To maintain crispness, reheat in a skillet over medium heat, covered, for 5-7 minutes per side.
Freezing Instructions
Unbaked pot pie: Assemble completely, wrap tightly in plastic wrap, then foil. Freeze for up to 3 months. Bake from frozen at 375°F for 60-75 minutes, covering with foil if the crust browns too quickly.
Baked pot pie: Cool completely, then wrap and freeze for up to 2 months. Reheat from frozen at 350°F for 45-55 minutes until heated through.
Individual portions: Freeze in muffin tins or mini loaf pans. Once solid, transfer to freezer bags. Reheat from frozen at 350°F for 25-30 minutes.
Make-Ahead Strategy
The filling can be made up to 3 days ahead and stored in the refrigerator. The crust dough can be made up to 3 days ahead or frozen for 3 months. Assembled pot pies (unbaked) can be refrigerated for up to 24 hours before baking—perfect for entertaining! Simply add 10-15 minutes to the baking time if starting from cold.
Frequently Asked Questions
Absolutely! While homemade crust is more economical and flavorful, store-bought crust works perfectly when you're short on time. Look for the refrigerated rolled crusts rather than frozen shells—they're easier to work with for a top-and-bottom crust pot pie. Let the refrigerated crust sit at room temperature for 15 minutes before unrolling to prevent cracking. For extra flavor, brush with egg wash and sprinkle with everything bagel seasoning before baking.
If your filling is too thin, you have several options. The easiest is to simmer it longer before adding to the crust—this reduces the liquid through evaporation. You can also mix 1 tablespoon cornstarch with 2 tablespoons cold water and stir it into the hot filling, cooking until thickened. Alternatively, add instant mashed potato flakes (start with 2 tablespoons) which thicken while adding subtle potato flavor. For future batches, ensure your roux cooks for 2 full minutes before adding liquid, and remember the filling thickens as it cools.
Yes, but you'll need to adjust the recipe. A standard 9-inch pie plate holds about half the filling of a 9×13 dish. Halve the filling ingredients, but make the full crust recipe—you'll just have extra dough for decorative cutouts or mini hand pies. The baking time remains similar, but start checking at 30 minutes. The deeper filling in a pie plate takes longer to heat through, so ensure the center is bubbling before removing from the oven.
No vodka? No problem! Substitute with an equal amount of ice-cold water plus 1 tablespoon white vinegar or lemon juice. The acid serves a similar purpose to vodka, inhibiting gluten formation for tender crust. Some bakers swear by using cold beer or white wine for extra flavor. If you must skip alcohol entirely, use all ice water, but work quickly and handle the dough minimally to prevent toughness.
Your pot pie is perfectly baked when three things happen: the crust is deep golden brown (not pale blonde), you can see the filling bubbling up through the steam vents, and the internal temperature reaches 165°F (74°C). The crust should sound hollow when tapped. If the edges brown too quickly before the center is done, cover them with foil strips and continue baking. Let it rest for 15 minutes before serving—this crucial step allows the filling to set properly.
Yes! For the crust, substitute the all-purpose flour with a 1:1 gluten-free flour blend that contains xanthan gum (like Bob's Red Mill or King Arthur). The vodka trick works even better here, as gluten-free crusts tend to be more delicate. For the filling, replace the flour with an equal amount of cornstarch or arrowroot powder, or skip the roux entirely and thicken with 2 tablespoons of instant mashed potato flakes. The result won't be quite as rich, but still delicious and safe for those with celiac disease.
Budget Friendly Chicken Pot Pie with Flaky Crust Topping
Ingredients
Instructions
- Make the crust: Combine flour and salt, cut in cold butter until crumbly. Add vodka and ice water, mix until just combined. Divide, wrap, and chill 1 hour.
- Prepare filling: Sauté onion and potatoes in butter for 5 minutes. Add remaining butter and flour, cook 2 minutes to make a roux.
- Create sauce: Gradually whisk in chicken broth and milk. Simmer until thickened, then add chicken, vegetables, and seasonings.
- Assemble: Roll out bottom crust and fit into 9×13 dish. Pour in filling, top with second crust, seal edges, and cut steam vents.
- Bake: Bake at 425°F for 35-45 minutes until golden brown and bubbly. Rest 15 minutes before serving.
Recipe Notes
For extra flaky crust, brush with egg wash and sprinkle with everything bagel seasoning. The pot pie can be assembled and frozen unbaked for up to 3 months. Bake from frozen at 375°F for 60-75 minutes.