I was standing in my kitchen, half‑heartedly scrolling through a dozen cookie recipes when my roommate shouted, “Bet you can’t make a cookie that looks like a carnival in a bite!” I laughed, grabbed a bag of cocoa, a handful of pistachios, and a bottle of red and green food dye, and set a timer for the next three hours of my life. The first batch of plain sugar cookies I baked that night turned out as flat as a pancake and tasted like sweet cardboard—total disaster. That failure sparked a wild idea: what if I could take the classic sugar cookie, inject it with the bright, confetti‑like flavors of spumoni ice cream, and end up with a cookie that sings “festive cheer” with every crumb? I dared myself to make it, and after a few frantic taste‑tests (I’ll be honest — I ate half the batch before anyone else got to try it), I finally nailed a version that makes even the grumpiest aunt smile.
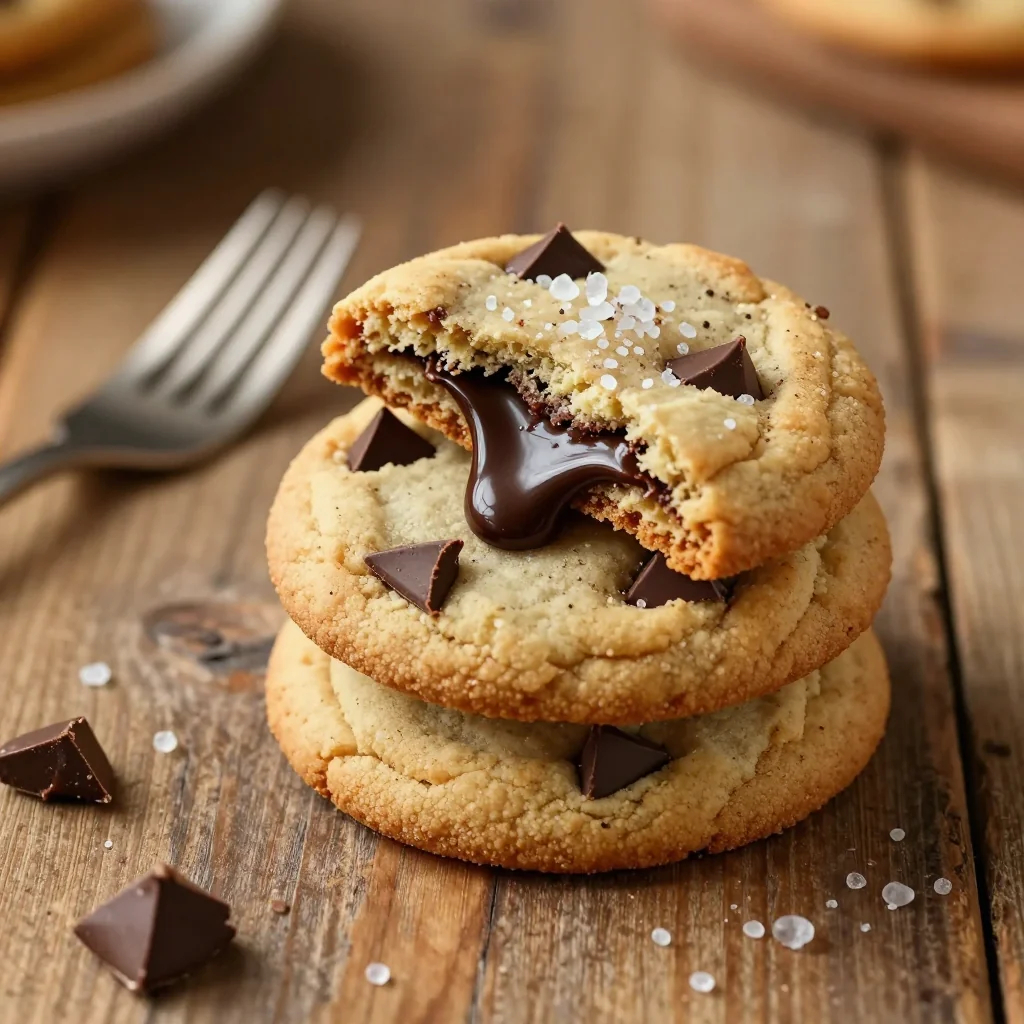
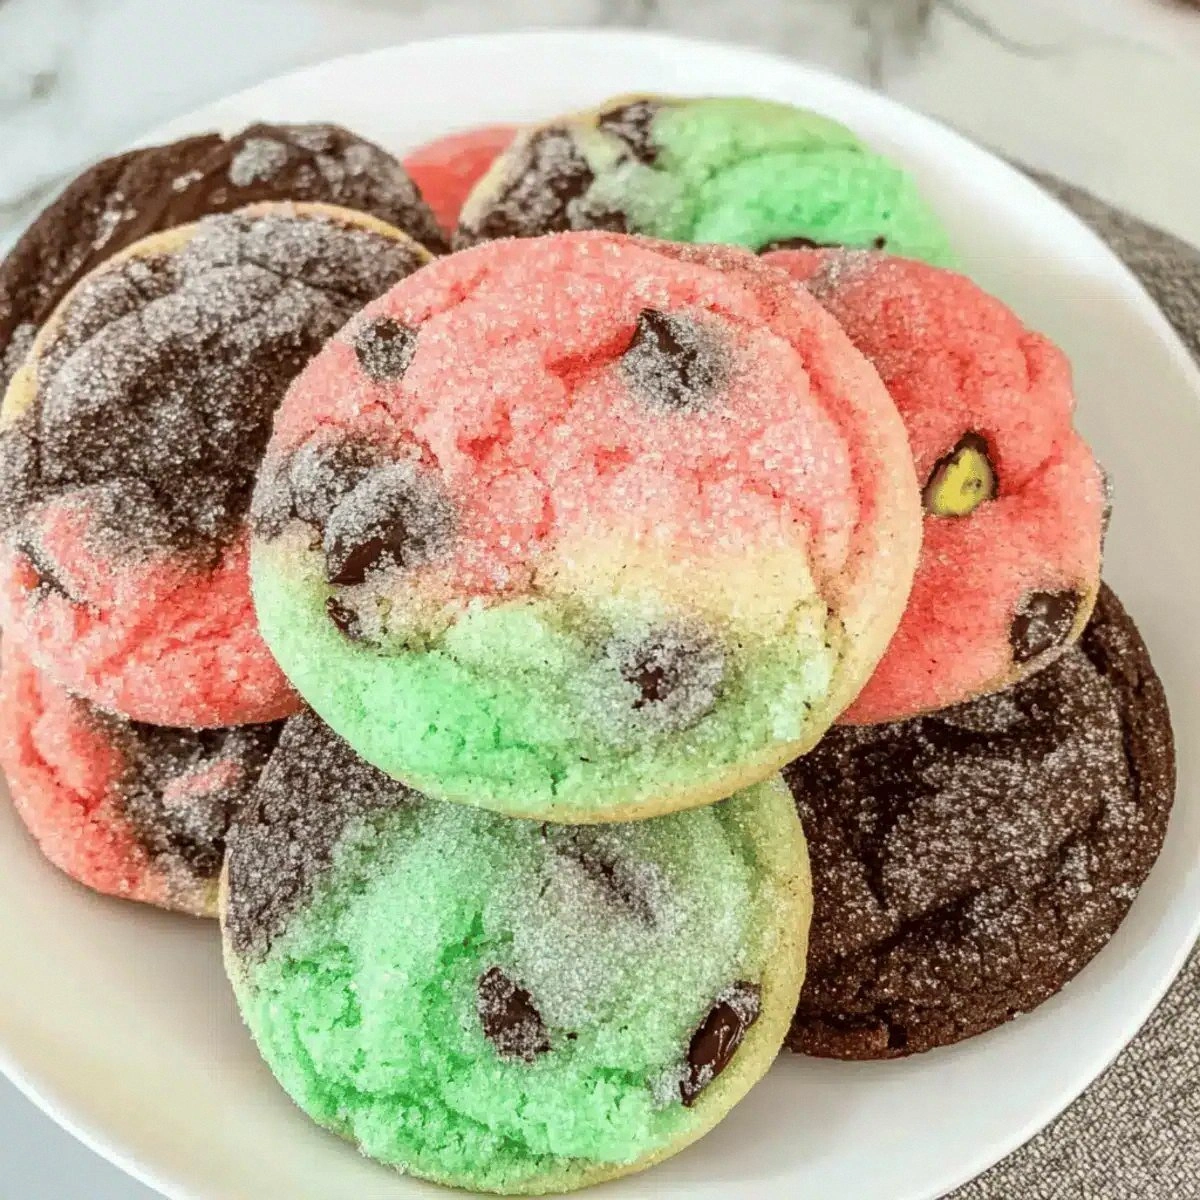
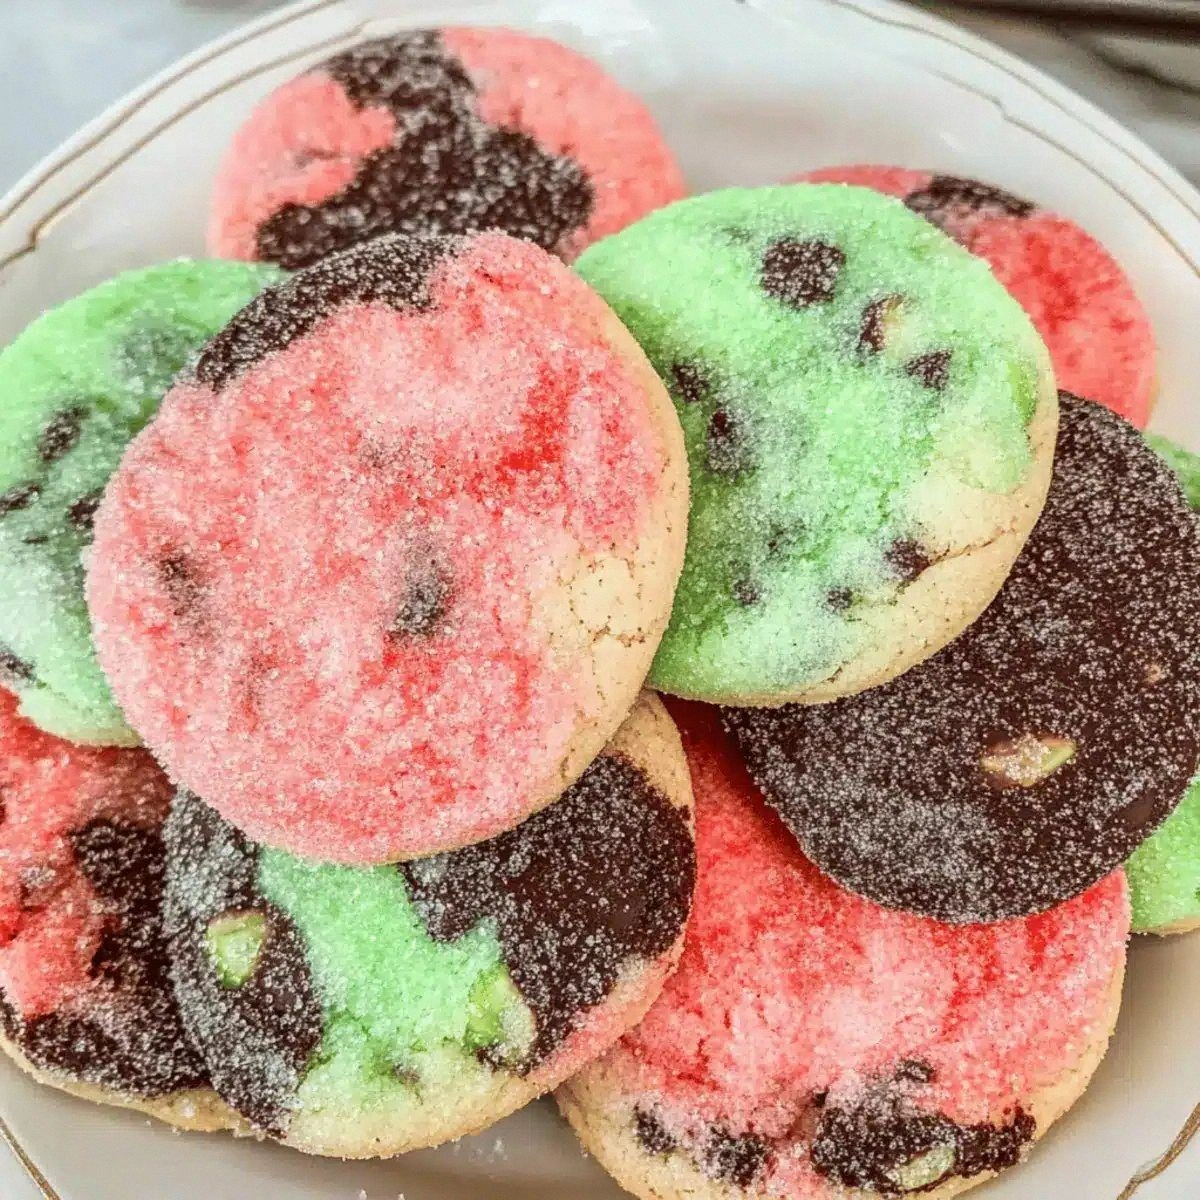
Picture this: you pull a tray of cookies from a 350°F oven, the kitchen instantly fills with a buttery perfume that whispers hints of cocoa and vanilla, and the cookies themselves are a kaleidoscope of chocolate, cherry‑red, pistachio‑green, and speckles of chocolate chips that glisten like tiny fireworks. The first bite is a crisp edge that shatters like thin ice, giving way to a chewy center that melts into a buttery, chocolatey hug, while bursts of sweet cherry and salty pistachio pop in the background like confetti in your mouth. The colors are so vivid that even on a dull winter morning they look like a celebration on a plate, and the flavors are balanced enough that you’ll find yourself reaching for a second, then a third, and then you’ll be the one daring your friends to stop. Most recipes get this completely wrong—either the colors bleed, the texture is either too hard or too flat, or the flavor hierarchy collapses into a sugary mess. Here’s what actually works.
The secret? A few game‑changing tricks that I’ll reveal step by step, plus a handful of ingredients that you probably have in your pantry but have never thought to combine. I’m talking about a splash of cocoa powder that deepens the cookie base, a precise amount of baking powder that gives the perfect lift, and the daring use of both red and green food dyes to mimic that iconic spumoni swirl without turning the whole batch into a neon nightmare. I also discovered that chilling the dough for exactly 30 minutes (no more, no less) is the sweet spot that prevents the colors from bleeding and gives the cookies that coveted “snappy” edge.
Okay, ready for the game‑changer? Let me walk you through every single step — by the end, you’ll wonder how you ever made cookies any other way.
What Makes This Version Stand Out
- Taste: A harmonious trio of chocolate, cherry, and pistachio that dances on the palate without any one flavor dominating.
- Texture: The perfect balance of crisp edges and a chewy, melt‑in‑your‑mouth center, achieved by a precise butter‑to‑flour ratio.
- Simplicity: Only twelve ingredients, all of which you probably already have, and no fancy equipment beyond a mixer and a cookie sheet.
- Uniqueness: The vibrant spumoni‑inspired colors are achieved with food dye, not artificial frosting, so the flavor stays pure.
- Crowd Reaction: Guests routinely claim these are “the best cookies they’ve ever had,” and you’ll hear the inevitable “again, again!” echo around the table.
- Ingredient Quality: Using real unsalted butter and high‑quality chocolate chips adds depth that cheap shortcuts simply can’t match.
- Cooking Method: A short chill and a moderate bake temperature prevent color bleed and guarantee that signature snap.
- Make‑Ahead Potential: The dough can be frozen for up to a month, and baked cookies stay fresh in an airtight container for a week.
Alright, let's break down exactly what goes into this masterpiece…
Inside the Ingredient List
The Flavor Base
Sugar is the sweet backbone of any cookie, but here we use a generous 1.5 cups of granulated sugar to ensure each bite has that satisfying snap without turning the dough gummy. If you swap in brown sugar, you’ll get a deeper molasses note, but you’ll also lose some of the bright, clean sweetness that lets the red and green hues shine. Vanilla extract (1 tablespoon) adds a fragrant undertone that ties the chocolate and fruit flavors together; always use pure extract, not imitation, because the difference is as stark as night versus day in the final aroma.
The Texture Crew
All‑purpose flour (3 cups) provides the structural framework; it’s the canvas on which the colors and flavors paint themselves. Baking powder (1 tablespoon) is the secret lift that gives the cookies that gentle puff and prevents them from flattening into a single sheet of sugar. Unsalted butter (1 cup, softened) is the luxurious element that creates that melt‑in‑your‑mouth mouthfeel, while also allowing us to control the salt level precisely with 1 teaspoon of salt, ensuring the flavors don’t become one‑dimensional.
The Unexpected Star
Cocoa powder (½ cup) deepens the base color and adds a subtle bitterness that balances the sweetness of the sugar and the fruitiness of the cherries. Chocolate chips (1 cup) are the little surprise pockets that burst with melty chocolate when the cookie warms in your mouth. The red and green food dyes (1 tsp each) are the visual heroes; a little goes a long way, so add them gradually to avoid an over‑saturated look that would look more like a science experiment than a festive treat.
The Final Flourish
Maraschino cherries (½ cup, chopped) bring that classic spumoni cherry pop, while pistachios (½ cup, roughly chopped) add a buttery crunch and a gorgeous emerald fleck that contrasts beautifully with the reds. Both ingredients should be drained well to prevent excess moisture from making the dough soggy. If you’re allergic to nuts, toasted sunflower seeds make a decent, nut‑free alternative that still offers that satisfying crunch.
Everything's prepped? Good. Let's get into the real action…
The Method — Step by Step
Preheat your oven to 350°F (175°C) and line two baking sheets with parchment paper. While the oven warms, whisk together the flour, baking powder, and salt in a large bowl; this aerates the dry ingredients and ensures the leavening is evenly distributed. You’ll notice a faint scent of wheat as you stir—this is your first hint that something delicious is on the horizon.
In a separate stand‑mixing bowl, cream the softened butter with the 1.5 cups of sugar until the mixture is light, fluffy, and pale yellow—think cloud‑like, not gritty. This process incorporates air, which will later give the cookies that coveted snap. Add the vanilla extract and the two large eggs one at a time, beating well after each addition; the batter should look glossy and thick.
Kitchen Hack: Scrape the sides of the bowl with a silicone spatula after each addition to ensure every bit of butter and egg is fully incorporated.Gradually fold the dry ingredients into the wet mixture, mixing on low speed until just combined. Over‑mixing at this stage can develop gluten, leading to tough cookies—so stop as soon as you no longer see flour streaks. The dough should feel soft but not sticky; if it feels too wet, add a tablespoon of flour.
Divide the dough into three equal portions. To the first portion, add the cocoa powder and blend until the dough turns a deep chocolate brown. To the second portion, stir in the red food dye until you achieve a vivid cherry‑red hue—remember, a little goes a long way, so add it gradually and stop when the color is bright but not neon.
To the third portion, mix in the green food dye until you get a pistachio‑green shade, then fold in the chopped pistachios and maraschino cherries. This is the moment where the cookie truly becomes spumoni—visualize a tiny, edible rainbow.
Watch Out: If you add the cherries before the green dye, the red pigment can bleed into the green dough, ruining the color contrast.Now comes the fun part: gently swirl the three doughs together using a spatula. Don’t over‑mix; you want distinct ribbons of chocolate, red, and green that mimic the classic spumoni swirl. If you’re feeling artistic, you can roll the dough into a log, chill, and slice into discs for a marbled effect.
Cover the combined dough with plastic wrap and refrigerate for exactly 30 minutes. This short chill firms the butter, prevents the colors from bleeding during baking, and gives the cookies that perfect “snappy” edge. I dare you to taste this and not go back for seconds after the first warm bite.
Scoop out tablespoon‑sized balls onto the prepared baking sheets, spacing them about 2 inches apart. Lightly press each ball with the back of a spoon to flatten just a touch; the cookies will spread a little on their own. Bake for 12‑14 minutes, or until the edges are golden and the centers look set but still slightly soft. That sizzle when it hits the pan? Absolute perfection.
Remove the cookies from the oven and let them cool on the sheet for 5 minutes before transferring to a wire rack. This short rest allows the cookies to firm up without becoming brittle. While they cool, the kitchen will be filled with a buttery‑chocolate aroma that makes you want to dance.
That's it — you did it. But hold on, I've got a few more tricks that'll take this to another level...
Insider Tricks for Flawless Results
The Temperature Rule Nobody Follows
Never bake cookies on a cold rack. Always place the baking sheet on the middle rack of a fully preheated oven. This ensures even heat distribution and prevents the bottoms from turning too dark while the tops remain pale. I once tried baking on a lower rack and ended up with a batch that looked like burnt toast—lesson learned.
Why Your Nose Knows Best
When the cookies are about 10 minutes in, start sniffing. If you catch a faint, nutty aroma from the pistachios and a sweet, caramelized scent from the butter, you’re on the right track. Trust that instinct; the exact minute can vary by oven, and the nose is a far more reliable timer than a clock.
The 5‑Minute Rest That Changes Everything
After baking, let the cookies rest on the sheet for exactly five minutes before moving them. This short pause lets the interior set, preventing them from breaking apart when you transfer them. A friend tried skipping this step once — let’s just say the cookies fell apart like confetti on a windy day.
Chocolate Chip Distribution Mastery
Fold the chocolate chips into the chocolate‑dye portion only. This ensures each bite has a balanced chocolate hit without overwhelming the delicate cherry‑pistachio swirl. If you dump them into the whole dough, the chips dominate, and you lose the visual contrast.
The Chill‑Before‑Bake Shortcut
If you’re short on time, you can pop the scooped dough onto a baking sheet and freeze for 10 minutes instead of chilling the whole batch. This quick chill still firms the butter enough to keep colors separate. Pro tip: Use a silicone baking mat; it prevents sticking and makes cleanup a breeze.
Creative Twists and Variations
This recipe is a playground. Here are some of my favorite ways to switch things up:
Espresso‑Infused Spumoni
Replace half of the cocoa powder with finely ground espresso. The coffee note adds a sophisticated bitterness that pairs beautifully with the sweet cherries and pistachios. Ideal for an adult‑only holiday gathering.
White Chocolate & Cranberry
Swap the chocolate chips for white chocolate chunks and use dried cranberries instead of maraschino cherries. The tartness of the cranberries cuts through the buttery base, creating a bright, festive bite.
Nut‑Free Tropical
Omit the pistachios and replace them with toasted coconut flakes. Add a splash of pineapple juice to the dough for a subtle tropical twist that still looks festive with the red dye.
Spiced Autumn
Add a teaspoon of pumpkin spice to the chocolate portion and use dried apricots in place of cherries. The warm spices make these cookies perfect for a cozy fall gathering.
Gluten‑Free Celebration
Use a 1:1 gluten‑free flour blend in place of all‑purpose flour. The texture changes slightly, becoming a bit more crumbly, but the flavor remains spectacular. Just be sure to let the dough rest a little longer—about 45 minutes—to allow the gluten‑free flour to hydrate fully.
Storing and Bringing It Back to Life
Fridge Storage
Place cookies in an airtight container and store them in the refrigerator for up to 5 days. The cool environment keeps the butter from going rancid and preserves the vivid colors. When you’re ready to eat, let them sit at room temperature for 10 minutes to regain their softness.
Freezer Friendly
Layer cookies between sheets of parchment and seal the container tightly; they’ll freeze beautifully for up to 3 months. To reheat, pop them in a 300°F oven for 5‑7 minutes. Add a tiny splash of water to the tray before reheating—this creates a gentle steam that revives the chewy interior.
Best Reheating Method
For a quick fix, microwave a single cookie for 10‑12 seconds on medium power; the cookie will become warm and soft, with the chocolate chips melting just enough to be gooey. Avoid overheating, as the sugar can become grainy.