I still remember the exact moment I decided that ordinary caramel apples just weren’t cutting it anymore. It was a rainy Saturday, the kind where the clouds look like they’re about to pour a whole kettle of chocolate over the world, and I was stuck inside watching my niece stare longingly at a bag of store‑bought candy‑coated apples that tasted like plastic. I dared her to bite one, and she gave me that look—half‑hopeful, half‑skeptical—like, “Can you really make something better?” I laughed, grabbed a skillet, and whispered to the empty kitchen, “Watch me turn this into the best version you’ll ever taste.” That night, the whole house smelled like a caramel‑laden carnival, the kind of scent that makes you think of cotton candy clouds and buttery popcorn all at once.
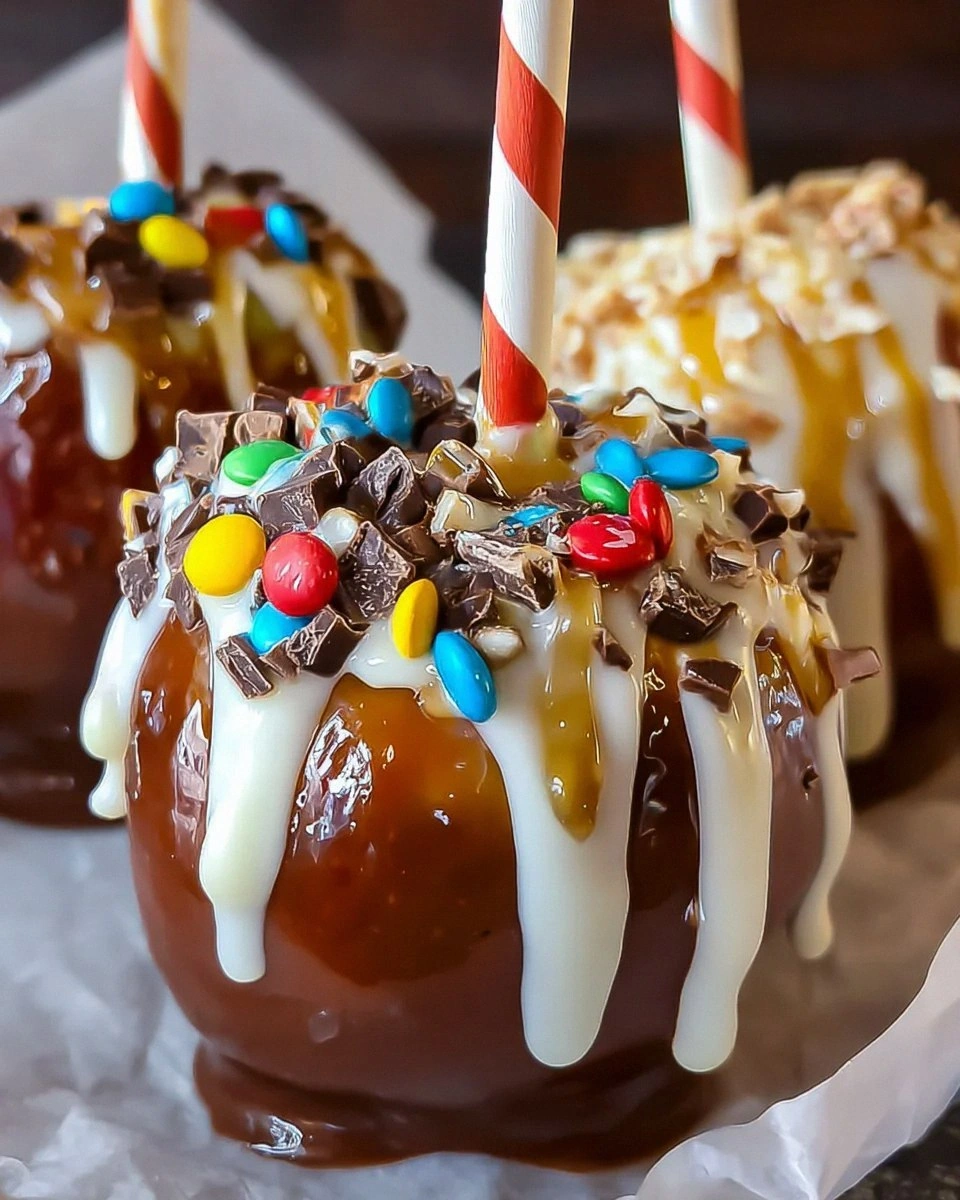
Fast forward a few weeks, and the result is a glossy, candy‑coated masterpiece that makes the ordinary apple look like a shy wallflower at a rave. Imagine a crisp, tart apple that’s been drenched in buttery caramel that clings like a second skin, then rolled in a shimmering coat of chocolate that snaps with a satisfying crack—like biting into a tiny, edible fireworks display. The moment you bite, the caramel stretches in slow‑motion ribbons, the chocolate shatters, and the apple’s fresh crunch bursts through, creating a symphony of textures that dance across your palate. I’ll be honest — I ate half the batch before anyone else got to try it, and that’s because every bite feels like a tiny, indulgent victory.
Most recipes get this completely wrong. They either skimp on the caramel, leaving you with a soggy apple that feels more like a wet sock, or they drown the fruit in candy coating so thick you can’t taste the apple at all. This version, however, strikes a perfect balance: a silky caramel base that’s buttery without being greasy, a candy coating that’s crisp yet melt‑in‑your‑mouth, and a sprinkle of salty crunch that elevates every flavor. I dare you to taste this and not go back for seconds, because once you’ve experienced the perfect harmony of sweet, salty, and tart, ordinary apples will never satisfy you again.
Let me walk you through every single step — by the end, you’ll wonder how you ever made it any other way. Okay, ready for the game‑changer? We’re about to dive into a technique that involves a quick flash‑cook of the caramel to lock in flavor and a secret cooling trick that makes the candy coating set like glass. Picture yourself pulling these beauties out of the oven, the whole kitchen smelling incredible, the glossy coating catching the light like tiny mirrors. Stay with me here — this is worth it.
What Makes This Version Stand Out
- Flavor Explosion: The caramel is infused with a hint of sea‑salt and vanilla, giving it a depth that rivals boutique confectioneries, while the chocolate coating adds a rich, velvety finish that makes each bite unforgettable.
- Texture Symphony: You get a crisp apple core, a buttery caramel that stretches like taffy, a crunchy candy coating that shatters like thin ice, and a final sprinkle of pretzel bits for that satisfying snap.
- Simplicity Meets Sophistication: Despite the gourmet vibe, the ingredient list is short, the steps are straightforward, and the equipment is everyday kitchen gear—no fancy torches required.
- Unique Ingredient Twist: A splash of heavy cream in the caramel creates a silk‑smooth texture that most recipes miss, and the addition of toasted pecans adds a buttery nuttiness that elevates the whole creation.
- Crowd Reaction: These apples disappear in minutes at parties, and the “wow” factor is so high that even the most skeptical guest will ask for the recipe (and probably steal a few).
- Ingredient Quality: Using fresh, crisp apples and high‑quality chocolate ensures that each component shines, turning a simple snack into a dessert worthy of a fine‑dining menu.
- Cooking Method: The flash‑cook caramel technique locks in flavor without burning, while the quick dip in melted chocolate guarantees a glossy finish without a grainy texture.
- Make‑Ahead Potential: You can prep the caramel and chocolate coating a day ahead, store them separately, and assemble the apples just before serving for ultimate convenience.
Inside the Ingredient List
The Flavor Base
Heavy cream (1 cup) is the secret weapon that transforms ordinary caramel into a buttery silk that coats the apple like a second skin. The cream’s fat content slows the crystallization of sugar, giving the caramel a glossy sheen and a melt‑in‑your‑mouth feel. If you skip the cream, you’ll end up with a grainy, brittle caramel that cracks under the slightest pressure. As a swap, you can use half‑and‑half, but expect a slightly thinner coating.
Unsalted butter (½ cup) adds richness and a subtle nutty aroma that rounds out the caramel’s sweetness. Butter also helps the caramel set at room temperature, preventing it from becoming too runny. Opt for European‑style butter for an extra buttery punch, or use ghee if you need a lactose‑free version.
Brown sugar (1 cup) provides the deep molasses flavor that distinguishes caramel from plain sugar syrup. Its moisture content ensures the caramel stays soft and pliable. If you’re watching sugar, you can replace half of it with coconut sugar, but the flavor will shift toward a more caramelized, almost toasty profile.
The Texture Crew
Light corn syrup (½ cup) is the unsung hero that prevents crystallization, keeping the caramel glossy and smooth. It also adds a subtle sweetness that balances the salt and butter. In a pinch, you can substitute with honey or agave nectar, though the final texture may be slightly stickier.
Sea salt (½ tsp) is sprinkled into the caramel to create that magical sweet‑and‑salty contrast that makes taste buds dance. A pinch more can turn the flavor profile into a gourmet experience, while too much will overpower the delicate apple. Use flaky sea salt for a burst of crunch, or fine kosher salt for an even distribution.
Crushed pretzels (½ cup) and toasted pecans (¼ cup) are rolled into the final coating to add a surprising crunch that shatters like thin ice when you bite. The pretzel’s salty crunch pairs perfectly with the caramel’s sweetness, while the pecans contribute a buttery nuttiness. If you’re allergic to nuts, substitute with toasted pumpkin seeds.
The Unexpected Star
Candy‑coated chocolate chips (2 cups) are the glossy armor that turns a simple apple into a show‑stopper. The chocolate’s cocoa butter content gives it a snap that’s both audible and tactile, while the candy coating ensures a smooth, glossy finish that doesn’t melt too quickly. For a twist, use white chocolate or a blend of dark and milk chocolate for a marbled effect.
Vanilla extract (1 tsp) is added at the end of the caramel stage to lift the entire flavor profile, giving it a warm, aromatic backdrop. Real vanilla beans can be used for an even richer taste, but a high‑quality pure extract works just as well.
The Final Flourish
Four large, crisp apples (preferably Granny Smith) are the canvas for our masterpiece. Their firm flesh holds up to the heavy caramel and chocolate without becoming mushy. If you prefer a sweeter apple, try Pink Lady or Fuji, but be aware that the natural sugar will alter the balance, so you may want to reduce the brown sugar slightly.
A tablespoon of butter (for greasing the baking sheet) ensures the apples don’t stick during the final chill, making cleanup a breeze. You can also line the sheet with parchment paper for an extra non‑stick layer.
Optional edible glitter (0 qty) adds a festive sparkle for holidays or special occasions. This is purely decorative, so feel free to skip it if you’re not feeling sparkly.
Everything's prepped? Good. Let's get into the real action…
The Method — Step by Step
- Start by washing the apples thoroughly, then pat them dry with a clean kitchen towel. Insert a sturdy wooden stick into the top of each apple, making sure it’s centered for even coating later. This is the moment of truth: the stick must be firm, or the caramel will slip off. Pro tip: dip the sticks in melted chocolate first; it creates a tiny “anchor” that helps the caramel adhere.
- In a medium saucepan, melt the butter over medium heat until it foams, then stir in the brown sugar and corn syrup. Cook, stirring constantly, until the mixture bubbles and turns a deep amber color—about 4‑5 minutes. That sizzle when it hits the pan? Absolute perfection. The caramel should smell like toasted marshmallows.Watch Out: If the heat is too high, the sugar will scorch and turn bitter. Keep the temperature steady and stir continuously.
- Slowly whisk in the heavy cream, a little at a time, allowing the mixture to bubble up without spilling over. Once fully incorporated, add the vanilla extract and sea salt, stirring until the sauce is smooth and glossy. This step is pure magic; the cream transforms the caramel into a silky river that coats the apple without clumping.
- Place the prepared apples on a parchment‑lined baking sheet and spoon a generous amount of warm caramel over each, allowing it to cascade down the sides. Use a silicone brush to spread the caramel evenly, ensuring every nook is covered. The caramel should be thick enough to cling, but still fluid enough to glide.Kitchen Hack: Chill the caramel for 2 minutes before spreading; it thickens just enough to stay on the apple without dripping.
- Let the caramel‑coated apples sit at room temperature for 5‑10 minutes, then transfer the sheet to the freezer for 15 minutes. This quick chill firms up the caramel, creating a sturdy base for the chocolate coating. While you wait, melt the candy‑coated chocolate chips in a double boiler, stirring until completely smooth and glossy.
- Once the caramel is firm, dip each apple into the melted chocolate, turning it slowly to achieve an even coat. Let any excess chocolate drip back into the bowl, then place the apple back onto the parchment sheet. Sprinkle the crushed pretzels and toasted pecans while the chocolate is still warm, pressing lightly so they adhere. The chocolate should set within 2‑3 minutes, forming a glossy shell that cracks satisfyingly under bite pressure.
- For an extra wow factor, drizzle a thin ribbon of white chocolate over the top or dust with edible glitter if you’re feeling festive. This final flourish not only looks stunning but also adds a subtle flavor contrast that keeps the palate intrigued.
- Allow the finished apples to set at room temperature for 10 minutes, then transfer them to a sealed container. They’re now ready to serve, or you can refrigerate them for up to 3 days. That moment when you pull a glossy, candy‑coated apple from the fridge? Pure joy.
That's it — you did it. But hold on, I've got a few more tricks that'll take this to another level. The next section reveals insider secrets that separate a good caramel apple from a legendary one. Trust me, these tips are the difference between “wow” and “wow, where did you learn this?”
Insider Tricks for Flawless Results
The Temperature Rule Nobody Follows
Never, ever let your caramel exceed 350°F (175°C). Once it passes that threshold, the sugars begin to break down into bitter compounds, and the glossy finish turns matte. Use an instant‑read candy thermometer to keep the temperature in check; it’s a tiny investment for a massive payoff. I once tried to speed things up by turning the heat up, and the result was a burnt, bitter mess that no amount of sea salt could rescue.
Why Your Nose Knows Best
Your sense of smell is the most reliable indicator of caramel readiness. When the mixture starts to emit a deep, buttery aroma reminiscent of toasted marshmallows, you’re in the sweet spot. If you rely solely on color, you might overcook it, as caramel darkens quickly. Trust the nose, and you’ll achieve that perfect, buttery sheen every time.
The 5‑Minute Rest That Changes Everything
After coating the apples in caramel, give them a brief 5‑minute rest before the chocolate dip. This short pause allows the caramel to set just enough to hold the chocolate without sliding off. Skipping this rest often leads to a sloppy, uneven coating that looks more like a kitchen accident than a gourmet treat.
The Double‑Dunk Technique
For an ultra‑smooth chocolate shell, dip each apple twice: first, a quick dunk to create a thin base layer, then let it set for 30 seconds, and dip again for a thicker coat. This double‑dunk creates a professional‑grade finish that cracks cleanly and shines like polished stone.
Cool‑Then‑Store Strategy
If you’re making these ahead of time, store the caramel‑coated apples separately from the chocolate‑coated ones. The caramel can be kept in the freezer for up to a week, while the chocolate coating stays fresh in the fridge for 5 days. When you’re ready to serve, give them a quick 5‑minute room‑temperature sit so the chocolate regains its snap.
Creative Twists and Variations
This recipe is a playground. Here are some of my favorite ways to switch things up:
Spicy Chili Chocolate
Add a pinch of cayenne pepper to the melted chocolate for a subtle heat that contrasts the sweet caramel. The spice awakens the palate and makes the apple feel like a daring adventure. Perfect for those who love a little kick.
Salted Caramel Pretzel Crunch
Swap the toasted pecans for extra crushed pretzels and finish with a light drizzle of flaky sea salt. The extra pretzel crunch amplifies the salty‑sweet balance, turning each bite into a carnival‑fair experience.
Nut‑Free Coconut Delight
Replace the toasted pecans with toasted coconut flakes and use almond‑free chocolate. This variation keeps the texture crunchy while catering to nut allergies, and the coconut adds a tropical aroma that pairs surprisingly well with caramel.
White Chocolate Raspberry Swirl
Melt white chocolate instead of dark, then swirl in a spoonful of raspberry jam before coating the apples. The tangy raspberry cuts through the richness, offering a bright, fruity note that feels like summer in every bite.
Caramel Apple Cheesecake Bites
Use mini apple slices, dip them in caramel, then coat with chocolate and serve atop a bite‑size cheesecake base. This transforms the classic caramel apple into an elegant dessert parfait, perfect for formal gatherings.
Storing and Bringing It Back to Life
Fridge Storage
Place the finished apples in an airtight container lined with parchment paper. They’ll stay fresh for up to 3 days. The chocolate coating may lose a touch of its snap, but a quick 5‑minute room‑temperature rest restores its crunch.
Freezer Friendly
If you need to make a larger batch, store the caramel‑coated apples (without chocolate) in a zip‑top freezer bag for up to 1 week. When you’re ready to finish, dip them in fresh melted chocolate and let them set. This method preserves the apple’s texture and prevents freezer burn.
Best Reheating Method
To revive a chilled apple, place it on a microwave‑safe plate, add a tiny splash (about a teaspoon) of water, and microwave for 10‑12 seconds. The steam generated re‑softens the caramel and restores the chocolate’s glossy sheen without melting it completely.