I still remember the day I almost set my kitchen on fire trying to make caramel. There I was, standing over a bubbling pot of sugar that looked more like volcanic lava than anything edible, thinking I'd ruined dessert for the entire neighborhood. Fast forward through the smoke alarm symphony and my roommate's dramatic evacuation, and I discovered something magical: that bitter, almost-burnt caramel was exactly what these blondies needed. The smoky depth married with buttery sweetness creates something that'll make you question every basic brownie you've ever eaten.
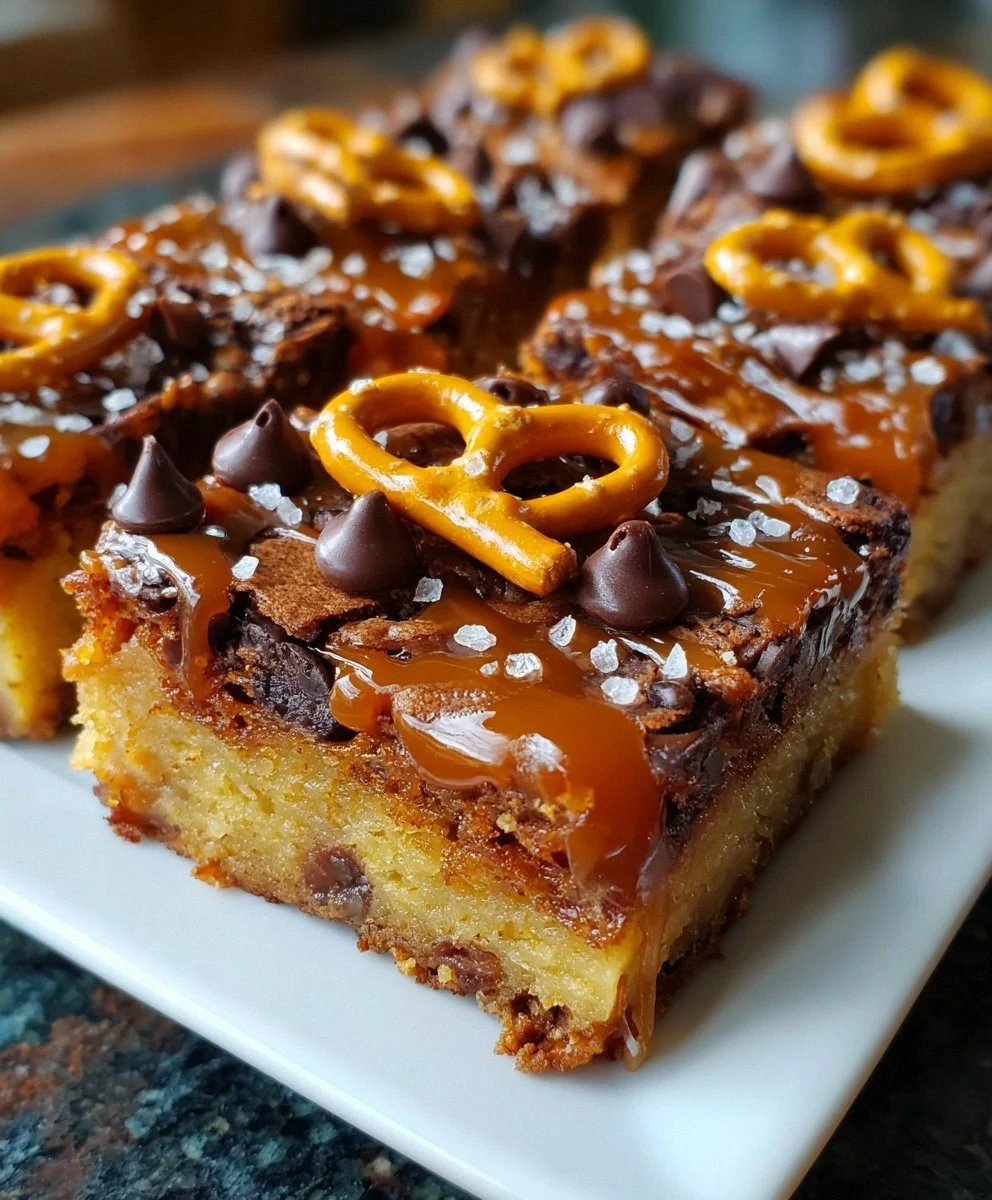
Picture this: it's 11 PM on a Tuesday, you're in your comfiest sweatpants, and the craving hits. Not just any craving — it's that specific need for something that walks the line between salty and sweet, between chewy and crunchy, between "I'll just have one bite" and "where did the whole pan go?" These salted caramel pretzel blondies are the answer to that very specific, very urgent need. They're the dessert equivalent of finding twenty bucks in your winter coat pocket, except better because you can eat them.
I've spent three years perfecting this recipe, testing it on unsuspecting dinner guests, office potlucks, and one very judgmental mother-in-law. The secret isn't just in the ingredients — though we'll get to those beauties — it's in the method. Most recipes treat the caramel as an afterthought, something to drizzle on top like an afterthought. But here's the game-changer: we're layering that liquid gold throughout the entire blondie, creating pockets of molten caramel that burst in your mouth like little sugar bombs. If you've ever struggled with dry, cakey blondies that taste like disappointment, you're not alone — and I've got the fix.
Let me walk you through every single step — by the end, you'll wonder how you ever made it any other way.
What Makes This Version Stand Out
Caramel Infusion: Instead of just a sad drizzle on top, we're creating a marbled masterpiece with ribbons of salted caramel running through every bite. The technique is stupidly simple but makes you look like a pastry wizard. You'll never go back to surface-level caramel again.
Texture Symphony: These aren't just soft or crunchy — they're both. The edges get that delicate crispness that shatters like thin ice, while the center stays gloriously gooey. Add the pretzel crunch and you've got a full orchestra of textures in every square.
Salt Strategy: We're not just throwing salt on top and calling it a day. There's salt in the caramel, salt in the batter, and a final flourish of flaky salt that makes the sweetness sing. It's like turning up the contrast on your taste buds.
One-Bowl Wonder: Despite tasting like they came from a fancy bakery, these come together in one bowl and one pan. No standing mixer, no candy thermometer, no culinary degree required. If you can stir and count to three, you can make these.
Make-Ahead Magic: These actually get better after a day in the fridge. The flavors meld, the caramel settles, and they slice like a dream. Make them Sunday, serve them Friday, and watch everyone assume you're some kind of dessert genius.
Crowd Psychology: I've watched people who claim they "don't really like sweets" go back for thirds. There's something about that salty-sweet combo that bypasses all rational thought. Bring these to work and you'll have new best friends by lunch.
Inside the Ingredient List
The Flavor Foundation
The unsalted butter isn't just providing richness — it's carrying flavor. When you cream it with the brown sugar, you're creating thousands of tiny air pockets that'll expand in the oven, giving you that perfect chewy-yet-tender texture. Skip the cheap stuff here; this is where you taste the difference. I learned this the hard way after making these with discount butter that tasted like it came from a gas station.
Light brown sugar is your best friend for depth. Those molasses notes don't just add sweetness — they bring a complex, almost smoky quality that makes people ask "what's in these?" like you're hiding some secret spice. Don't substitute with white sugar unless you want blondies that taste like sweet cardboard. The moisture from the brown sugar is crucial for that fudgy center.
The Texture Crew
All-purpose flour might seem boring, but it's doing heavy lifting here. Too much and you've got cake, too little and you've got a puddle. The 1:1 ratio with butter is the sweet spot for that brownie-like density. And please, for the love of all things holy, don't pack it into the cup. Spoon it in like you're handling baby birds.
The egg is your binding superhero, but it needs to be room temperature. Cold eggs make the butter seize up into little lumps that never quite incorporate. Leave it on the counter while you prep everything else. If you're impatient (been there), submerge it in warm water for five minutes.
The Unexpected Star
Mini pretzel twists aren't just for decoration — they're structural genius. They stay crispy even after baking, creating these delightful salty surprises. Don't crush them too small; you want recognizable pretzel pieces, not pretzel dust. The salt on the pretzels also migrates into the surrounding blondie, seasoning it from within. It's like having tiny savory bombs throughout.
The Final Flourish
Vanilla bean paste is worth every penny here. Those little black specks aren't just pretty — they're flavor explosions. Each tiny seed carries concentrated vanilla essence that regular extract can't match. If you must use extract, double the amount. The vanilla bridges the gap between the caramel and the pretzels, tying everything together like a good mediator.
The Caramel Situation
Here's where I lose some of you, but stay with me here — this is worth it. Store-bought caramel works in a pinch, but homemade comes together in ten minutes and tastes like liquid gold. The key is patience during the sugar melting phase. It goes from perfect to burnt faster than you can say "smoke alarm," but the flavor payoff is enormous. Plus, you'll have extra for ice cream, coffee, or eating with a spoon while watching Netflix.
Heavy cream needs to be warm when it hits the hot sugar, or you'll get a volcanic reaction that'll splatter molten caramel everywhere. Ask me how I know (and how many kitchen towels I sacrificed). Warm it gently in the microwave for 30 seconds. This isn't optional unless you enjoy cleaning caramel off your ceiling.
Everything's prepped? Good. Let's get into the real action...
The Method — Step by Step
- Preheat your oven to 350°F (175°C) and line an 8x8 pan with parchment paper, leaving wings hanging over the sides. These wings are your lifeline later — they'll let you lift the entire blondie out like a golden, delicious sheet. Don't skip the parchment unless you enjoy chiseling dessert out of your pan with a butter knife while cursing your life choices. While the oven heats, make your caramel if you're going homemade. The sugar should melt slowly over medium heat, swirling (never stirring) until it reaches that perfect amber color that looks like liquid autumn.
- Cream the butter and brown sugar together for a full three minutes. I know, it feels like forever when you're standing there with a hand mixer, but this is where the magic happens. The mixture should turn pale and fluffy, like coffee shop foam but better. Scrape down the sides twice during mixing — there's always a stubborn pocket of unmixed butter hiding in the corners. This step incorporates air, which gives you that perfect chewy-yet-light texture that makes people close their eyes when they take a bite.
- Add the egg and vanilla, beating until completely incorporated. The batter will look like it's broken or curdled at first — this is normal, don't panic. Keep mixing and it'll come together into a smooth, glossy mixture that smells like childhood memories. If it still looks separated after a minute, your egg was probably too cold. Microwave the bowl for ten seconds and keep mixing — it'll smooth out like it never had an attitude.
- Whisk together the flour, baking powder, and salt in a separate bowl. Yes, another dirty dish, but this ensures even distribution. Nobody wants to bite into a pocket of baking powder that tastes like soap. Add this to the wet ingredients and mix just until the last streak of flour disappears. Overmixing develops gluten, which turns your tender blondies into rubbery doorstops. When in doubt, stop mixing — the flour police aren't coming for you.
- Fold in half the pretzels and half the chocolate chips with a spatula, not the mixer. This keeps the pretzels intact and prevents chocolate smears throughout the batter. The remaining pretzels and chips go on top for visual appeal and extra crunch. Don't eat this batter — raw flour is risky, and more importantly, you need it for the blondies. Okay, maybe just a tiny taste. I won't tell.
- Pour half the batter into your prepared pan and spread it to the corners. It'll be thick like brownie batter, so use an offset spatula or the back of a spoon. Don't worry about perfect edges — rustic looks homemade and homemade tastes better. Now comes the fun part: drizzle half your caramel over this layer. Don't just dump it in the center — make pretty swirls and spirals. The caramel will sink and spread during baking, creating those coveted pockets of gooey gold.
- Add the remaining batter on top, dropping it in dollops and gently spreading to cover. Don't press too hard or you'll disturb your caramel artwork underneath. The top layer should completely conceal the caramel — if you see golden peeking through, add more batter. Smooth the top but don't obsess over perfection. Those little swirls and ridges become crispy edges that people fight over.
- Scatter the remaining pretzels and chocolate chips on top, pressing them in slightly so they stick. This isn't just for looks — the exposed pretzels get extra crispy while the buried ones stay chewy. Drizzle the remaining caramel over the top in artistic zigzags. Channel your inner food stylist, but don't overthink it. Even messy caramel tastes like heaven.
- Bake for 25-30 minutes, but start checking at 22. The edges should be golden brown and pulling away from the sides, while the center still jiggles slightly when you shake the pan. This jiggle is crucial — carryover cooking will finish the job. Overbaking is the enemy of fudgy blondies. If a toothpick comes out clean, you've gone too far and made cake. We want moist crumbs clinging to the tester.
- Cool completely in the pan on a wire rack for at least two hours. I know, this feels impossible when your kitchen smells like Willy Wonka's factory, but cutting warm blondies is like trying to slice pudding. They'll fall apart into a delicious mess that still tastes incredible but looks like abstract art. For clean cuts, chill them for 30 minutes after cooling, then lift out using the parchment wings and slice with a sharp knife dipped in hot water.
That's it — you did it. But hold on, I've got a few more tricks that'll take this to another level...
Insider Tricks for Flawless Results
The Temperature Rule Nobody Follows
Your ingredients should all be the same temperature — room temp. This isn't some chef-y nonsense; it's basic chemistry. Cold eggs hitting warm butter makes the fat seize up into tiny lumps that never incorporate properly. Set everything out 30 minutes before you start, or live with lumpy batter that bakes into weird textured blondies. I've tried the shortcut route too many times, and trust me, the 30-minute wait is shorter than the hour you'll spend trying to fix seized batter.
Why Your Nose Knows Best
Don't just rely on the timer — your nose is the best kitchen timer you have. When the blondies are perfectly baked, your kitchen will smell like caramel corn and toasted nuts. If you still smell raw dough, give them another few minutes. When the edges start smelling like butterscotch, they're done. This olfactory alarm system has never failed me, even when I've forgotten to set the actual timer while binge-watching cooking shows.
The 5-Minute Rest That Changes Everything
After baking, let the pan sit on a cooling rack for exactly 5 minutes, then run a thin knife around the edges. This prevents the caramel from gluing the blondies to the pan as it cools. Those five minutes are crucial — too soon and you burn yourself on molten caramel, too late and you're chiseling dessert like an archaeologist. Set a timer and don't get distracted by your phone. The caramel waits for no one.
The Salt Timing Secret
Don't add all the salt at once. Mix some into the batter, save some for the caramel, and finish with flaky salt on top. This layering creates depth that makes people ask for your secret ingredient. It's not one thing — it's everything. The pretzels contribute salt too, so taste your batter before adding more. I've made the mistake of over-salting and ended up with something that tasted like ocean dessert.
The Storage Game-Changer
Store these in an airtight container with a slice of bread. The bread prevents them from drying out and keeps the edges from getting too crisp. Replace the bread every day — it gets stale while your blondies stay perfect. This trick works for all baked goods and has saved countless desserts from becoming hockey pucks. It's like having a dessert humidifier that actually works.
Creative Twists and Variations
This recipe is a playground. Here are some of my favorite ways to switch things up:
Peanut Butter Pretzel Paradise
Swap half the butter for creamy peanut butter and use peanut butter chips instead of chocolate. The combination tastes like those peanut butter pretzel nuggets from the gas station, but elevated to dessert royalty. Add chopped honey-roasted peanuts on top for extra crunch. This version disappears at potlucks faster than free pizza at a college dorm.
White Chocolate Raspberry Riot
Use white chocolate chips and fold in freeze-dried raspberries that add tart punches against the sweet caramel. The raspberries stay crisp and provide bright flavor bombs that cut through the richness. It's like a chocolate-covered raspberry truffle met a blondie and had beautiful babies. People who claim they don't like white chocolate change their minds after one bite.
Maple Bacon Bonanza
Replace half the brown sugar with maple sugar and add candied bacon bits throughout. The smoky-salty-sweet combination hits every craving receptor in your brain. Make extra bacon because half of it will mysteriously disappear during cooking. This is breakfast and dessert having a delicious love child.
Spiced Chai Celebration
Add a teaspoon each of cardamom, cinnamon, and ginger to the batter. Use milk chocolate chips and finish with a dusting of chai spice mix. It tastes like your favorite coffee shop drink but in dessert form. Perfect for fall when you want something cozy but pumpkin spice feels too basic.
Mexican Hot Chocolate Madness
Add a teaspoon of cinnamon and a pinch of cayenne to the batter. Use dark chocolate chips and finish with cinnamon-sugar on top. The slight heat builds slowly and makes the chocolate taste more chocolatey. Serve with Mexican hot chocolate for a themed dessert experience that'll warm you from the inside out.
Coconut Macadamia Dream
Toast shredded coconut and chopped macadamia nuts, then fold them into the batter. Use coconut sugar instead of brown sugar for deeper coconut flavor. The tropical notes pair surprisingly well with the caramel, creating a dessert that tastes like vacation. Close your eyes while eating and you can almost hear the ocean.
Storing and Bringing It Back to Life
Fridge Storage
These keep beautifully in the fridge for up to a week — the caramel firms up and creates a delightful chew. Store in an airtight container with parchment between layers. The cold intensifies the saltiness, so let them come to room temp for 15 minutes before serving. If they last a week, you have more willpower than everyone I know. I've seen grown adults hide these from their own children.
Freezer Friendly
Wrap individual squares in plastic wrap, then foil, and freeze for up to three months. Thaw overnight in the fridge or for 30 minutes at room temperature. They freeze beautifully and taste fresh-baked when thawed. Pro tip: freeze them pre-cut so you can grab one without defrosting the whole batch. Late-night dessert emergencies are real and we must be prepared.
Best Reheating Method
Microwave for 10-12 seconds for that fresh-from-the-oven experience. Don't overdo it or the caramel becomes molten lava that'll burn your tongue. For multiple pieces, wrap in foil and warm in a 300°F oven for 8-10 minutes. Add a tiny splash of water to the foil packet — it steams them back to perfection. They're almost better reheated because the flavors have had time to meld and mature like fine wine.