Love this? Pin it for later! 📌
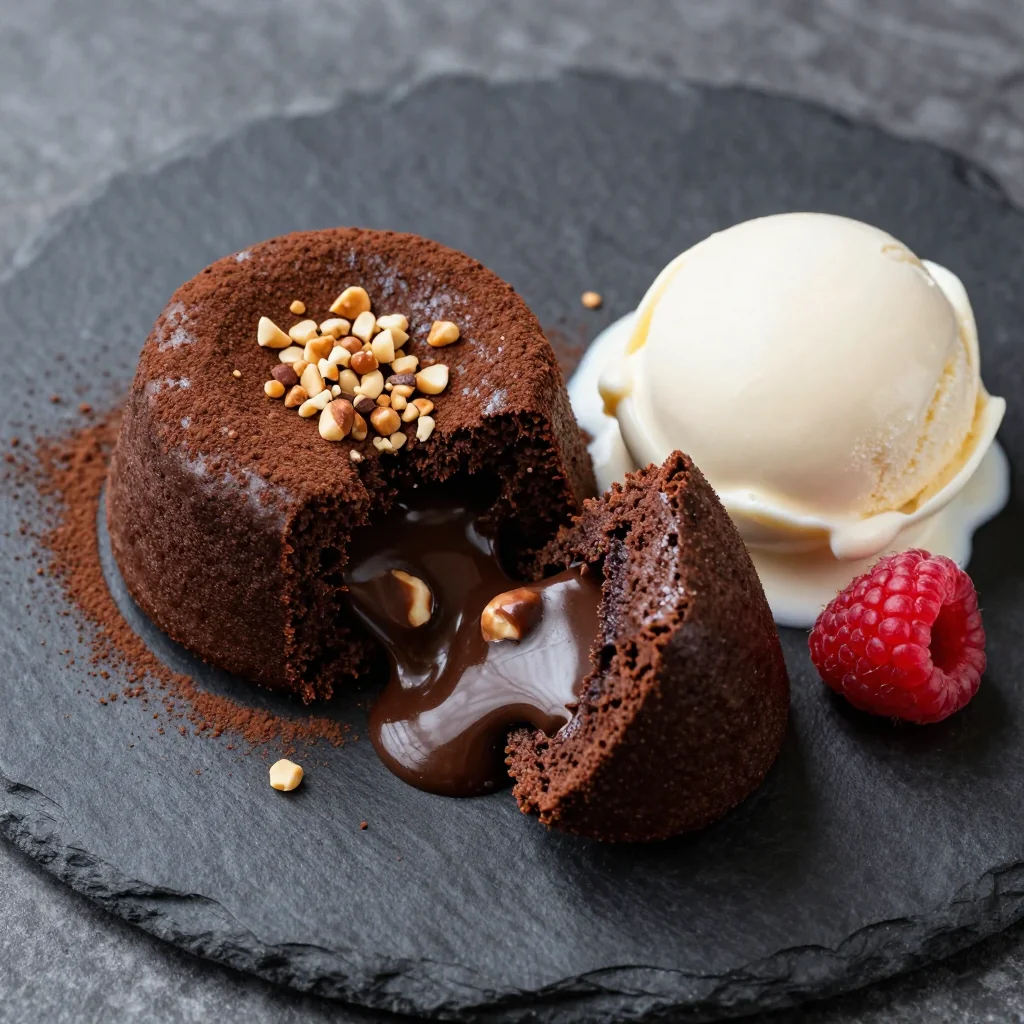
I developed this recipe after returning from a trip to the Italian Piedmont region, where hazelnuts grow in abundance and find their way into every conceivable confection. The local pasticcerie served miniature chocolate-hazelnut cakes that were deliberately underbaked, their centers remaining fluid and intensely flavored. I knew I had to recreate that experience at home, but with the dramatic presentation that makes lava cakes so irresistible.
After countless tests (my neighbors certainly didn't complain about being taste-testers), I landed on the perfect balance: a cake that's sturdy enough to unmold yet surrenders immediately to the gentle pressure of a fork, releasing a glossy stream of chocolate-hazelnut goodness. The secret lies in the ratio of chocolate to butter, the precise baking time, and the addition of hazelnut paste that amplifies the nutty flavor without compromising the texture.
Why This Recipe Works
- Perfect Chocolate Ratio: Using 70% dark chocolate ensures the cakes aren't overly sweet, allowing the hazelnut flavor to shine through
- Room Temperature Eggs: Eggs at room temperature incorporate more easily, creating a smoother batter that rises evenly
- Hazelnut Paste Magic: A tablespoon of pure hazelnut paste intensifies the nutty flavor without adding excess oil
- Individual Portions: Baking in 4-ounce ramekins ensures perfect portion control and even cooking
- Make-Ahead Friendly: The batter can be prepared up to 24 hours in advance, making entertaining stress-free
- Reliable Results: The baking time window is forgiving, giving you 2-3 minutes of flexibility for perfect lava flow
Ingredients You'll Need
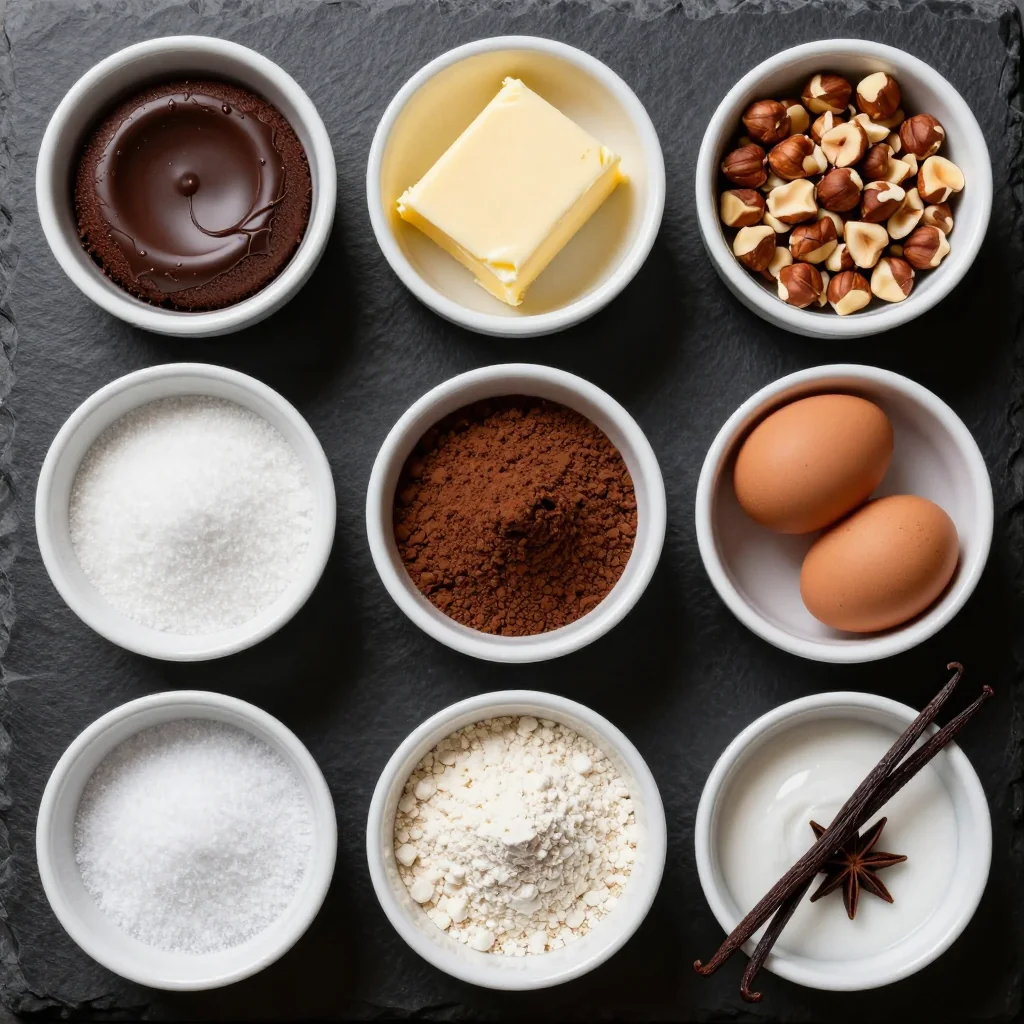
Quality ingredients make all the difference in a dessert this simple. The chocolate is the star here, so splurge on the best you can find—I use Valrhona or Callebaut for their complex flavor and reliable melting properties. The hazelnut paste might seem like an unusual ingredient, but it's worth seeking out; you can find it at specialty food stores or online. If you can't locate it, make your own by grinding toasted hazelnuts with a touch of oil until smooth.
Bittersweet Chocolate (70%): The higher cocoa percentage ensures the cakes aren't cloyingly sweet. Look for chocolate with a glossy finish and a clean snap when broken—it indicates proper tempering and freshness. Avoid chocolate chips, which contain stabilizers that prevent smooth melting.
Unsalted Butter: European-style butter with its higher fat content creates a richer, more tender cake. The butter should be at room temperature for easy creaming with the sugar, though we'll melt some with the chocolate for the perfect texture.
Hazelnuts: Buy whole hazelnuts and toast them yourself for maximum flavor. Store them in the freezer to prevent the oils from going rancid. When toasting, keep a close eye—they can burn quickly. Once cooled, rub them in a clean kitchen towel to remove most of the skins.
Eggs: Large eggs at room temperature are crucial. Cold eggs can cause the melted chocolate to seize, creating a grainy texture. If you forget to take them out ahead of time, place them in warm water for 10 minutes.
Confectioners' Sugar: Also known as powdered sugar, this dissolves instantly into the batter, ensuring a smooth texture without any grittiness. Sift it first to remove any lumps.
All-Purpose Flour: Just a small amount provides structure. I recommend using a kitchen scale for accuracy—too much flour will make the cakes cakey rather than gooey.
Vanilla Extract: A good quality vanilla enhances the chocolate flavor. Madagascar bourbon vanilla pairs beautifully with both chocolate and hazelnuts.
How to Make Indulgent Chocolate and Hazelnut Lava Cakes That are Gooey and Nutty
Prepare Your Ramekins
Generously butter four 4-ounce ramekins, making sure to coat every ridge and corner. Dust with cocoa powder, tapping out the excess. This double coating ensures your lava cakes will release perfectly every time. Place the prepared ramekins on a baking sheet for easy transport to and from the oven. If you don't have ramekins, you can use a standard muffin tin, but reduce the baking time by 2-3 minutes.
Toast the Hazelnuts
Preheat your oven to 350°F (175°C). Spread hazelnuts on a baking sheet in a single layer. Toast for 8-10 minutes, until fragrant and the skins begin to crack. Remove and immediately transfer to a clean kitchen towel. Fold the towel over the nuts and rub vigorously to remove as much skin as possible. Don't worry if some skin remains—it adds character and color. Let cool completely, then roughly chop half of them for garnish, leaving the rest whole for the batter.
Melt Chocolate and Butter
In a heatproof bowl set over a pan of barely simmering water (make sure the bowl doesn't touch the water), combine 4 ounces of the chocolate (broken into pieces) with 4 tablespoons of butter. Stir occasionally until melted and smooth. Alternatively, microwave in 30-second bursts, stirring between each. Remove from heat and let cool slightly—if the mixture is too hot, it can cook the eggs when combined.
Create the Base Batter
Whisk the whole eggs, egg yolks, and confectioners' sugar in a large bowl until pale and slightly thickened—about 2 minutes of vigorous whisking or 1 minute with an electric mixer. The mixture should fall in a thick ribbon when the whisk is lifted. Stir in the hazelnut paste and vanilla extract until completely incorporated. This is your opportunity to ensure the hazelnut flavor is distributed throughout every bite.
Combine Chocolate and Egg Mixtures
Pour the cooled chocolate mixture into the egg mixture, whisking constantly to prevent the eggs from scrambling. Start with a small amount to temper the eggs, then add the remaining chocolate in a steady stream, whisking continuously. The batter should be glossy and smooth, with no streaks of egg or chocolate remaining.
Fold in Dry Ingredients
Sift the flour and salt over the chocolate mixture. Using a rubber spatula, fold gently until just combined. Add the remaining chopped chocolate and whole toasted hazelnuts, folding just enough to distribute them. Overmixing will develop gluten, resulting in tough cakes. The batter should be thick but pourable—if it seems too thick, a tablespoon of warm milk can loosen it.
Fill and Chill
Divide the batter among the prepared ramekins, filling each about three-quarters full. Gently tap the baking sheet on the counter to release any air bubbles. At this point, you can cover with plastic wrap and refrigerate for up to 24 hours—this actually improves the texture as the flour has time to hydrate. Bring to room temperature for 30 minutes before baking if chilled.
Bake to Perfection
Preheat your oven to 425°F (220°C). Bake the cakes for 12-14 minutes, until the edges are firm but the centers jiggle slightly when gently shaken. The tops should be just set with a slight dome. Baking time will vary based on your oven and the starting temperature of your batter, so start checking at 10 minutes. Remember, they continue cooking from residual heat after removal.
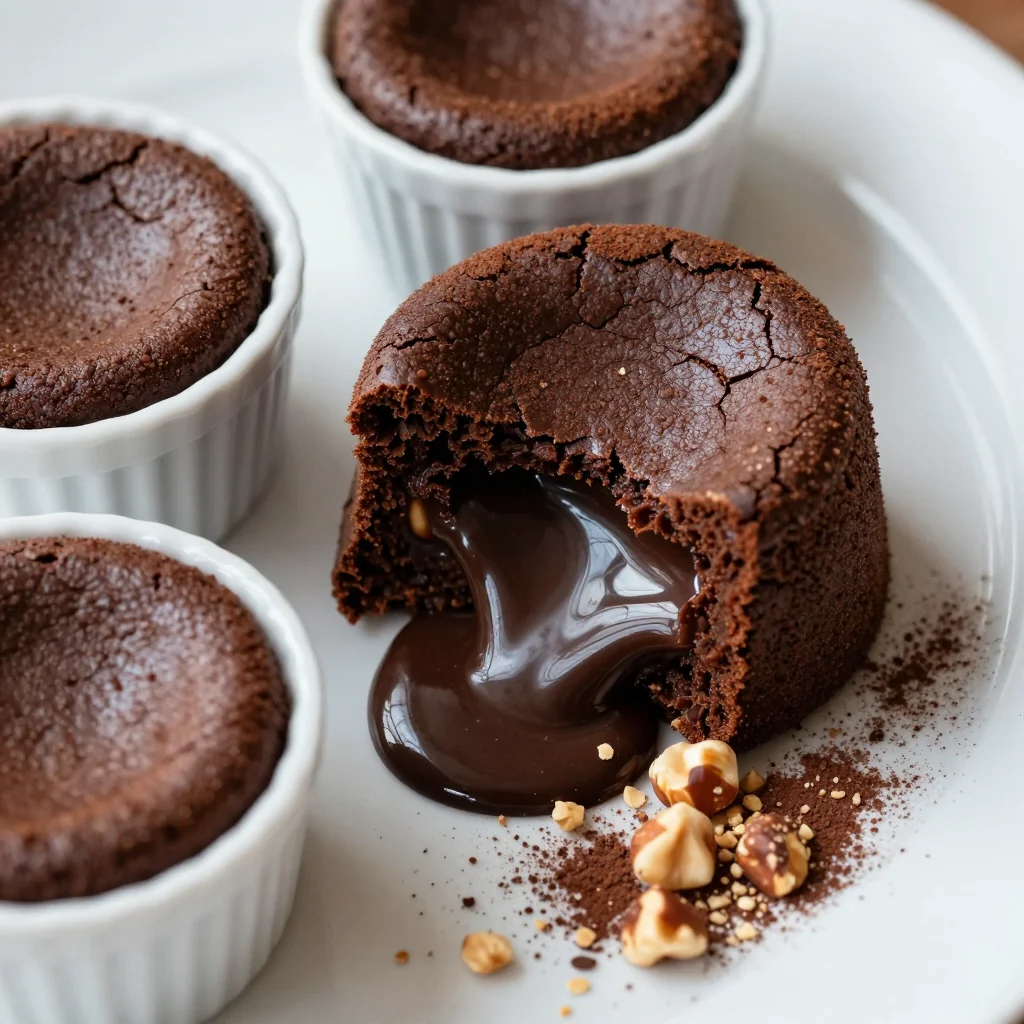
Unmold and Serve
Let the cakes rest for exactly 1 minute—no more, no less. This allows them to set just enough to unmold while keeping the centers liquid. Run a thin knife around the edges to loosen, then invert onto serving plates. They should release easily, sliding out in one piece. Dust with confectioners' sugar and serve immediately with vanilla ice cream or whipped cream. The contrast of hot cake and cold ice cream is divine.
Expert Tips
Temperature Matters
All ingredients should be at room temperature for smooth incorporation. Cold eggs can cause the chocolate to seize, creating a grainy texture. Plan ahead and set everything out 30 minutes before starting.
Timing is Everything
Set a timer for 2 minutes less than the minimum baking time. Check every 30 seconds after that. The difference between perfect and overbaked can be less than a minute, especially if your oven runs hot.
Butter Generously
Don't be shy with the butter when preparing your ramekins. This is not the time to worry about calories—proper greasing ensures clean release and prevents sticking that could break your lava cakes.
Serve Immediately
Lava cakes wait for no one. Have your serving plates, ice cream, and garnishes ready before they come out of the oven. The molten center begins to set within minutes of removal from the oven.
Practice Makes Perfect
Make a test batch to learn your oven's quirks. Every oven is different, and knowing exactly how long your particular oven needs is the secret to consistent results every time.
Overnight is Better
The batter actually improves after an overnight rest in the refrigerator. The flour fully hydrates, creating a more tender cake. Just bring to room temperature before baking for even results.
Variations to Try
Almond Joy Version
Replace hazelnuts with toasted almonds and add 2 tablespoons of coconut cream to the batter. Top with toasted coconut flakes for a tropical twist on this classic.
Peanut Butter Center
Fill each ramekin halfway, add a frozen ball of peanut butter mixture (peanut butter mixed with a bit of powdered sugar), then cover with more batter. The result is a peanut butter lava core.
Espresso Boost
Dissolve 1 teaspoon of instant espresso powder in the vanilla extract. The coffee intensifies the chocolate flavor without making the cakes taste like coffee.
White Chocolate Raspberry
Substitute white chocolate for dark, add a few drops of raspberry extract, and place a fresh raspberry in the center of each cake before baking. The tart berry balances the sweetness.
Storage Tips
Make-Ahead Magic
The unbaked batter can be prepared up to 24 hours in advance. Fill the ramekins, cover tightly with plastic wrap, and refrigerate. When ready to serve, bring to room temperature for 30 minutes before baking as directed.
For longer storage, freeze the filled ramekins for up to 1 month. Thaw overnight in the refrigerator, then let stand at room temperature for 45 minutes before baking. Add 2-3 minutes to the baking time if starting from cold.
Baked Leftovers
If you've already baked the cakes but have leftovers (lucky you!), they can be refrigerated for up to 2 days. The centers will set, but they're still delicious. Reheat in the microwave for 15-20 seconds to soften slightly.
Alternatively, enjoy them chilled as a fudgy, truffle-like treat. Crumble over ice cream or fold into whipped cream for an instant chocolate-hazelnut mousse.
Frequently Asked Questions
Yes! A standard muffin tin works well. Grease and flour 6 cups, fill with batter, and bake for 9-11 minutes. They're slightly trickier to unmold, but running a thin knife around the edges and inverting immediately usually does the trick. Serve them inverted-side up for a rustic presentation.
The most common culprit is overbaking. Even an extra minute can set the center. Your oven might run hot—use an oven thermometer to verify the temperature. Also, check your chocolate content; chocolate chips or low-quality chocolate don't melt as smoothly.
If the centers are completely set, you've still made delicious individual chocolate cakes. Serve them warm with a scoop of ice cream and call them chocolate hazelnut puddings!
Absolutely! Simply double all ingredients. You can prepare up to 12 cakes at once, but don't crowd the oven—bake in batches if necessary. The baking time remains the same, but you may need to rotate the baking sheet halfway through for even browning if your oven has hot spots.
You can make your own by grinding 1/2 cup toasted hazelnuts with 1 tablespoon neutral oil until smooth. Alternatively, use almond paste or even Nutella (though Nutella will make the cakes sweeter).
If you have hazelnut allergy concerns, simply omit the paste and substitute with an equal amount of smooth almond butter or peanut butter for a different but equally delicious flavor profile.
The edges should be firm and slightly pulling away from the sides of the ramekin, while the center jiggles like gelatin when gently shaken. If you're unsure, err on the side of underbaking—you can always return them to the oven for 30 seconds.
A toothpick inserted near the edge should come out with moist crumbs, not wet batter. When in doubt, take them out. Overbaked lava cakes are still delicious chocolate cakes!
Yes! Replace the all-purpose flour with an equal amount of almond flour or a gluten-free flour blend. The texture will be slightly more tender, almost like a chocolate hazelnut soufflé. Make sure your chocolate and hazelnut paste are certified gluten-free if serving someone with celiac disease.
Indulgent Chocolate and Hazelnut Lava Cakes That are Gooey and Nutty
Ingredients
Instructions
- Prepare ramekins: Generously butter four 4-ounce ramekins and dust with cocoa powder.
- Melt chocolate: Melt chocolate and butter together until smooth; let cool slightly.
- Make batter: Whisk eggs, yolks, and sugar until pale. Stir in hazelnut paste and vanilla.
- Combine: Whisk chocolate mixture into egg mixture until smooth.
- Add dry ingredients: Fold in flour, salt, and half the chopped hazelnuts.
- Fill ramekins: Divide batter among prepared ramekins; chill if making ahead.
- Bake: Bake at 425°F for 12-14 minutes until edges are firm but centers jiggle.
- Serve: Let rest 1 minute, then invert onto plates and serve immediately.
Recipe Notes
For best results, use room temperature ingredients and don't overbake. The cakes will continue cooking from residual heat after removal from oven. Serve with vanilla ice cream for the ultimate dessert experience.