Love this? Pin it for later! 📌
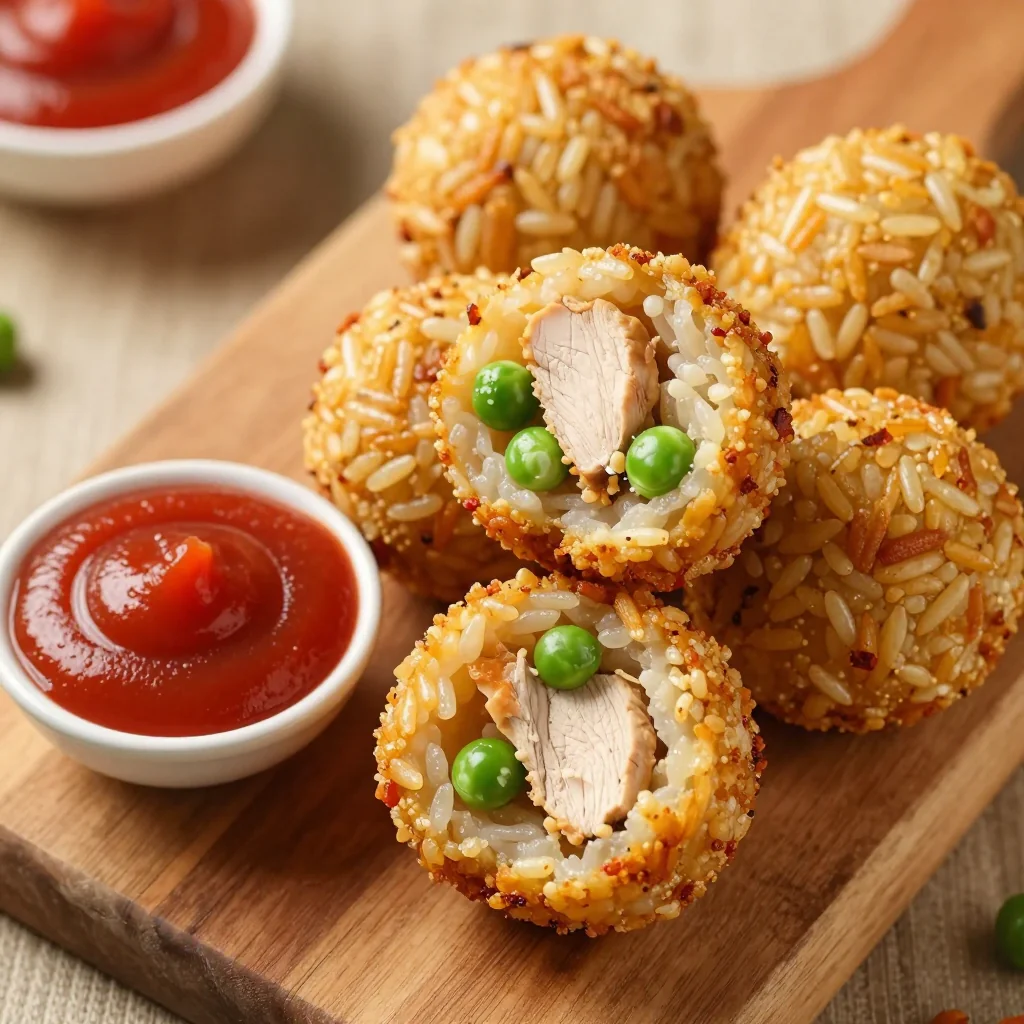
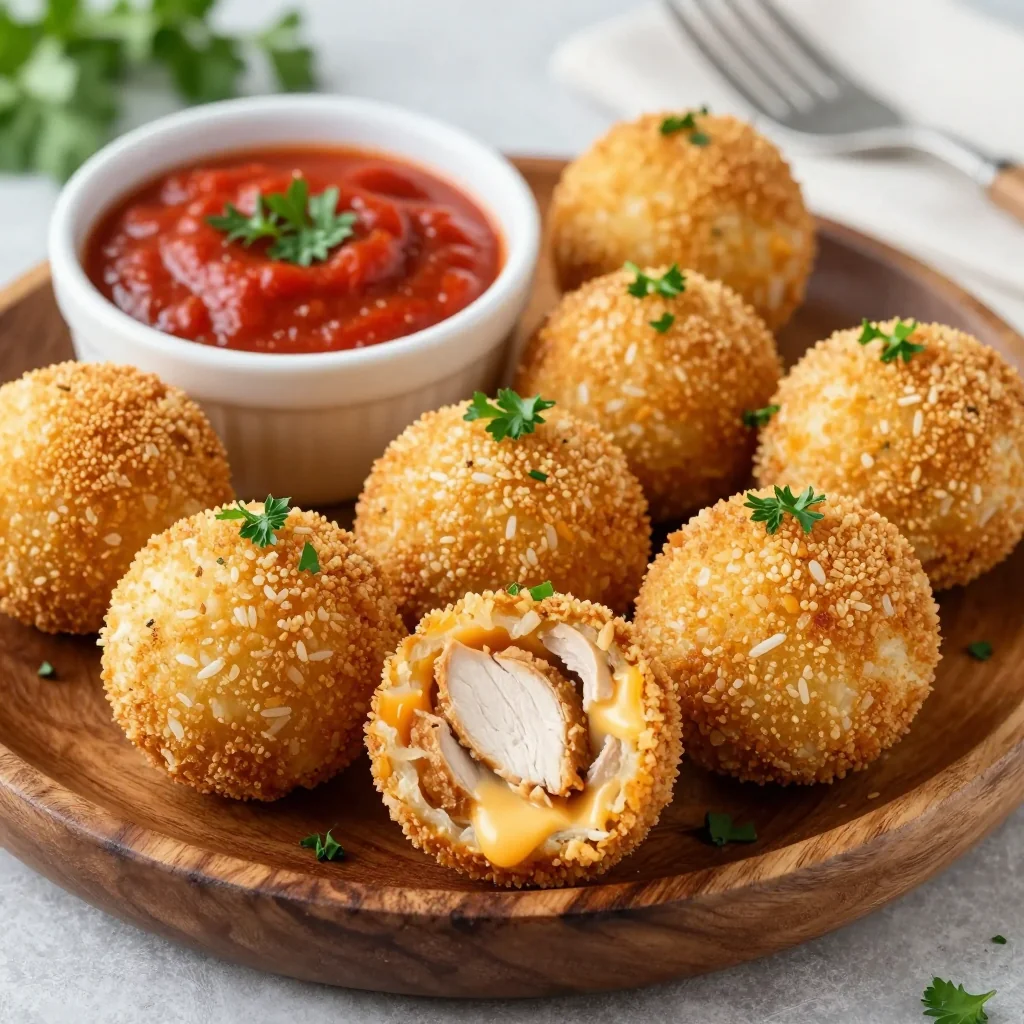
Transform ordinary chicken and rice into irresistible, poppable lunch box heroes that even the pickiest eaters will devour. These golden, bite-sized balls are protein-packed, perfectly seasoned, and baked—not fried—for a healthier twist on everyone's favorite comfort food combination.
My Lunch Box Game-Changer
Last September, my kindergarten-bound daughter declared war on sandwiches. While her classmates munched on PB&J, she returned home with untouched lunch boxes and a hangry attitude that could rival a teenager's. Sound familiar? After two weeks of desperate experimentation (and way too many uneaten cheese sticks), I stumbled upon these baked chicken and rice balls during a frantic 6 AM pantry raid.
What started as a "let's throw everything together and pray" moment became our household's most requested lunch item. By October, her teacher was emailing me for the recipe because half the class was trading their snacks for "those amazing chicken rice thingies." The real magic? They're secretly loaded with vegetables, use leftover rice like a champion, and freeze beautifully for those mornings when coffee hasn't kicked in yet.
Think of these as the lunch box equivalent of a warm hug: portable, nutritious, and endlessly customizable. They hold their shape at room temperature, reheat in 30 seconds, and—most importantly—pass the crucial "can I eat this while discussing My Little Pony" test that every six-year-old administers.
Why This Recipe Works
- Hidden Veggie Power: Finely grated carrots and zucchini disappear into the mixture, adding moisture and nutrients without complaints.
- Leftover Rice Magic: Day-old rice creates the perfect texture—no mushy balls here!
- Freezer-Friendly Champions: Make a double batch, flash-freeze on a baking sheet, then store for up to 3 months.
- Dip-Able Delight: Kids love dunking them in everything from ketchup to sweet chili sauce.
- Protein-Packed: Each ball contains 3 grams of protein, keeping little bellies full until dinner.
- Allergy-Aware: Naturally gluten-free and easily made dairy-free with simple swaps.
Ingredients You'll Need
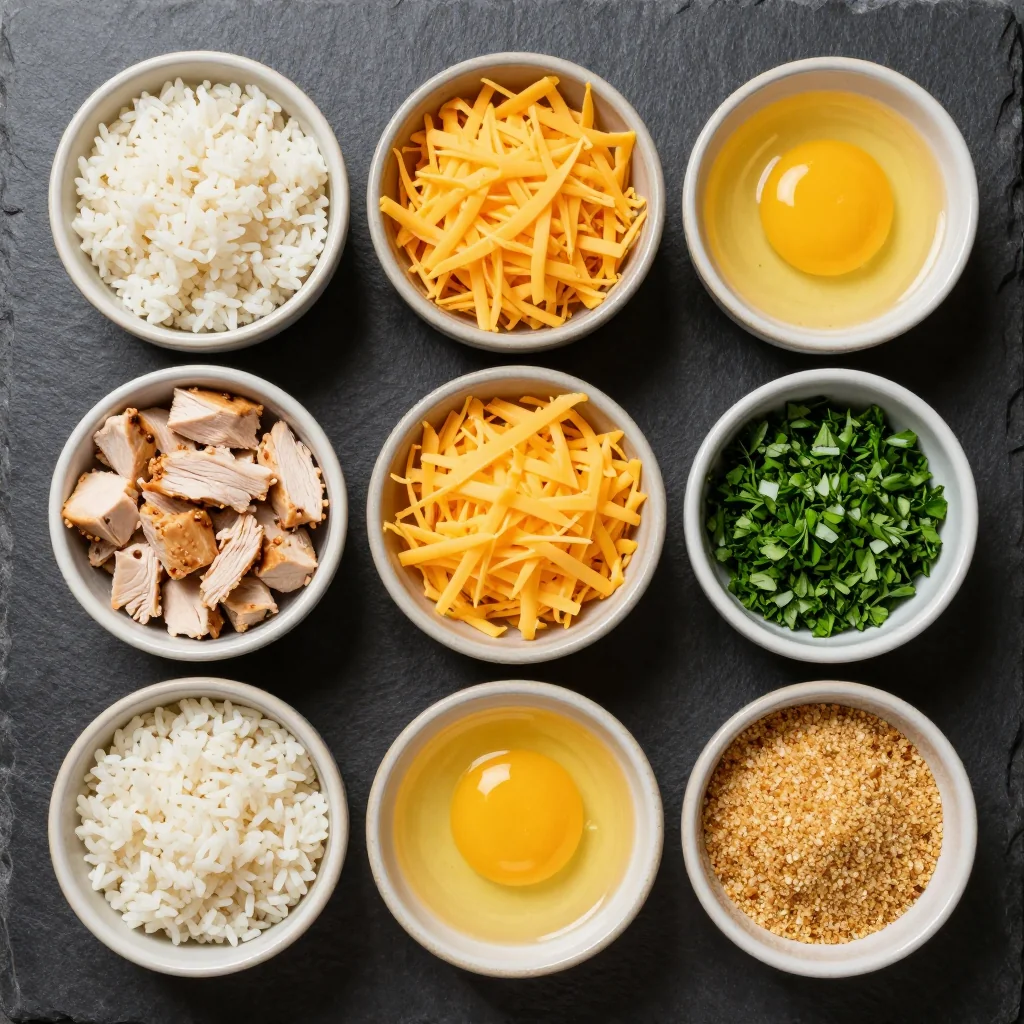
Quality ingredients make all the difference when creating these little gems. Here's what to look for and why each component matters:
Protein Powerhouse
Ground Chicken: Opt for dark meat (thigh) ground chicken if available—it stays juicier than breast meat. If using breast, add an extra tablespoon of olive oil to prevent dryness. For the best flavor, ask your butcher to grind chicken thighs fresh. Turkey works equally well, but chicken's milder flavor wins over picky eaters every time.
The Rice Foundation
Cooked White or Brown Rice: Day-old refrigerated rice is your best friend here. The slightly dried texture helps bind everything together without becoming gummy. Jasmine rice adds a lovely fragrance, while short-grain brown rice provides extra chewiness and fiber. Avoid freshly cooked hot rice—it'll turn your mixture into paste.
Vegetable Sneak Attack
Carrots & Zucchini: Grate these on the fine side of a box grater—they'll virtually disappear into the mixture. Squeeze excess moisture from zucchini using a clean kitchen towel; this prevents soggy balls. In summer, try grated yellow squash or sweet potato for variety.
Binding Agents
Eggs & Cheese: One large egg acts as the primary binder, while shredded mozzarella adds calcium and that irresistible cheese-pull moment. For dairy-free versions, substitute nutritional yeast for cheesy flavor without the dairy.
Flavor Enhancers
Garlic Powder & Italian Herbs: These provide familiar flavors that kids recognize. Feel free to substitute with poultry seasoning or even a teaspoon of mild curry powder for adventurous eaters. The key is keeping flavors recognizable while introducing new ones gradually.
How to Make Kid-Friendly Baked Chicken and Rice Balls for Lunch
Prep Your Ingredients
Grate vegetables finely, measure out seasonings, and ensure your rice is cold from the refrigerator. Set up your workspace with a large mixing bowl, baking sheet lined with parchment paper, and a small bowl of water for shaping. This mise en place approach prevents sticky fingers and ensures even mixing.
Create the Base Mixture
In your largest mixing bowl, combine ground chicken, cold rice, grated vegetables, shredded cheese, egg, and all seasonings. Use your hands (they're your best tools here) to mix thoroughly, but avoid overworking the mixture. The goal is even distribution without compacting the meat, which creates tough balls. The mixture should hold together when squeezed but not feel wet.
Test for Consistency
Before shaping all your balls, test one: scoop 2 tablespoons of mixture, roll gently between palms, and place on the prepared baking sheet. If it holds shape without cracking, you're golden. If it crumbles, add another beaten egg. If it's too wet, mix in 2-3 tablespoons of breadcrumbs or oat flour. This step saves frustration later!
Shape Uniform Balls
Using a small cookie scoop or tablespoon measure ensures even cooking. Dip your hands in water before rolling—this prevents sticking and creates smooth surfaces. Aim for 1.5-inch diameter balls (about the size of a golf ball). Place them on the baking sheet with 1 inch between each ball for proper browning. Kids love helping with this step; just ensure they wash hands thoroughly first.
Chill for Success
Refrigerate the shaped balls for 20 minutes before baking. This crucial step helps them hold their shape and prevents flattening. While they chill, preheat your oven to 400°F (200°C). The cold resting period allows the proteins to relax and the starches in rice to hydrate fully, creating a more cohesive final product.
Bake to Golden Perfection
Bake for 18-20 minutes, rotating the pan halfway through for even browning. The balls are done when they reach 165°F (74°C) internally and develop golden-brown bottoms. For extra crispy exteriors, brush lightly with olive oil before baking or broil for the final 2 minutes. Let rest 5 minutes before serving—they'll continue cooking from residual heat.
Cool and Pack
Allow balls to cool completely before packing in lunch boxes. They taste fantastic at room temperature, making them perfect for school lunches. Pack with small containers of dipping sauces—honey mustard, ketchup, or yogurt ranch are kid favorites. Add fresh fruit and veggie sticks for a complete, balanced meal that'll make other parents ask for your secrets.
Expert Tips
Keep It Cold
Work with cold ingredients throughout. Warm chicken and rice make the mixture sticky and hard to shape. If your kitchen is warm, chill the mixing bowl in the freezer for 10 minutes before starting.
Moisture Control
Zucchini and carrots vary in water content. After grating, wrap in a clean kitchen towel and squeeze out excess liquid. Your mixture should feel like cookie dough—not wet cement.
Size Matters
Consistent sizing ensures even cooking. A 1.5-inch diameter is perfect—large enough to stay moist inside, small enough for little hands. Overcrowding the pan leads to steaming instead of browning.
Batch Cooking Brilliance
Double or triple the recipe. These freeze beautifully for up to 3 months. Flash-freeze on a baking sheet, then transfer to freezer bags. Thaw overnight in the refrigerator or microwave for 60 seconds.
Color Pop Appeal
Add 2 tablespoons of finely chopped fresh herbs (parsley, chives) for green flecks that signal freshness without affecting flavor. Kids eat with their eyes first!
Safety First
Always verify internal temperature reaches 165°F (74°C) using an instant-read thermometer. Undercooked poultry is no joke, especially for little immune systems.
Variations to Try
Mexican Fiesta
Swap Italian herbs for 1 tsp cumin, 1 tsp chili powder. Add 1/4 cup corn kernels and 2 tbsp chopped cilantro. Serve with salsa or guacamole for dipping.
Mediterranean Sunshine
Replace mozzarella with feta, add 1 tsp oregano, 2 tbsp chopped sun-dried tomatoes. Include 1/4 cup finely chopped spinach for extra nutrients.
Asian Fusion
Replace Italian herbs with 1 tsp ginger powder, 1 tsp garlic powder. Add 1 tbsp soy sauce and 2 green onions, finely sliced. Serve with sweet chili sauce.
Allergy-Friendly
Make egg-free by mixing 1 tbsp ground flaxseed with 3 tbsp water. Use nutritional yeast instead of cheese. Replace rice with quinoa for grain-free needs.
Storage Tips
Refrigerator Storage
Store cooled balls in an airtight container with parchment paper between layers. They'll stay fresh for up to 4 days in the refrigerator. For best texture, reheat in a toaster oven or air fryer rather than the microwave.
Freezer Method
Flash-freeze individual balls on a parchment-lined baking sheet for 2 hours, then transfer to freezer bags. Remove as much air as possible. Properly stored, they'll maintain quality for 3 months. Label with the date—future you will thank present you!
Reheating Guidelines
- Microwave: 30-45 seconds for refrigerated, 60-90 seconds for frozen (add 15-second intervals to avoid overheating)
- Toaster Oven: 350°F for 5-7 minutes refrigerated, 10-12 minutes frozen
- Air Fryer: 350°F for 3-4 minutes refrigerated, 6-8 minutes frozen (shake halfway)
Frequently Asked Questions
Fresh rice contains too much moisture and will create mushy balls. If you must use fresh rice, spread it on a baking sheet and refrigerate for at least 2 hours, or place in the freezer for 30 minutes to cool quickly. The goal is dry, separate grains that will bind without becoming paste-like.
The vegetables are grated so finely that they virtually disappear into the mixture. The Italian herbs and cheese mask any "vegetable" flavor. Start with just carrots if you're nervous—它们的天然甜味实际上增强了整体味道。Once your child loves these, gradually increase the vegetable content.
Absolutely! These are meal-prep champions. Make a double batch on Sunday, bake them all, and store in the refrigerator. They'll stay fresh for 4 days, making lunch packing a breeze. For longer storage, freeze half the batch and defrost as needed throughout the week.
Too wet? Add 2-3 tablespoons of breadcrumbs, oat flour, or crushed crackers. Too dry? Beat an additional egg and mix in 1 tablespoon at a time until the mixture holds together when squeezed. Remember that vegetables vary in water content, so adjustments are completely normal.
Turkey works beautifully and is often more budget-friendly. Ground pork adds richness but increase baking time by 2-3 minutes. For a vegetarian version, substitute cooked lentils or mashed chickpeas for the chicken, keeping everything else the same. The binding will be slightly different but equally delicious.
Three key factors: proper binding (don't skip the egg), chilling before baking (20 minutes minimum), and correct oven temperature. Also, avoid overworking the mixture—mix just until combined. If you're still having issues, add 1 tablespoon of oat flour or breadcrumbs to help absorb excess moisture.
Kid-Friendly Baked Chicken and Rice Balls for Lunch
Ingredients
Instructions
- Prep vegetables: Grate carrot and zucchini on fine side of box grater. Wrap zucchini in kitchen towel and squeeze out excess moisture.
- Mix ingredients: In large bowl, combine ground chicken, cold rice, cheese, egg, vegetables, and all seasonings. Mix gently with hands until just combined.
- Test consistency: Scoop 2 tablespoons mixture and roll into ball. If it holds shape, proceed. If too wet, add breadcrumbs 1 tbsp at a time.
- Shape balls: Using small cookie scoop, form 1.5-inch balls. Place on parchment-lined baking sheet with 1 inch between each.
- Chill: Refrigerate shaped balls for 20 minutes while preheating oven to 400°F (200°C).
- Bake: Brush balls lightly with olive oil. Bake 18-20 minutes until golden brown and internal temperature reaches 165°F (74°C).
- Cool and serve: Let rest 5 minutes before serving. Cool completely before packing in lunch boxes.
Recipe Notes
For extra crispy exteriors, broil for final 2 minutes of baking. These taste fantastic at room temperature, making them perfect for school lunches. Freeze up to 3 months—flash-freeze first, then store in freezer bags.