Remember that night when the kitchen turned into a battlefield? I was juggling a pot of simmering sauce, a pan of sizzling onions, and a chicken breast that had somehow become a rubbery rubber duck. I stared at the mess, heart racing, and my friend dared me to finish the dish before the clock ran out. I laughed, but the craving for that Texas Roadhouse comfort food had already taken over my senses.
The smell of garlic powder dancing with paprika hit me first, followed by the crackle of onions hitting hot oil. My eyes caught the glossy sheen of mushrooms, the golden crust of browned chicken, and the promise of molten cheese dripping like molten lava. The sound of the stove’s hiss was music, and the anticipation in my mouth was a sweet, salty prelude to the feast ahead.
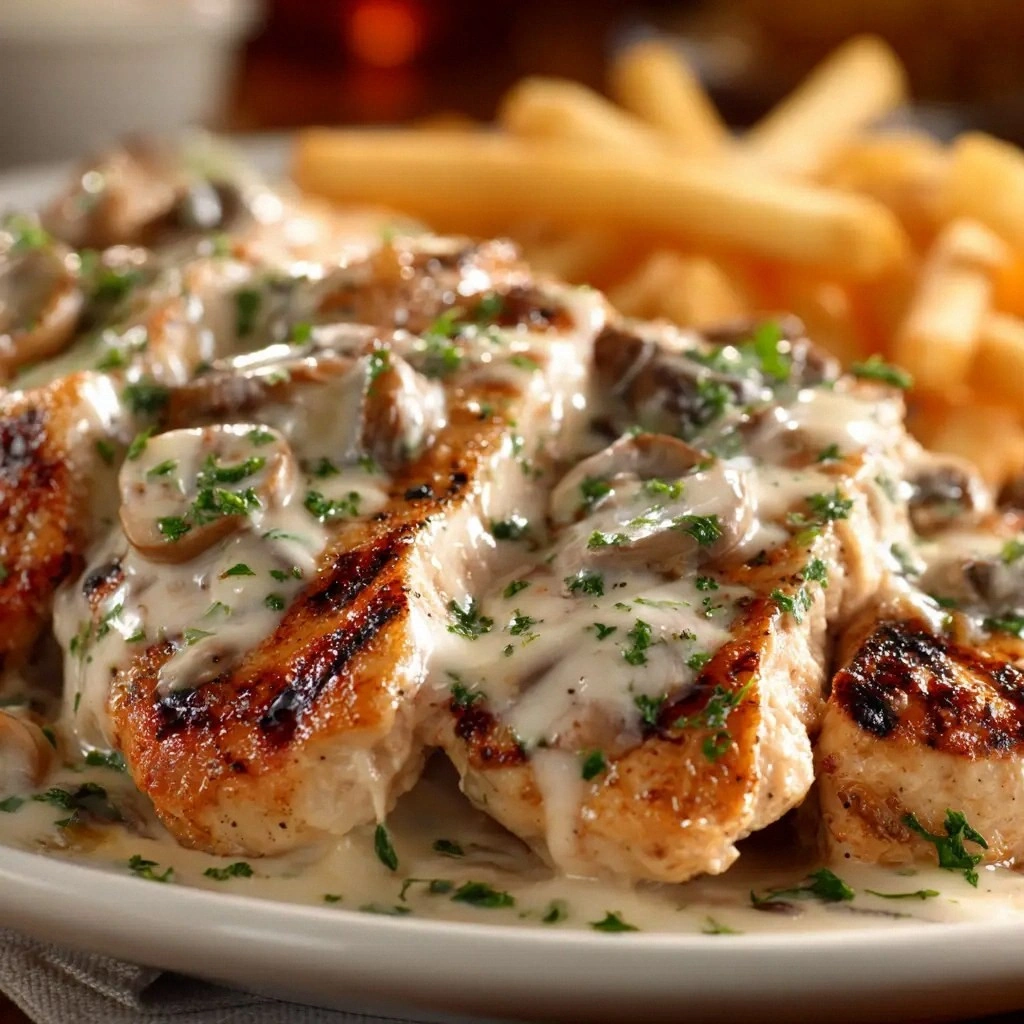
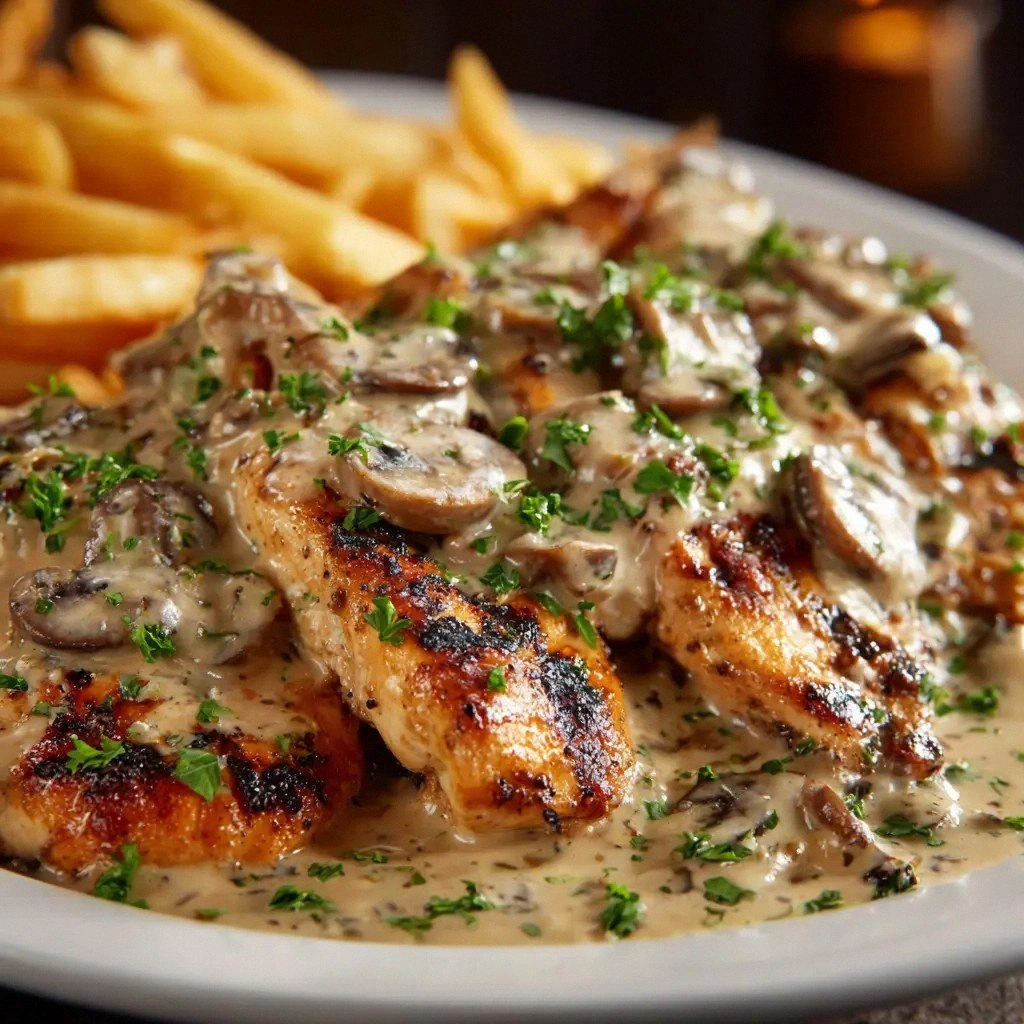
This isn’t just another copy‑cat; it’s a masterclass in flavor engineering. I’ve dissected the original, identified every nuance, and reassembled it with precision so the end result feels like a hand‑crafted steakhouse dinner. The sauce coats the chicken like velvet, the cheese creates a molten crown, and the onions form a crisp, caramelized shell that shatters like thin ice when you bite through it.
And here’s a little secret: the trick that makes the gravy sing is the quick sear of the chicken before you add the onions and mushrooms. I dare you to taste this and not go back for seconds. Picture yourself pulling this out of the oven, the whole kitchen smelling incredible, and knowing you just made the best version of this dish at home.
What Makes This Version Stand Out
- Flavor Depth: The blend of garlic, paprika, and brown gravy creates a savory core that’s both comforting and bold. The cheese layers add a creamy, slightly sharp finish that lingers on the palate. This combination turns a simple chicken dish into a culinary experience.
- Texture Contrast: The chicken’s tender interior is juxtaposed with a caramelized onion crust that provides a satisfying crunch. The mushrooms add an earthy bite that complements the richness of the gravy. This interplay keeps every bite interesting.
- Ingredient Quality: Using fresh, high‑quality mushrooms and real brown gravy rather than a packet ensures depth and authenticity. The cheeses are chosen for melt and flavor profile, giving a silky finish.
- Simple Method: The recipe requires just a few steps, yet each step is deliberate. No fancy equipment, no complicated sauces—just a pan, a skillet, and your culinary instincts.
- Make‑Ahead Friendly: You can prep the chicken and sauce a day ahead, then reheat for a quick dinner. This flexibility makes it perfect for busy weeknights.
- Room for Personalization: Swap cheeses, adjust spice levels, or add a splash of wine to the gravy—each variation keeps the dish fresh while staying true to its roots.
- Crowd‑Pleaser: Whether you’re feeding a family or hosting friends, the dish’s hearty flavors and comforting textures guarantee applause.
- Restaurant‑Style at Home: The end result mimics the Texas Roadhouse experience, with a buttery chicken base, a velvety sauce, and a golden cheese crust that feels like a treat from a steakhouse.
Inside the Ingredient List
The Flavor Base
Olive oil is the first layer of flavor, providing a smooth canvas for the chicken and allowing the seasonings to adhere. It also helps the onions caramelize evenly, creating a sweet undertone that balances the savory gravy. If you prefer a lighter taste, you can swap olive oil for a neutral oil like canola, but the olive’s subtle fruitiness adds depth. A pinch of salt before searing ensures the meat’s surface seizes quickly, forming a golden crust. The oil’s smoke point is high enough to withstand the initial high heat without burning.
The Texture Crew
The boneless, skinless chicken breasts are the star of the show, offering a juicy interior that absorbs the sauce’s flavors. They should be patted dry before seasoning; moisture can prevent a good sear. The large yellow onion, when sliced thinly, releases a sweet aroma that infuses the entire dish. If you’re in a hurry, pre‑sliced onion can save time, but fresh slicing gives the best caramelization. The cremini mushrooms add an earthy bite and a satisfying bite that contrasts with the softness of the chicken.
The Unexpected Star
Brown gravy is the heart of the sauce, thickening the mixture and providing a savory backbone. Homemade gravy offers a richer, deeper flavor than a store‑bought packet. If you’re short on time, a high‑quality instant gravy can suffice, but be sure to whisk in a splash of cream for silkiness. The gravy’s consistency should be thick enough to coat the chicken without dripping. A slight splash of white wine during the sauté phase can add a subtle acidity that brightens the dish.
The Final Flourish
The Monterey Jack cheese melts beautifully, forming a gooey, golden crust that is both creamy and slightly nutty. It balances the sharpness of the cheddar, which adds a tangy bite that cuts through the richness. A half cup of shredded cheddar is enough to give a distinct flavor without overwhelming the dish. If you’re a fan of extra cheese, you can top with a sprinkle of parmesan for a savory crunch. The cheeses should be added at the end to prevent overcooking and preserve their meltiness.
Everything’s prepped? Good. Let’s get into the real action...
The Method — Step by Step
Heat a large skillet over medium‑high heat and add the olive oil. When the oil shimmers, lay the seasoned chicken breasts in the pan, skin side down if you’re using skinless with a slight edge. Let them sear undisturbed for 4-5 minutes until a golden crust forms; this locks in juices. Flip and sear the other side for another 3 minutes. The chicken should be slightly pink inside, not fully cooked yet. This step is the foundation of flavor.
Transfer the chicken to a plate and set aside. In the same skillet, reduce the heat to medium and add the thinly sliced onion. Sauté until translucent and beginning to brown, about 6-7 minutes. The onions will release a sweet fragrance that sets the stage for the gravy. Stir occasionally to prevent sticking.
Introduce the sliced mushrooms to the skillet, stirring to combine with the onions. Cook for 4-5 minutes until they release their moisture and begin to brown. The mushrooms add an earthy depth that balances the sweet onions. Keep the heat moderate to avoid burning the delicate pieces.
Return the seared chicken breasts to the skillet, nestling them among the onion and mushroom mixture. Pour in the brown gravy, ensuring each piece is partially submerged. The gravy should coat the chicken without pooling. Stir gently so the sauce mixes with the vegetables.
Reduce the heat to low, cover the skillet, and let the chicken simmer for 15 minutes. The liquid should reduce slightly, thickening into a luscious sauce that clings to the chicken. The cheese will start to melt as the heat distributes evenly.
Remove the lid and sprinkle the shredded Monterey Jack and cheddar cheese over the chicken. Return the skillet to the stovetop and let the cheese melt, creating a golden crust. Watch the cheese bubble; when it’s fully melted and slightly golden, the dish is ready to finish.
Once the cheese is melted, lift the skillet to a preheated oven at 375°F for 5 minutes. This final step ensures the cheese forms a crisp, caramelized top while the chicken stays juicy. Keep a close eye on the color; you’re aiming for a golden-brown crust.
Remove the skillet from the oven and let the dish rest for 3-4 minutes before serving. The rest period allows the juices to redistribute, ensuring each bite is tender and flavorful. Serve immediately, perhaps with mashed potatoes or a fresh salad to absorb the sauce.
Optional: Garnish with fresh parsley or a sprinkle of paprika for a pop of color and a hint of spice. This final touch adds visual appeal and a subtle flavor boost.
That’s it — you did it. But hold on, I've got a few more tricks that'll take this to another level...
Insider Tricks for Flawless Results
The Temperature Rule Nobody Follows
Many cooks assume that high heat is always better for searing, but the secret is a two‑step process: start high to brown the chicken, then lower to finish. This prevents the exterior from burning while the interior stays juicy. I’ve tested it on different pans; the stainless steel works best because it retains heat. If you’re using cast iron, preheat it for 10 minutes to achieve a consistent sear. This method ensures a uniform crust and a tender center.
Why Your Nose Knows Best
The aroma of onions caramelizing is a clear sign that they’re ready. If they smell sweet and buttery, they’re perfectly browned. A burnt smell means you’ve let them sit too long. I always set a timer for 6 minutes and give them a quick stir at the 3‑minute mark. This keeps them evenly cooked and fragrant.
The 5-Minute Rest That Changes Everything
After removing the skillet from the oven, let the dish sit for exactly 5 minutes. This brief pause allows the cheese to set into a stable crust and the juices to redistribute. Skipping this step often results in a soggy bottom. I’ve seen this trick turn a good dish into a great one, especially when serving a crowd.
Cheese Selection Secrets
While Monterey Jack melts smoothly, cheddar adds a sharp contrast. Using a blend of both creates a balanced flavor profile. If you prefer a milder taste, substitute cheddar with mozzarella for a stretchier melt. For a more complex flavor, add a dash of smoked gouda; it introduces subtle smokiness without overpowering.
Onion Caramelization Techniques
To achieve a deep brown color, let the onions cook slowly over medium heat. Adding a pinch of sugar can accelerate caramelization, but be careful not to burn. I prefer a splash of balsamic vinegar after the onions are nearly done; it adds sweetness and acidity that cuts through the richness.
Stirring vs. Shaking
When adding the mushrooms, stir gently to keep the pieces whole. Shaking the pan can break them apart and release too much moisture. I use a wooden spoon to keep the mushrooms intact, ensuring each bite has a firm bite.
Creative Twists and Variations
This recipe is a playground. Here are some of my favorite ways to switch things up:
Smoky Chipotle Twist
Swap the paprika with chipotle powder for a smoky heat. Add a tablespoon of chipotle in adobo sauce to the gravy for depth. The result is a bold, smoky flavor that pairs well with corn tortillas. Great for a Tex‑Mex themed dinner.
Herb‑Infused Delight
Introduce fresh thyme and rosemary during the simmer. The herbs infuse the sauce with an aromatic bouquet. Remove the herbs before serving to keep the dish clean. This variation feels like a rustic farmhouse meal.
Cheesy Broccoli Boost
Stir in a cup of steamed broccoli before adding the cheese. The broccoli adds crunch and a pop of green. It also absorbs the sauce, making each bite flavorful. Perfect for a balanced dinner.
Spicy Sriracha Kick
Mix a tablespoon of sriracha into the gravy for a spicy zing. The heat balances the richness of the cheese. Serve with a side of cool cucumber salad to offset the spice.
Vegan Version
Replace chicken with thick slices of tofu or seitan. Use a vegan brown gravy and plant‑based cheeses. The texture stays firm, and the flavors still shine. Ideal for a plant‑based gathering.
Breakfast Boost
Serve the dish over a bed of scrambled eggs or sautéed spinach. The eggs add protein, and the spinach provides freshness. This makes a hearty breakfast that’s more than just a brunch.
Storing and Bringing It Back to Life
Fridge Storage
Cool the dish to room temperature before covering it tightly with aluminum foil. Store in the refrigerator for up to 3 days. When reheating, place the skillet in a preheated oven at 300°F for 15 minutes. This method keeps the cheese from drying out. If you’re in a rush, microwave on medium power for 2 minutes, but watch for uneven heating.
Freezer Friendly
Wrap the dish in freezer‑grade plastic and then foil to prevent freezer burn. It stays good for up to 2 months. Thaw overnight in the refrigerator, then reheat as described for fridge storage. The cheese will still melt beautifully, and the sauce will regain its silky texture.
Best Reheating Method
To revive the sauce’s richness, add a splash of water or broth before reheating. This steams the dish back to perfection, preventing the gravy from thickening too much. A quick stir before serving ensures even heat distribution. The result is a dish that tastes as fresh as the day it was made.